
Crocheted witch coasters are a delightful way to celebrate the Halloween season while adding a handmade touch to your home décor.
One of the greatest advantages of making crochet coasters is how quickly they come together. They require only a small amount of yarn, making them ideal for using leftover skeins from previous projects.
Throughout this tutorial, you will learn how to choose the right yarn, understand the crochet abbreviations, crochet the round coaster base, add the iconic witch hat, embellish your design with decorative details, and finish every piece professionally. By following these easy step-by-step instructions, you will create beautiful Crocheted witch coasters that combine seasonal charm with everyday practicality.
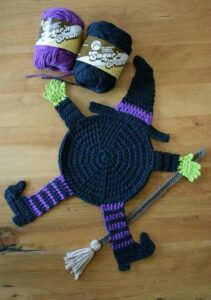
Choosing Materials and Learning the Basic Crochet Stitches
Before beginning your Crocheted witch coasters, gather all the necessary materials. Medium-weight cotton yarn is highly recommended because it creates durable coasters with excellent stitch definition while absorbing moisture from cups and mugs. Cotton also helps the finished coaster lie flat and maintain its shape after repeated use.
Traditional Halloween colors such as black, purple, orange, green, gray, and white work beautifully for this project. You can also experiment with pastel Halloween palettes or elegant neutral tones depending on your decorating style.
A 4.0 mm crochet hook pairs well with most worsted-weight cotton yarns. If your stitches tend to be loose, choose a slightly smaller hook to create a firmer coaster with better structure.
Useful crochet abbreviations include:
MR = Magic Ring
ch = chain
sl st = slip stitch
sc = single crochet
hdc = half double crochet
dc = double crochet
inc = increase
st = stitch
Additional supplies include scissors, a yarn needle, stitch markers if desired, and optional embroidery thread for facial details or decorative accents.
Before starting the complete coaster, crochet a small practice swatch to check your stitch tension. Consistent tension helps every coaster maintain the same size, especially when making matching sets.
Step-by-Step Crocheted Witch Coasters Pattern
Coaster Base
Round 1:
MR.
Work 12 dc into the Magic Ring.
Join with sl st.
Pull the ring closed securely.
Round 2:
Ch 2.
2 dc in every stitch.
Join with sl st.
Round 3:
Dc, inc.
Repeat around.
Round 4:
2 dc, inc.
Repeat around.
Continue increasing evenly until the coaster reaches approximately 4½ inches in diameter.
Border:
Work one round of sc evenly around the edge.
Fasten off.
Witch Hat
Using black yarn:
Ch 16.
Row 1:
Sc across.
Turn.
Row 2:
Skip first stitch.
Sc across remaining stitches.
Turn.
Repeat Row 2 until a triangle forms.
Fasten off and sew the triangle onto the upper portion of the coaster.
Hat Brim
Attach black yarn to the base of the triangle.
Work hdc evenly across the bottom edge.
Fasten off.
Optional Hat Band
Using purple or orange yarn:
Sl st across the center of the hat to create a contrasting decorative band.
Carefully weave in all yarn ends using a yarn needle. Lightly block the finished coaster if needed to help it maintain a perfectly flat shape.
Creative Ways to Customize Your Crocheted Witch Coasters
One of the most enjoyable aspects of making Crocheted witch coasters is experimenting with different color combinations. Traditional black hats paired with orange backgrounds create classic Halloween decorations, while purple, emerald green, or burgundy hats offer elegant seasonal alternatives.
Small embroidered stars, moons, spiders, bats, or pumpkins can be added around the witch hat to create whimsical decorative scenes without making the coaster overly complicated.
Metallic embroidery thread or subtle glitter yarn may be incorporated into the hat band for a magical appearance that catches the light during Halloween gatherings.
Create matching table décor by crocheting coordinating placemats, mug rugs, table runners, or garlands using the same color palette and decorative motifs.
A complete set of four or six matching Crocheted witch coasters makes a thoughtful handmade gift for friends, teachers, neighbors, or anyone who enjoys decorating for autumn and Halloween.
These coaster designs can also be adapted into appliqués for tote bags, pillows, blankets, wall hangings, or seasonal banners simply by adjusting the finished size.
Tips for Professional Crochet Results
Maintain consistent stitch tension throughout every round to help each coaster remain perfectly circular and flat after completion.
Count your stitches carefully during every increase round. Even stitch counts prevent unwanted rippling or curling along the coaster edges.
If your coaster begins to curl, lightly steam block it or damp-block it according to the yarn manufacturer’s recommendations. Blocking significantly improves the finished appearance.
Take your time while sewing the witch hat onto the coaster. Even placement creates a balanced design that looks polished and symmetrical.
Weave in every yarn end securely by following the direction of nearby stitches. Proper finishing improves durability while preventing loose ends from becoming visible during regular use.
Practice making several versions of your Crocheted witch coasters using different colors, decorative borders, and embellishments. Every completed coaster strengthens your crochet skills while expanding your collection of festive handmade home décor.
FAQ
Are Crocheted witch coasters suitable for beginners?
Yes. The project mainly uses beginner-friendly stitches such as chain, single crochet, and double crochet. The simple triangular hat also makes it an approachable seasonal project.
Which yarn works best?
Cotton yarn is the best choice because it absorbs moisture, provides excellent stitch definition, and remains durable through everyday use.
Can I make larger coasters?
Absolutely. Continue adding increase rounds until the desired diameter is reached before adding the decorative border.
How long does one coaster take to complete?
Most crocheters can finish one coaster within one to two hours depending on experience and decorative details.
Can I wash the finished coasters?
Yes. Cotton coasters are generally machine washable on a gentle cycle or can be hand washed. Lay them flat to dry to preserve their shape.
Can I sell handmade witch coasters?
Yes. Seasonal crochet home décor is popular at autumn craft fairs, Halloween markets, farmers’ markets, and online handmade shops.
Can I use different Halloween colors?
Certainly. Purple, green, cream, gray, burgundy, mustard, and even pastel Halloween palettes all create beautiful variations while maintaining the same pattern.
What other projects can I make with this design?
The witch motif can also be adapted for mug rugs, table runners, pillows, tote bags, blankets, bunting, wall hangings, and seasonal appliqués.
Conclusion
Creating these Crocheted witch coasters is a rewarding crochet project that combines seasonal creativity with everyday practicality. Throughout this tutorial, you learned how to choose suitable materials, understand the essential crochet abbreviations, crochet a flat circular coaster, create the classic witch hat, add decorative embellishments, and apply professional finishing techniques that improve both appearance and durability. These valuable crochet techniques can also be used in many future seasonal home décor projects.
Whether you crochet a single coaster for your favorite mug or create an entire matching set for Halloween entertaining, this project offers endless opportunities for creativity through different colors, embellishments, and decorative borders. Every new set of Crocheted witch coasters you complete will strengthen your crochet skills while adding handmade warmth and festive charm to your autumn decorating.
Thank you for reading this tutorial. I hope these Crocheted witch coasters inspire your next seasonal crochet project and encourage you to continue exploring creative handmade designs. If you decide to make this pattern, I would truly appreciate your honest opinion. Please share your experience, suggestions, and creative variations, as your feedback can inspire other crochet enthusiasts and help improve future tutorials.