
Crochet cat keychain pattern projects are one of the most enjoyable ways to combine creativity, practicality, and the timeless charm of handmade accessories.
One of the greatest advantages of making a Crochet cat keychain pattern is the endless opportunity for customization.
In this complete tutorial, you will learn every stage of creating your own Crochet cat keychain pattern, from choosing materials and understanding crochet abbreviations to crocheting the head, ears, body, tail, and facial features. The instructions include beginner-friendly stitch explanations and practical assembly tips that produce a neat and durable finished keychain suitable for everyday use. By following this guide, you will gain confidence in amigurumi construction while creating an adorable crochet accessory you can proudly carry wherever you go.
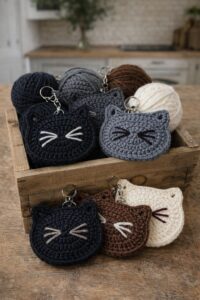
Materials and Crochet Stitch Guide
Before beginning your Crochet cat keychain pattern, gather all of your materials. Preparing everything before you start helps maintain a smooth workflow and improves stitch consistency throughout the project.
Choose lightweight cotton yarn for crisp stitch definition or soft acrylic yarn if you prefer a slightly fluffier appearance. Both yarn types produce beautiful results, although cotton is especially popular for small amigurumi because it holds its shape well.
Use a crochet hook one size smaller than the yarn label recommends. Tight stitches prevent stuffing from showing through and help the finished cat remain firm and compact.
Additional materials include polyester fiberfill stuffing, stitch markers, scissors, a yarn needle, embroidery thread, a keychain ring with a small chain, and safety eyes if desired. For children’s accessories, embroidered eyes provide a safer alternative.
The crochet abbreviations used in this project include:
ch = chain
mr = magic ring
sc = single crochet
inc = increase (2 sc in one stitch)
dec = invisible decrease
sl st = slip stitch
FO = fasten off
Take time to count your stitches after every round. Accurate stitch counts help create a symmetrical cat head and body while making assembly much easier later.
Crocheting the Head and Body
Begin your Crochet cat keychain pattern by crocheting the head.
Round 1: Create a magic ring and work 6 sc into the ring. Pull the ring closed tightly. (6)
Round 2: Inc in every stitch around. (12)
Round 3: (1 sc, inc) repeat around. (18)
Round 4: (2 sc, inc) repeat around. (24)
Rounds 5–8: Sc in each stitch around. Insert the safety eyes between Rounds 6 and 7, leaving several stitches between them. Begin stuffing the head gradually to achieve a smooth round shape.
Round 9: (2 sc, dec) repeat around. (18)
Round 10: (1 sc, dec) repeat around. (12)
Round 11: Dec around until the opening closes. Finish stuffing before completing the final decreases, then fasten off while leaving a long yarn tail.
For the body, begin another magic ring.
Round 1: 6 sc in mr. (6)
Round 2: Inc around. (12)
Rounds 3–6: Sc around.
Round 7: (1 sc, dec) repeat around. Stuff lightly before closing and sew the completed body securely beneath the head.
Making the Ears, Tail, and Facial Features
The adorable details are what truly bring your Crochet cat keychain pattern to life.
For each ear, begin with a magic ring containing 4 sc.
Round 2: (1 sc, inc) twice to create a small triangle. Flatten the piece gently and leave a long yarn tail for sewing.
Attach one ear to each side of the head, ensuring they are evenly positioned and slightly angled outward for a playful appearance.
To create the tail, chain 18 stitches.
Beginning in the second chain from the hook, work one slip stitch into each chain across. Fasten off, leaving a sewing tail before attaching the tail securely to the back of the body.
Embroider a tiny pink nose using a few simple stitches. Add a smiling mouth beneath the nose and create delicate whiskers using white or black embroidery thread. Small embroidered eyebrows or blush stitches can also give the cat an expressive personality.
Assembly Tips and Creative Customization Ideas
Assembling your Crochet cat keychain pattern carefully helps achieve a professional-looking result that will withstand everyday use.
Begin by sewing the head securely onto the body using matching yarn. Stitch around the entire neck area to ensure the head remains stable when attached to the keychain ring.
Attach the tail firmly using several reinforced stitches. Since keychains experience regular movement, secure assembly is especially important for long-term durability.
Install the keychain hardware by sewing a strong loop through the top of the head. Reinforce this attachment several times before connecting the metal key ring.
Experiment with different coat patterns by changing yarn colors. Add stripes, patches, white paws, contrasting ears, or a colored tail tip to resemble real cat breeds or your favorite pet.
You can also personalize each cat with tiny accessories such as miniature bows, scarves, flowers, tiny bells, or embroidered hearts. These decorative additions make every finished keychain unique and are especially popular for handmade gifts or craft fair collections.
Frequently Asked Questions
Is the Crochet cat keychain pattern suitable for beginners?
Yes. The project mainly uses beginner-friendly amigurumi stitches such as the magic ring, single crochet, increases, decreases, chains, and slip stitches.
Which yarn works best?
Cotton yarn provides excellent stitch definition and durability, while acrylic yarn offers a softer texture. Both work well depending on your preferred finish.
Can I embroider the eyes?
Absolutely. Embroidered eyes are an excellent alternative, especially if the keychain may be handled by young children.
How much yarn is required?
Only a small quantity of yarn is needed, making this project perfect for using leftover yarn from previous crochet projects.
Why is my cat head uneven?
Uneven stitch counts or inconsistent stuffing can affect the shape. Count every round carefully and distribute the stuffing evenly.
Can I make a larger version?
Yes. Simply use thicker yarn and a larger crochet hook while following the same stitch sequence to create a larger plush cat.
Can I sell finished keychains?
Yes. Handmade crochet keychains are popular at craft fairs and online handmade marketplaces, provided your finished products comply with applicable laws and marketplace guidelines.
Can I customize the colors?
Certainly. Create realistic cats inspired by your own pets or experiment with fantasy colors such as lavender, mint, blue, or rainbow combinations to produce completely unique handmade accessories.
Conclusion
Creating a Crochet cat keychain pattern is a rewarding crochet project that combines simple amigurumi techniques with endless creative possibilities. Throughout this tutorial, you learned how to gather suitable materials, understand the essential crochet abbreviations, crochet the head and body, create pointed ears, make a flexible tail, embroider expressive facial features, and assemble every component into a durable handmade keychain. These techniques provide valuable practice while helping you improve your confidence with miniature crochet projects.
One of the greatest strengths of this project is its versatility. By experimenting with different yarn colors, facial expressions, accessories, and decorative details, you can create an entire collection of unique crochet cats that reflect different personalities and styles. Whether used as a keychain, backpack charm, purse accessory, or thoughtful handmade gift, every finished cat becomes a special keepsake that showcases your creativity and crochet skills.
Thank you for reading this Crochet cat keychain pattern tutorial. I hope this guide inspires you to create your own adorable crochet cat and enjoy every step of the process. If you found this article helpful, please leave your honest opinion, share your experience with the pattern, and send your suggestions for future crochet tutorials. Your feedback is greatly appreciated and helps inspire even more creative handmade projects.