
Maple Leaf Quilt Block Pattern designs are among the most beloved traditional quilt blocks, admired for their timeless beauty and their connection to the changing seasons.
One of the reasons the Maple Leaf Quilt Block Pattern remains so popular is its versatility. The same block can appear bold and dramatic when sewn with rich autumn colors or soft and elegant when created using neutral fabrics.
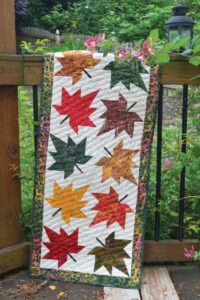
In this detailed guide, you will learn how to select fabrics, cut every piece accurately, sew half-square triangles, assemble the leaf points, create the stem, and join the entire quilt block together following the layout shown in the reference photo. Every step has been explained using beginner-friendly language while including practical quilting techniques that help improve precision. By the end of this tutorial, you will have all the knowledge needed to create a beautiful Maple Leaf Quilt Block Pattern for your next quilting project.
Choosing Fabrics and Cutting the Pieces
The first step in making a beautiful Maple Leaf Quilt Block Pattern is selecting fabrics that highlight the natural beauty of the leaf. Cotton quilting fabric is highly recommended because it is easy to sew, presses well, and provides long-lasting durability.
For a traditional autumn appearance, choose fabrics in shades of orange, rust, burgundy, golden yellow, deep red, or warm brown for the leaf. These rich colors beautifully capture the look of changing maple leaves during the fall season.
Select a contrasting background fabric in cream, white, beige, or light gray. A lighter background helps the maple leaf stand out and emphasizes the clean geometry of the finished quilt block.
To recreate the block shown in the photo, prepare one coordinating fabric for the stem, usually a medium or dark brown. A subtle print or solid fabric both work well depending on the overall style of your quilt.
For a finished 12-inch quilt block, cut the following pieces:
- Four 4½-inch background squares.
- Four 4½-inch leaf fabric squares.
- One 2½-inch × 4½-inch rectangle for the stem.
- Two 2½-inch background squares for constructing the stem section.
- Additional background pieces as needed to complete the block layout.
Before sewing, organize every cut piece according to its position in the final layout. This simple preparation step reduces mistakes and makes the assembly process much smoother.
Sewing the Half-Square Triangles and Leaf Sections
The distinctive points of the Maple Leaf Quilt Block Pattern are created using half-square triangles, often abbreviated as HSTs. These units provide the angled edges that form the characteristic maple leaf shape.
Pair each leaf fabric square with one matching background square. Draw a diagonal line across the wrong side of each background square using a removable fabric marker.
Place the paired squares with right sides together. Sew one-quarter inch on both sides of the marked diagonal line before cutting directly along the drawn line. This method produces two identical half-square triangle units.
Press each half-square triangle carefully. Many quilters prefer pressing the seam toward the darker fabric, while others choose to press the seams open to reduce bulk. Either technique works well if performed consistently.
Trim every half-square triangle to the exact unfinished size required for your chosen block dimensions. Accurate trimming ensures crisp points and greatly improves the alignment of the finished block.
Arrange the completed half-square triangles on your design surface according to the photo. Before sewing rows together, double-check that each triangle is rotated correctly so the leaf points flow naturally toward the center.
Assembling the Maple Leaf Quilt Block
With all of the individual units prepared, you are ready to assemble the complete Maple Leaf Quilt Block Pattern.
Lay out every square, triangle unit, and stem section exactly as shown in the reference image. Taking a few moments to verify the arrangement prevents assembly errors that can be difficult to correct later.
Construct the stem by sewing the brown rectangle between the smaller background squares. Press the seams carefully to maintain a flat unit that fits neatly into the overall block.
Sew each horizontal row together using a consistent quarter-inch seam allowance. Pin matching intersections whenever possible to keep the corners aligned and achieve sharp points.
After completing each row, press the seams before joining the rows together. Careful pressing throughout the project significantly improves the accuracy of the finished quilt block.
Join the completed rows while matching every seam intersection precisely. Sew slowly through the thicker intersections to avoid shifting the fabric layers.
Once the block is fully assembled, press it one final time and square it to the correct unfinished size using a quilting ruler. A properly squared block will fit beautifully with additional quilt blocks during final quilt assembly.
Creative Ideas for Using Your Maple Leaf Quilt Block Pattern
One of the reasons the Maple Leaf Quilt Block Pattern has remained popular for generations is its incredible versatility across many quilting projects.
Combine multiple maple leaf blocks using different autumn-colored fabrics to create a stunning seasonal quilt filled with movement and visual interest. Varying the leaf colors adds depth while maintaining a cohesive overall design.
Alternate maple leaf blocks with simple plain blocks or coordinating pieced blocks to create a balanced quilt layout that allows each leaf to become a focal point.
Reduce the block size to make placemats, table runners, mug rugs, tote bags, cushion covers, or wall hangings. Smaller projects provide an excellent opportunity to practice accurate piecing techniques.
Experiment with unexpected fabric combinations such as batiks, reproduction prints, low-volume backgrounds, or modern solids. Even though the construction remains identical, different fabrics create dramatically different visual styles.
Decorative quilting can further enhance the finished project. Stitching leaf veins, echo quilting around the block, or adding swirling free-motion quilting in the background beautifully complements the natural maple leaf shape.
As your confidence grows, consider combining maple leaf blocks with pumpkins, acorns, stars, or other seasonal quilt blocks to create larger quilts that celebrate autumn through traditional patchwork.
Frequently Asked Questions
Is the Maple Leaf Quilt Block Pattern suitable for beginners?
Yes. While accurate cutting and careful piecing are important, the block mainly uses basic quilting techniques such as half-square triangles and straight seams, making it suitable for confident beginners.
Which fabric is recommended?
High-quality quilting cotton is the best choice because it provides stability, accurate pressing, and long-lasting durability.
What size should the seam allowance be?
A consistent quarter-inch seam allowance is the quilting standard and helps every unit fit together accurately.
Why should I trim my half-square triangles?
Trimming ensures every unit is identical in size, improving point alignment and reducing distortion during assembly.
Can I make the block larger or smaller?
Absolutely. Simply adjust the cutting measurements proportionally while preserving the overall block layout.
What colors work best?
Traditional autumn shades such as orange, gold, burgundy, rust, and brown are classic choices, but modern fabrics, batiks, and even monochromatic palettes also create beautiful results.
Can I use scraps?
Yes. This pattern is ideal for scrap quilting because each leaf can feature a different fabric while maintaining a coordinated appearance.
Can I sell quilts made from this block?
Yes. Handmade quilts featuring traditional quilt blocks are commonly sold at craft fairs and online marketplaces, provided your finished products comply with applicable laws and marketplace guidelines.
Conclusion
Creating a Maple Leaf Quilt Block Pattern is a rewarding quilting experience that combines traditional piecing techniques with timeless seasonal beauty. Throughout this tutorial, you learned how to select coordinating fabrics, prepare accurate fabric cuts, construct half-square triangles, assemble the stem, join the rows, and recreate the quilt block shown in the photo with clean points and professional-looking precision. These skills not only help you complete this classic block successfully but also strengthen the quilting techniques that will benefit many future patchwork projects.
One of the greatest strengths of the Maple Leaf Quilt Block Pattern is its flexibility. By simply changing fabric colors, prints, or block sizes, you can create quilts that range from traditional farmhouse style to bold modern patchwork. Whether incorporated into full-sized quilts, table runners, wall hangings, pillows, or seasonal home décor, this elegant block continues to be a favorite among quilters of every skill level.
Thank you for reading this Maple Leaf Quilt Block Pattern guide. I hope this tutorial inspires you to create your own beautiful quilt block and enjoy every step of the quilting process. If you found this article helpful, please leave your honest opinion, share your experience with the pattern, and send your suggestions for future quilting tutorials. Your feedback is always appreciated and helps inspire even more creative patchwork projects.