
Crochet Pumpkin Pie Slice Coaster Pattern is the perfect project for anyone who loves creating seasonal handmade decorations that are both beautiful and practical.
Crocheting seasonal items is a wonderful way to improve your skills while creating decorations that can be enjoyed year after year.
One of the greatest advantages of this project is its versatility. You can make a complete set for your dining table, create matching gifts for family members, or even use the finished pieces as decorative ornaments, mug rugs, or table accents. Throughout this guide, you will learn exactly how to crochet your own Crochet Pumpkin Pie Slice Coaster Pattern, including recommended materials, stitch abbreviations, shaping instructions, finishing techniques, and creative customization ideas.
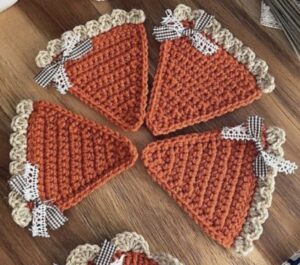
Materials and Crochet Stitch Guide
Before beginning your project, gather all the necessary supplies. A smooth cotton yarn works best because it creates durable, absorbent coasters that hold their shape well. Choose pumpkin orange for the filling, beige or light brown for the crust, white for the whipped cream, and a matching yarn for weaving in ends.
Recommended materials include medium-weight cotton yarn, a 4.0 mm crochet hook, scissors, a yarn needle, and stitch markers. Cotton yarn is especially suitable because it withstands frequent washing and absorbs moisture from cups and mugs.
The finished coaster typically measures about 5 to 6 inches wide depending on your yarn and hook size. If you prefer a larger coaster, simply increase your hook size or add one additional increase row before shaping the slice.
Common stitch abbreviations include:
Ch = Chain
Sl St = Slip Stitch
Sc = Single Crochet
Hdc = Half Double Crochet
Dc = Double Crochet
Inc = Increase (2 stitches in one stitch)
Dec = Decrease
FO = Fasten Off
Start by creating a foundation chain of approximately 18 stitches. Work one row of Sc across, then chain one and turn. Continue increasing slightly on each side every few rows to gradually create the triangular slice shape. Use Hdc and Dc stitches near the center for a softer texture if desired.
The pie crust is crocheted separately using beige yarn. Crochet a long strip using alternating Sc and Hdc stitches. Once complete, sew the crust securely along the curved edge of the pie slice. This separate construction creates a realistic three-dimensional appearance.
Step-by-Step Crochet Pumpkin Pie Slice Coaster Pattern
Begin with orange yarn and chain 18 stitches. Work one row of single crochet into each chain beginning with the second chain from the hook. Chain one and turn your work.
For the following rows, continue working Sc stitches while adding one increase at the beginning and one increase at the end every second row. This gradual shaping produces the classic triangular pie slice without creating harsh angles.
After approximately 14 to 16 rows, stop increasing and crochet one final row evenly across. Fasten off the orange yarn, leaving a long tail for sewing if necessary.
Using beige yarn, crochet the pie crust separately. Chain enough stitches to match the curved edge of the pie slice. Work several rows of Hdc while occasionally working front loop only stitches to create natural ridges that resemble baked pie crust.
Attach the crust to the curved edge using slip stitches or whip stitching. Make sure the seam remains neat and secure while maintaining the natural curve of the slice.
Finish by crocheting a small whipped cream topping. Begin with a magic ring, work six Sc, then increase evenly for two rounds. Add a few popcorn stitches or clusters to create fluffy texture before sewing it securely onto the widest section of the pumpkin filling.
Finishing Techniques and Creative Customization Ideas
After assembling your coaster, weave in every loose yarn end using a yarn needle. This simple finishing step significantly improves durability while giving the project a clean, professional appearance.
Blocking your coaster is optional but highly recommended. Lightly dampen the finished piece, shape it carefully into a perfect pie slice, and allow it to dry completely. Blocking helps even out stitches and improves the overall appearance.
If you enjoy decorative details, consider adding embroidered cinnamon sprinkles using brown embroidery thread. Tiny scattered stitches across the pumpkin filling create a charming realistic effect without overwhelming the design.
Another fun variation is creating different pie flavors. Replace the orange yarn with chocolate brown for chocolate pie, yellow for lemon pie, or dark red for cherry pie while keeping the same basic Crochet Pumpkin Pie Slice Coaster Pattern construction.
You can also create complete seasonal table settings by making matching pumpkin mug rugs, maple leaf coasters, acorn decorations, and crochet placemats using coordinating autumn colors. Together they create a warm handmade atmosphere.
For gift giving, stack four matching coasters, wrap them with twine, and attach a handwritten tag. Handmade gifts often become treasured keepsakes because they reflect time, creativity, and personal care.
Tips for Success, Storage, and Seasonal Inspiration
Maintaining consistent stitch tension is one of the most important parts of creating an attractive coaster. Even tension helps the slice remain flat and prevents curling around the edges.
Cotton yarn is strongly recommended because acrylic yarn may soften when exposed to heat from mugs. Cotton also absorbs condensation more effectively, making it ideal for everyday use.
Do not worry if your first coaster is not perfectly symmetrical. Handmade projects naturally develop character, and each new coaster helps improve your shaping skills and stitch consistency.
Wash finished coasters gently using mild soap and cool water. Lay them flat to dry to preserve their shape. Avoid twisting or wringing the fabric after washing.
Store seasonal crochet decorations in a clean, dry container during the off-season. Keeping them away from direct sunlight helps preserve the brightness of the yarn colors for many years.
Most importantly, enjoy the creative process. The Crochet Pumpkin Pie Slice Coaster Pattern is designed to be relaxing, enjoyable, and suitable for crocheters of many skill levels. Each completed coaster becomes a small celebration of handmade craftsmanship and the cozy feeling of autumn.
FAQ
Is the Crochet Pumpkin Pie Slice Coaster Pattern suitable for beginners?
Yes. The pattern mainly uses basic crochet stitches such as chain, single crochet, half double crochet, and simple increases, making it an excellent beginner-friendly project.
What yarn works best?
Medium-weight cotton yarn is the best choice because it is absorbent, durable, washable, and helps the coaster maintain its shape.
Can I make the coaster larger?
Absolutely. Increase the starting chain length and add a few extra increase rows before completing the triangle.
How long does it take to finish?
Most crocheters can complete one coaster in approximately one to two hours depending on their experience.
Can I sell finished coasters?
Yes. Handmade coasters created from your own work are commonly sold at craft fairs, online shops, and local markets. Always ensure you respect any licensing terms if using a designer’s proprietary pattern.
Can I use acrylic yarn?
Yes, although cotton is recommended because it absorbs moisture better and performs well as a functional coaster.
How do I prevent curling?
Maintain consistent tension and consider lightly blocking the finished coaster after assembly.
Can children learn this project?
Older children with basic crochet experience can usually complete this project with adult guidance.
Conclusion
The Crochet Pumpkin Pie Slice Coaster Pattern is a delightful project that combines creativity, functionality, and seasonal charm in one enjoyable crochet design. Throughout this tutorial, you learned how to select appropriate materials, understand the basic stitch abbreviations, shape the pumpkin pie slice, create a realistic pie crust, add a whipped cream topping, finish the coaster professionally, and personalize the design with decorative details. Because the project is quick, affordable, and beginner-friendly, it is perfect for building confidence while creating beautiful handmade home décor.
Whether you crochet a single coaster for your favorite mug or an entire matching set for autumn gatherings, this project offers endless opportunities for creativity and personalization. Handmade items like these bring warmth and personality into every home while making thoughtful gifts for friends and family.
Thank you for reading this guide. If you enjoyed this Crochet Pumpkin Pie Slice Coaster Pattern, please leave your honest opinion in the comments and share your suggestions for future crochet tutorials. Your feedback helps inspire new creative ideas and supports a growing community of crochet enthusiasts. Happy crocheting!