
Crochet pumpkin coaster pattern is one of the most enjoyable seasonal crochet projects for crafters who love decorating their homes with handmade accessories.
Creating a crochet pumpkin coaster pattern is an excellent way to practice basic crochet stitches while producing something useful.
Another reason why this pattern has become so popular is its versatility. You can create traditional orange pumpkins, experiment with white heirloom pumpkins, or even use different autumn-inspired colors to match your existing decorations. Throughout this guide, you will learn everything you need to know about making your own Crochet pumpkin coaster pattern, including materials, stitch abbreviations, shaping techniques, finishing details, and creative customization ideas that will help your finished project look beautiful and professional.
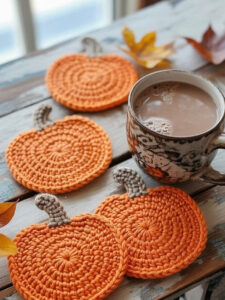
Materials and Crochet Stitch Guide
Before starting your Crochet pumpkin coaster pattern, gather all the supplies you will need. Choosing quality materials makes the finished coaster more durable and gives it a polished appearance. Cotton yarn is highly recommended because it absorbs moisture well and helps the coaster maintain its shape after repeated use.
For this project, you will need medium-weight cotton yarn in pumpkin orange, green for the stem or leaf, and brown if you wish to add decorative vines. You will also need a 4.0 mm crochet hook, scissors, a yarn needle, and stitch markers if you like marking the beginning of rounds.
The finished coaster generally measures between 4.5 and 6 inches in diameter depending on your yarn choice and crochet tension. If you prefer a larger coaster, simply use a larger hook or add an additional increase round before shaping the pumpkin ridges.
The stitch abbreviations used throughout this project include:
Ch = Chain
Sl St = Slip Stitch
Sc = Single Crochet
Hdc = Half Double Crochet
Dc = Double Crochet
Inc = Increase (2 stitches in one stitch)
FO = Fasten Off
MR = Magic Ring
Begin by making a Magic Ring. Work 12 Dc into the ring and join with a Slip Stitch. This creates a smooth center that will become the middle of your pumpkin. Chain two to begin the following round.
Continue increasing evenly around the circle. For Round 2, crochet 2 Dc into each stitch. Round 3 alternates one Dc and one Increase. Continue increasing until the coaster reaches your desired size while keeping the circle flat and even.
Step-by-Step Crochet Pumpkin Coaster Pattern
After completing the circular base, begin shaping the pumpkin. One of the easiest methods is to create soft ridges using surface slip stitches after finishing the circle. These lines imitate the natural sections found on real pumpkins.
Using orange yarn, continue crocheting evenly without additional increases for one round. This stabilizes the edge and helps the coaster remain flat during use. Fasten off once the desired diameter has been reached.
Thread a long piece of orange yarn onto a yarn needle. Insert the needle through the center of the coaster and gently wrap the yarn around the outside edge, pulling lightly to form several raised pumpkin segments. Repeat this process six to eight times around the coaster until the pumpkin shape becomes visible.
Next, crochet the stem using green or brown yarn. Chain six stitches, then work Single Crochet back across the chain. Fasten off, leaving a tail for sewing. Attach the stem securely at the top center of the pumpkin.
For a decorative leaf, chain eight stitches. Work one Single Crochet, one Half Double Crochet, three Double Crochet, one Half Double Crochet, and one Single Crochet before fastening off. Sew the leaf beside the stem for a realistic appearance.
Finally, weave in all loose ends carefully with a yarn needle. Trim any excess yarn and lightly block the finished coaster if needed. The result is a charming Crochet pumpkin coaster pattern that looks festive while remaining fully functional.
Customization Ideas and Finishing Tips
One of the best features of the Crochet pumpkin coaster pattern is how easily it can be personalized. Instead of using traditional orange yarn, try cream-colored pumpkins for farmhouse décor or deep green pumpkins for a unique seasonal display.
Adding embroidered details can make the coaster even more realistic. Simple brown embroidery stitches can imitate pumpkin texture, while small twisted chains can represent curling vines growing from the stem.
If you enjoy textured crochet, consider replacing some Double Crochet stitches with Puff Stitches or Bobble Stitches. These create extra dimension that resembles the rounded surface of a pumpkin.
To improve durability, block each coaster after completing it. Lightly dampen the finished piece, shape it carefully, and allow it to dry completely on a flat surface. Blocking helps create crisp edges and consistent sizing for matching coaster sets.
A complete set of four or six pumpkin coasters makes an attractive seasonal gift. Wrap the finished pieces with natural twine and include a handwritten tag for a thoughtful handmade presentation.
You can also combine these coasters with matching crochet placemats, mug rugs, table runners, or pumpkin garlands to create a coordinated autumn-themed home décor collection that reflects your personal crochet style.
Helpful Tips for Beginners and Care Instructions
If this is your first circular crochet project, count your stitches carefully after every round. Consistent stitch counts help maintain a perfectly flat coaster without unwanted curling or ruffling.
Maintaining even yarn tension is another important factor. Pulling the yarn too tightly may cause the coaster to cup, while very loose stitches can produce an uneven shape. Practice keeping a comfortable, consistent rhythm throughout the project.
Cotton yarn remains the preferred fiber because it absorbs moisture from mugs and glasses effectively. Acrylic yarn can also be used, but it may not provide the same level of absorbency as cotton.
When washing your finished coasters, use cool water and mild detergent. Gently reshape them after washing and lay them flat to dry. Proper care helps preserve both the shape and color for many seasons.
Store your seasonal crochet projects in a clean, dry container away from direct sunlight. This protects the yarn from fading and keeps the coasters ready for use every autumn.
Most importantly, enjoy the creative journey. Every completed Crochet pumpkin coaster pattern improves your crochet skills while adding a handmade touch to your seasonal decorations. Small projects like this are perfect for relaxing evenings and are an excellent way to build confidence with new crochet techniques.
FAQ
Is the Crochet pumpkin coaster pattern suitable for beginners?
Yes. This project mainly uses basic crochet stitches and simple shaping techniques, making it an excellent beginner-friendly pattern.
What is the best yarn for pumpkin coasters?
Medium-weight cotton yarn is recommended because it is durable, absorbent, washable, and helps the coaster maintain its shape.
How long does it take to complete one coaster?
Most crocheters can finish one coaster in approximately one to two hours depending on their skill level.
Can I make the coaster larger?
Absolutely. Simply add one or two additional increase rounds before completing the pumpkin shaping.
Can I use different colors?
Yes. White, cream, sage green, mustard yellow, and even soft gray pumpkins create beautiful seasonal variations.
How do I keep the coaster flat?
Count stitches carefully, increase evenly, maintain consistent tension, and block the finished coaster if necessary.
Are these coasters good handmade gifts?
Definitely. They are practical, attractive, inexpensive to make, and perfect for housewarming gifts, Thanksgiving gatherings, birthdays, and holiday celebrations.
Can I sell finished pumpkin coasters?
Yes. Handmade crochet coasters are popular at craft fairs, online marketplaces, and local artisan events, provided you respect the licensing terms of any proprietary pattern you use.
Conclusion
The Crochet pumpkin coaster pattern is a fun, practical, and rewarding crochet project that beautifully captures the cozy spirit of autumn. Throughout this tutorial, you learned how to choose the right materials, understand the essential crochet stitch abbreviations, crochet a circular pumpkin base, shape realistic pumpkin ridges, create a decorative stem and leaf, finish the coaster professionally, and personalize the design with creative details. Because the project is quick to complete and suitable for crocheters of all skill levels, it is an excellent addition to any seasonal crochet collection.
Whether you make a single coaster for your favorite mug or an entire matching set for family gatherings, this project combines creativity with everyday functionality. Handmade decorations like these bring warmth, personality, and craftsmanship into your home while providing an enjoyable crochet experience from beginning to end.
Thank you for taking the time to read this guide. I hope this Crochet pumpkin coaster pattern inspires your next seasonal crochet project. If you enjoyed this tutorial, please leave your honest opinion in the comments and share your suggestions for future crochet patterns. Your feedback is greatly appreciated and helps inspire even more creative ideas for the crochet community.