
Pumpkin quilt pattern projects are a beautiful way to celebrate the warmth and charm of the autumn season. Whether you are creating a decorative wall hanging, a cozy table runner, a festive throw, or a full-sized quilt, a Pumpkin quilt pattern brings seasonal color and timeless style into your home.
One of the reasons a Pumpkin quilt pattern remains a favorite among quilting enthusiasts is its versatility. You can make realistic pumpkins using traditional piecing techniques, experiment with modern geometric designs, or combine multiple pumpkin blocks into a stunning patchwork composition.
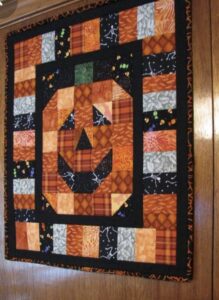
In this complete tutorial, you will learn how to recreate the quilt shown in the reference photo by following a simple step-by-step process. From selecting coordinating fabrics and cutting accurate quilt pieces to assembling pumpkin blocks, adding borders, quilting, and binding, every stage is explained in detail. Whether this is your first seasonal quilt or another addition to your growing collection, this guide will help you confidently complete your own beautiful Pumpkin quilt pattern.
Choosing Fabrics and Preparing the Quilt Blocks
Before beginning your Pumpkin quilt pattern, gather all of the necessary materials. High-quality 100% quilting cotton is recommended because it is durable, presses well, and produces crisp, accurate seams. Select several shades of orange fabric for the pumpkins, medium and dark green fabrics for stems and leaves, cream or beige fabric for the background, and coordinating fabrics for borders and binding.
To recreate the appearance shown in the project photo, combine a variety of orange prints instead of using only one fabric. Mixing floral, tone-on-tone, subtle plaid, and tiny dot prints creates visual depth while giving every pumpkin its own personality. Neutral background fabrics help the pumpkins stand out beautifully and create a balanced composition.
For one finished pumpkin block measuring approximately 12″ x 12″, prepare the following fabric pieces:
- 8 orange squares measuring 3½” x 3½”
- 4 orange rectangles measuring 3½” x 6½”
- 2 green rectangles measuring 2″ x 3½” for the stem
- 2 green leaf pieces measuring 2½” x 3″
- Background squares and rectangles according to your block layout
Add an extra quarter inch seam allowance to every piece if it is not already included in your cutting measurements.
Accurate cutting is one of the most important parts of quilting. Use a rotary cutter, acrylic ruler, and self-healing cutting mat to ensure every fabric piece is perfectly square. Even small cutting inaccuracies can affect how well the finished blocks fit together.
Press every fabric before cutting. Wrinkles can distort measurements and make piecing more difficult. Starching the fabric lightly before cutting may also improve accuracy, especially for beginners.
Lay all the pieces on a design wall or flat table before sewing. This allows you to preview color placement and confirm that each pumpkin block matches the layout shown in the photo before stitching begins.
Step-by-Step Instructions to Assemble the Pumpkin Quilt Pattern
Begin by assembling the pumpkin body. Sew the orange squares and rectangles together in horizontal rows using a consistent quarter-inch seam allowance. Press the seams after each row to reduce bulk and improve accuracy.
Once the pumpkin body is complete, sew the rows together carefully. Match every seam intersection as closely as possible to create clean patchwork lines. Pinning the rows before sewing helps prevent shifting and keeps the block aligned.
Construct the stem separately by joining the green rectangles. Position the stem at the center of the pumpkin’s upper edge, just as shown in the reference project. Attach it between the upper background pieces before sewing the final top row together.
Create simple fabric leaves using folded rectangles or easy pieced triangles. Sew the leaves beside the stem to give the pumpkin a more natural appearance. If your reference quilt contains several pumpkins, vary the leaf direction slightly to create movement throughout the design.
After completing each pumpkin block, square the block carefully to exactly 12½” x 12½”. Trimming ensures that every block fits together smoothly when assembling the quilt top and prevents uneven borders later.
Arrange all completed blocks on your design surface until you achieve a pleasing composition similar to the quilt in the photo. Alternate fabric prints and pumpkin shapes to create visual balance while maintaining a cohesive autumn color palette.
Assembling the Quilt Top and Quilting the Layers
Once all pumpkin blocks are finished, begin sewing the blocks together row by row. Use a quarter-inch seam allowance throughout the assembly process and press seams in alternating directions so they nest neatly when joining rows.
After assembling the quilt center, add borders that complement the seasonal design. A narrow green inner border followed by a wider cream or orange outer border often frames pumpkin quilts beautifully while emphasizing the colorful blocks.
Prepare the quilt sandwich by placing the backing fabric right side down, the batting in the center, and the quilt top right side up. Smooth each layer carefully to remove wrinkles before securing them with safety pins or temporary quilting spray.
For quilting, echo quilting around each pumpkin creates attractive texture while making the pumpkin shapes stand out. Straight-line quilting is another excellent option that provides a clean, modern appearance and is easy for beginners to complete.
If you prefer more decorative quilting, free-motion swirls, falling leaves, vines, or gentle curves enhance the autumn theme without overwhelming the patchwork. Choose a quilting thread that blends well with the background for a subtle finish or use contrasting thread to highlight the stitching.
Finish the quilt by trimming all layers evenly and attaching double-fold binding. Carefully stitch the binding around the quilt edges using neat mitered corners for a polished and professional result.
Creative Variations and Helpful Quilting Tips
One of the greatest advantages of a Pumpkin quilt pattern is its flexibility. You can create pumpkins in many colors, including white heirloom pumpkins, sage green pumpkins, pale blue pumpkins, or even soft gray pumpkins for a modern farmhouse look.
Instead of making every pumpkin identical, vary their widths, heights, and fabric combinations. Slight differences make the quilt appear more natural while adding visual interest throughout the finished design.
Consider adding appliqué details such as curling vines, embroidered leaves, or tiny acorns between the pumpkin blocks. These small embellishments provide extra character while keeping the quilt elegant and seasonal.
If the quilt shown in the photo includes multiple pumpkins of different sizes, create larger feature pumpkins surrounded by smaller accent pumpkins. This creates depth and draws the eye naturally across the quilt.
Label the back of your finished quilt with the project name, completion date, and your signature. Handmade quilts often become treasured family heirlooms, and future generations will appreciate knowing who created them.
Most importantly, enjoy every stage of the quilting process. A Pumpkin quilt pattern is not simply a seasonal decoration—it is a handmade piece of art that reflects patience, creativity, craftsmanship, and the joy of creating something meaningful with fabric.
FAQ
Is the Pumpkin quilt pattern suitable for beginners?
Yes. The project mainly uses straightforward patchwork techniques, making it an excellent choice for beginners who have basic sewing and quilting experience.
What fabric is best for this project?
High-quality 100% quilting cotton is recommended because it presses well, is easy to sew, and provides excellent durability.
What size should each pumpkin block be?
A finished 12″ x 12″ block is a popular choice, although you can easily resize the pattern depending on your quilt dimensions.
How much fabric will I need?
The total amount depends on the size of your quilt. A wall hanging requires much less fabric than a bed quilt, so calculate your yardage based on the number of pumpkin blocks you plan to make.
Can I use fabric scraps?
Absolutely. Scrap fabrics work wonderfully for pumpkin quilts because mixing different orange prints creates additional texture and visual interest.
What quilting design works best?
Straight-line quilting, echo quilting around the pumpkins, or gentle free-motion leaf and vine designs all complement this seasonal pattern beautifully.
How should I wash the finished quilt?
Wash using cold water on a gentle cycle with mild detergent, then air dry or tumble dry on low heat to help preserve the fabric colors and quilting stitches.
Can I give this quilt as a gift?
Yes. A handmade Pumpkin quilt pattern makes a thoughtful gift for autumn birthdays, housewarmings, Thanksgiving celebrations, weddings, or anyone who appreciates handcrafted home décor.
Conclusion
The Pumpkin quilt pattern is a timeless quilting project that beautifully captures the warmth, color, and comfort of the autumn season. Throughout this tutorial, you learned how to select coordinating fabrics, accurately cut the quilt pieces, assemble realistic pumpkin blocks, recreate the layout shown in the reference photo, join the quilt top, quilt the layers, add professional binding, and personalize the finished design with creative seasonal details. By following these step-by-step instructions, you can confidently create a quilt that is both decorative and functional.
Whether you choose to make a small wall hanging, a festive table topper, or a full-sized quilt, this project offers endless opportunities for creativity while helping you improve your quilting skills. Every completed block contributes to a beautiful handmade quilt that can be displayed and enjoyed for many autumn seasons to come.
Thank you for reading this guide. I hope this Pumpkin quilt pattern inspires your next quilting project. If you found this tutorial helpful, please leave your honest opinion and share your suggestions for future quilting articles. Your feedback is greatly appreciated and helps create even more inspiring projects for quilting enthusiasts around the world.