
Crocheted heart keychain pattern is a charming small crochet project that transforms a few basic stitches and a modest amount of yarn into a soft, handmade accessory you can attach to keys, handbags, backpacks, zipper pulls, or gift packages.
A handmade Crocheted heart keychain pattern is especially appealing because it can be personalized without dramatically changing the basic instructions.
Throughout this Crocheted heart keychain pattern, the instructions are organized into manageable stages, beginning with materials and crochet abbreviations before moving into the two rounded lobes at the top of the heart. The lobes are joined and gradually decreased to form the pointed bottom, after which the heart is stuffed, closed, and prepared for keychain hardware. Stitch counts are included wherever they are useful so you can check your progress as you crochet. Since yarn thickness and individual tension can affect the finished size, consider the measurements and stitch counts a practical foundation that you can adapt after making your first heart. Read the complete tutorial before beginning, keep a stitch marker nearby, and take your time with the shaping rounds for the neatest result.
Materials, Crochet Stitch Key, and Project Preparation
To make this Crocheted heart keychain pattern, prepare a small amount of cotton or acrylic yarn in your preferred color. A light worsted or DK-weight yarn is an excellent choice for a compact keychain. You will also need a crochet hook compatible with the yarn, polyester fiberfill, scissors, a yarn needle, a stitch marker, and suitable keychain hardware such as a split ring attached to a short chain.
The crochet abbreviations used in this tutorial are straightforward. MR means magic ring, ch means chain, sc means single crochet, inc means increase, dec means decrease, sl st means slip stitch, and st/sts means stitch or stitches. An increase is made by placing two single crochet stitches into the same stitch, while a decrease combines two stitches into one.
Most of the heart is worked in continuous rounds. This means you do not normally join each round with a slip stitch unless specifically instructed. Instead, place a stitch marker in the first stitch of every round and move it upward as you work. This keeps the surface smoother and avoids creating a prominent joining seam along the side of the heart.
Tension is particularly important for a stuffed crochet keychain. Your stitches should be firm enough that the fiberfill does not show between them, but they should not be so tight that inserting the hook becomes uncomfortable. If your fabric has obvious gaps, try moving down slightly in hook size rather than pulling every stitch excessively tight.
Before beginning, decide approximately how large you want the finished crochet heart keychain to be. Using DK or light worsted yarn will generally produce a small accessory-sized heart, although the exact dimensions depend on your yarn, hook, and personal tension. Thicker yarn can create a larger bag charm, while thinner yarn is useful for miniature hearts.
The construction begins with two separate rounded pieces. These become the upper lobes of the heart and are later joined into one continuous shape. Preparing both sections as similarly as possible is essential because uneven lobes can make the finished heart appear tilted. Count your stitches carefully and compare the two pieces before joining them.
Crocheting and Joining the Two Heart Lobes
Begin the first lobe of the Crocheted heart keychain pattern by creating an MR. Round 1: work 6 sc into the magic ring and pull the ring securely closed. Place your stitch marker into the first single crochet. You should have 6 stitches at the end of the round.
For Round 2, work inc in each stitch around, creating 12 stitches. Round 3: work (sc, inc) around six times, giving you 18 stitches. These increases form a small circular piece that will naturally begin developing into the rounded upper portion of the heart.
Round 4: work sc in each of the 18 stitches around. Round 5: repeat 18 sc around. If you want a slightly deeper or plumper heart, you can work one additional even round, but remember to make the second lobe exactly the same way. Finish the first lobe and leave a yarn tail that can later be woven securely into the project.
Now repeat the same process for the second lobe. Make an MR with 6 sc, increase to 12 stitches, increase again to 18, and work the same number of even rounds used for the first piece. Do not fasten off the second lobe because its working yarn will be used to join the two pieces and continue crocheting the body.
Place both lobes side by side with their openings facing downward. Using the working yarn from the second piece, crochet across the appropriate stitches of the first lobe so the two rounded sections become connected. Continue crocheting around both pieces. Depending on how you join them, the combined round should contain approximately 36 stitches before shaping begins.
Inspect the center where the lobes meet. A tiny opening can sometimes appear between them, especially after stuffing. If necessary, use the yarn tail from the first lobe to sew this small space closed later. Do not pull so tightly that the center puckers. The goal is to create a smooth indentation that clearly defines the two upper curves of the amigurumi heart.
Shaping, Decreasing, Stuffing, and Closing the Heart
Once the lobes have been joined, the next stage of the Crocheted heart keychain pattern creates the tapered lower body. Work one complete round of sc around the combined heart. This stabilizing round helps establish the body before decreases begin and gives you an opportunity to confirm the total stitch count.
On the following round, distribute decreases evenly. If you have 36 stitches, work (4 sc, dec) around to reduce the round to approximately 30 stitches. Use an invisible decrease when possible because this technique produces a smoother surface and is especially useful for small stuffed amigurumi pieces.
For the next shaping round, work (3 sc, dec) around, reducing the circumference further. Then work one even round of single crochet if you want a slightly longer heart. This optional round can make the finished shape appear more elongated, while omitting it produces a shorter and plumper heart.
Continue decreasing with (2 sc, dec) around. At this stage, begin adding small amounts of polyester fiberfill. Push the stuffing gently into both upper lobes before the opening becomes too narrow. The two rounded sections should feel evenly filled, and the center indentation should remain visible.
Work the next decrease round as (sc, dec) around. Add additional stuffing gradually, paying special attention to the center and lower body. A stuffed crochet heart should be firm enough to maintain its shape but not so densely packed that the stitches become stretched apart. Use small pieces of fiberfill rather than one large clump.
Continue decreasing until approximately six stitches remain. Cut the yarn, leaving a generous tail. Thread it through a yarn needle, pass the needle through the front loops of the remaining stitches, and pull the opening closed. Weave the tail securely inside the heart. Gently shape the piece between your fingers to emphasize the rounded top and pointed lower section.
Adding the Keychain and Customizing Your Crochet Heart
With the basic heart complete, you can turn the Crocheted heart keychain pattern into a practical accessory. Thread a strong yarn tail through the top center of the heart and around the final link of the keychain chain several times. Pass through multiple crochet stitches rather than attaching the hardware to only one stitch, as distributing the tension creates a more secure connection.
If your keychain hardware includes a jump ring, make sure it is properly closed after attachment. The hardware should sit near the center indentation without dramatically pulling the two lobes together. Before using the keychain regularly, give the attachment a gentle test to ensure the yarn and hardware remain secure.
For an entirely crocheted alternative, make a hanging loop using chains. Attach yarn securely near the upper center of the heart, ch 12 to 18, depending on the desired loop length, and sl st back into the attachment point. Reinforce the connection, fasten off, and weave the ends inside. This creates a soft loop suitable for decorative hanging.
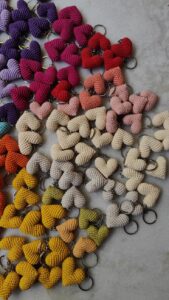
Color is one of the easiest ways to personalize this crochet heart pattern. Red creates a traditional romantic appearance, pink feels soft and cheerful, cream gives the design a minimalist style, and bright rainbow colors can turn several hearts into a playful collection. Using leftover yarn also makes every heart slightly different.
Simple embroidery can add even more personality. A small initial, tiny flower, short decorative line, or minimalist facial expression can be stitched onto the front before or after stuffing, depending on the detail. Keep embellishments lightweight because the heart is small and excessive decoration can hide the crochet texture.
Once you are comfortable with the basic Crocheted heart keychain pattern, experiment with yarn thickness and hook size. Make matching hearts for bags, create miniature versions for zipper pulls, or use larger yarn for soft decorative charms. The construction method remains essentially the same, making this an adaptable pattern you can revisit whenever you have small amounts of yarn available.
FAQ About the Crocheted Heart Keychain Pattern
Is the Crocheted heart keychain pattern suitable for beginners?
Yes. This project is suitable for beginners who already know basic single crochet and are ready to practice working in continuous rounds. The joining and decrease sections require a little concentration, but the small scale makes the heart an excellent introduction to basic amigurumi shaping.
What yarn should I use for a crochet heart keychain?
Cotton and acrylic are both practical options. Cotton yarn offers crisp stitch definition and a structured feel, while acrylic yarn can create a softer heart and is available in a wide range of colors. Choose a yarn that is durable enough for the way you plan to use the finished keychain.
What crochet hook size should I use?
Choose a hook that works with your yarn while creating relatively dense stitches. For stuffed amigurumi, many crocheters use a hook slightly smaller than they would use for a loose garment or blanket. The correct size should allow comfortable stitching without leaving large spaces.
Why can I see the stuffing through my stitches?
This usually happens when the crochet fabric is too loose or the heart has been overstuffed. Try using a slightly smaller hook and insert the fiberfill gradually. Firm, even stitches help create a cleaner amigurumi keychain.
How do I make both heart lobes the same size?
Use exactly the same yarn, hook, stitch count, and number of rounds for both sections. Counting every round is important. You can also place the two lobes beside each other before joining them to identify any obvious difference.
How can I make a smaller crocheted heart?
Use thinner yarn with a compatible smaller hook. This is generally easier than redesigning the entire stitch count. Crochet thread or fine yarn can produce tiny hearts, although working at a smaller scale requires more precise tension.
How can I make the heart larger?
Use thicker yarn and a larger compatible hook for a straightforward size increase. You can also add more increase rounds to the lobes, but this changes the stitch counts for the entire pattern and requires corresponding adjustments during the decrease section.
What is the best stuffing for this project?
Polyester fiberfill is a convenient choice because it is lightweight and easy to distribute inside small shapes. Add small pieces at a time and push them into the upper lobes first. This helps prevent empty spaces from remaining after the opening becomes narrow.
What is an invisible decrease?
An invisible decrease is an amigurumi technique used to combine two stitches while reducing the visible bump created by a traditional decrease. It is generally worked through the front loops of two adjacent stitches before completing the single crochet.
Can I make this heart without stuffing?
Yes. You could crochet two flat heart pieces and sew them together without filling, or adapt the three-dimensional version by adding only a tiny amount of stuffing. However, fiberfill gives this particular pattern its soft and rounded amigurumi appearance.
How do I securely attach keychain hardware?
Pass strong yarn through multiple stitches near the upper center of the heart and around the keychain connection several times. Avoid relying on a single crochet stitch because regular movement can place considerable stress on that one point.
Can I use this pattern for something other than a keychain?
Certainly. The same crocheted heart can become a bag charm, zipper decoration, garland component, gift embellishment, decorative ornament, or part of a larger handmade project. Simply leave off the metal keychain hardware when it is not needed.
How long does a crocheted heart keychain take to make?
The time varies depending on experience and working speed. Because the project uses relatively few stitches and a small amount of yarn, it can be completed much faster than most full-size crochet projects. Beginners may prefer to work slowly and concentrate on accurate counting.
Why does my heart look round instead of pointed?
The pointed lower section depends on gradual decreases. If the decrease rounds are skipped or additional even rounds are added near the bottom, the heart may look more oval. Continue decreasing consistently and shape the stuffing toward the center as the opening becomes smaller.
Can I make several hearts using scrap yarn?
Yes. This is an excellent scrap yarn crochet project because each heart requires relatively little material. Save leftover yarn from blankets, scarves, amigurumi, and other projects, then combine coordinating colors into a collection of handmade heart keychains.
Conclusion
The Crocheted heart keychain pattern is a small but rewarding project that combines fundamental crochet techniques with practical amigurumi shaping. Beginning with two separate magic rings, you learned how to create matching rounded lobes, join them into a single piece, and gradually decrease the stitches to develop the familiar heart silhouette.
The tutorial also covered essential techniques such as the magic ring, single crochet, increases, invisible decreases, continuous rounds, stitch counting, stuffing, closing an amigurumi piece, and weaving in yarn ends. These are valuable skills that can be applied to many other small crochet projects, making this heart a useful practice piece as well as a decorative accessory.
Most importantly, this Crocheted heart keychain pattern gives you a flexible foundation for your own creative ideas. Try making a coordinated set, experiment with leftover yarn, or adapt the heart into decorations for other handmade projects. If you make this pattern, please leave your sincere opinion about the tutorial and share your suggestions. I would love to know which colors and variations you would choose and what details you would add to make your crocheted heart truly personal.