
Fabric bat quilt pattern is a creative sewing and quilting project that combines simple geometric fabric pieces to form a recognizable bat motif, making it an excellent choice for Halloween quilts, seasonal wall hangings, table runners, cushion covers, and decorative patchwork projects.
The beauty of a Fabric bat quilt pattern is that it does not require an enormous fabric collection or complicated specialty equipment.
Throughout this tutorial, the Fabric bat quilt pattern will be explained step by step, including suggested fabric quantities, cutting measurements, seam allowances, block construction, pressing, assembly, quilting, and finishing. The measurements are designed as a practical starting point for approximately a 12-inch finished quilt block, although slight variations can occur depending on seam accuracy and pressing technique. A standard 1/4-inch seam allowance is recommended throughout the patchwork construction unless otherwise noted. Before cutting your favorite fabric, it can be helpful to make one practice block using scraps, especially if you are new to diagonal piecing. Taking a little extra time during preparation will usually produce cleaner wing points, straighter edges, and a more symmetrical bat. The goal is not only to create a seasonal quilt block but also to develop useful quilting skills that can be applied to many future patchwork designs.
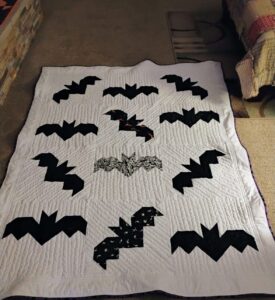
Materials, Fabric Measurements, and Cutting the Bat Pieces
For one approximately 12-inch Fabric bat quilt pattern block, prepare around one fat eighth of dark fabric for the bat and one fat quarter of contrasting background fabric. You will also need coordinating sewing thread, a sewing machine, quilting ruler, rotary cutter or fabric scissors, cutting mat, iron, ironing surface, pins or sewing clips, and a fabric-marking tool. If you plan to turn the block into a finished mini quilt, you will additionally need batting, backing fabric, and binding.
For the main bat color, cut one 3 1/2 x 4 1/2-inch rectangle for the center body section, two 3 1/2 x 5 1/2-inch rectangles for the main wings, and several smaller squares for connecting and shaping the silhouette. Cut four dark 2 1/2-inch squares and two dark 1 1/2-inch squares. These smaller pieces help create the angular transitions between the wings, body, and pointed upper sections of the bat.
From the background fabric, cut two 3 1/2 x 5 1/2-inch rectangles, four 2 1/2-inch squares, four 1 1/2-inch squares, and additional strips that can be trimmed to complete the outer edges of the block. Having a little extra background fabric is useful because the final block can be squared after assembly. If you want a larger border around the bat, simply prepare wider background strips.
The bat quilt block measurements can be adjusted, but proportional cutting is important. When enlarging the project, increase all pieces consistently rather than changing only the wings or body. For your first block, staying with the suggested measurements makes it easier to understand how the sections interact. Once you have successfully constructed one bat, experimenting with different dimensions becomes much simpler.
Before sewing, arrange all the cut pieces on a flat surface in the approximate shape of the finished bat. Place the body in the center and position one wing on either side. Add the background pieces around the outer edges. This dry layout is an important step because it helps prevent pieces from being accidentally rotated during assembly.
Finally, check that the fabric grain is reasonably straight and that every square has accurate 90-degree corners. Small cutting errors can accumulate across a patchwork bat quilt block, eventually making it difficult to align the final sections. Precision does not mean the project has to be stressful; simply measure carefully, cut once, and keep each group of pieces organized before moving to the sewing machine.
Sewing the Bat Wings and Creating the Halloween Silhouette
Begin the sewing stage of the Fabric bat quilt pattern by constructing the wing units. Place one background square on a corner of a dark wing rectangle with right sides facing. Draw a diagonal guideline from one corner of the background square to the opposite corner. Sew directly along this marked line, keeping your stitches smooth and consistent.
Trim the excess fabric approximately 1/4 inch beyond the stitched diagonal line, then press the background triangle away from the dark fabric. This creates an angled section without requiring you to cut and handle individual bias-edge triangles. Repeat the same technique on the necessary corners of both wing rectangles, making sure the two wings mirror each other rather than pointing in the same direction.
The lower edges of bat wings naturally have an irregular, pointed appearance. To suggest this shape in patchwork, use additional background squares on selected lower corners of the dark wing units. Stitch diagonally, trim the excess, and press outward. These contrasting corners create the illusion of dips and points along the lower edge while keeping the overall block construction manageable.
As you work, place the left and right wings beside each other frequently. A successful Halloween bat quilt pattern should have reasonably balanced wings. Handmade blocks do not need mathematical perfection, but obvious differences can usually be corrected before the units are permanently joined. Checking orientation after every diagonal seam is much easier than removing stitches later.
Pressing direction also affects the quality of the block. Instead of aggressively moving the iron back and forth, place the iron down gently and lift it before repositioning. Excessive movement can stretch diagonal seams. Pressing some seam allowances toward the dark fabric may also reduce the chance of darker seam allowances showing through a light background.
When both wings are finished, trim them carefully to their intended dimensions if necessary. Do not automatically remove fabric simply because one edge looks slightly uneven. Use a quilting ruler to identify the correct trimming line and preserve the required seam allowance around important wing points. Proper trimming at this stage helps the bat body and wings fit together cleanly during final assembly.
Assembling the Bat Quilt Block Step by Step
The center section gives the Fabric bat quilt pattern its recognizable body. Position the dark body rectangle vertically between the two wing sections. If you want a more defined head, use the smaller dark squares above the body and add small background corner pieces diagonally. This technique can suggest the pointed ears commonly associated with a bat silhouette without requiring complicated curved piecing.
Sew the smaller upper units together first and press the seams carefully. Then attach the head section to the central body. Check that the centerline remains straight. If the head is slightly off-center, the entire bat can appear tilted once the wings are attached, so this is a useful point to check alignment before continuing.
Next, join the left wing section to the center body using a 1/4-inch quilting seam allowance. Pin or clip the pieces at the top, bottom, and center if necessary. Sew slowly across intersections where several layers meet. After sewing, press the seam toward the darker fabric when practical. Repeat the process with the right wing.
Once the main bat silhouette is assembled, add background pieces above, below, and along the sides until the unit becomes a complete rectangular or square block. The background acts as negative space, allowing the dark bat to become the visual focal point. For a classic Halloween appearance, orange background fabric paired with a black bat creates especially strong contrast.
Measure the completed unit before trimming. For a block intended to finish at approximately 12 inches after being sewn into a quilt, you may choose to trim the unfinished block to about 12 1/2 inches square, provided your construction has left enough background around the motif. Keep the bat centered and avoid trimming too close to the wing tips.
If your block is slightly smaller than expected, do not try to stretch it with the iron. Instead, add narrow background strips to the outer edges and trim again. This is one reason extra background fabric is helpful. Borders can correct small size differences while also creating breathing room around the fabric bat motif.
At this stage, your Fabric bat quilt pattern block is essentially complete. You can make a single block for a small wall hanging or continue producing additional blocks for a larger quilt. When repeating the design, try reversing some bats, changing iris-like color accents if you add decorative details, or alternating background colors to create movement across the finished quilt.
Quilting, Finishing, and Creative Ways to Use the Bat Block
To turn a single Fabric bat quilt pattern block into a mini quilt, cut a piece of batting and backing fabric approximately 1 to 2 inches larger than the quilt top on every side. Place the backing right side down, position the batting over it, and center the completed quilt block on top with its right side facing upward. Smooth all three layers carefully.
Secure the quilt sandwich using safety pins, temporary basting methods, or your preferred quilting technique. For a small project, straight-line quilting is simple and effective. You can stitch around the bat silhouette to emphasize its shape or quilt evenly spaced lines across the entire block. Gentle diagonal quilting can also complement the angular construction of the wings.
Another attractive option is outline quilting approximately 1/4 inch away from the bat. This creates a subtle frame around the silhouette and makes it stand out from the background. More experienced quilters may enjoy adding free-motion swirls, stars, moons, spiderweb-inspired curves, or other seasonal details in the background.
After quilting, trim away the excess batting and backing so the edges align with the quilt top. Prepare binding strips approximately 2 1/4 to 2 1/2 inches wide, join them as necessary, and press the long strip in half lengthwise. Attach the binding around the perimeter using your preferred machine or hand-finishing method.
A single bat quilt block can also be transformed into a pillow front. Add borders until the panel reaches your desired cushion size, quilt it for additional texture, and attach an envelope or zipper-style backing. The same block could become the center of a tote bag, a decorative table mat, or part of a Halloween fabric banner.
For a larger Halloween quilt project, make several bats and arrange them in horizontal rows with sashing between the blocks. You can use identical bats for a coordinated design or create each one from a different dark fabric. Scrappy blacks, purples, grays, and deep blues can give the quilt greater visual texture while maintaining the recognizable bat theme.
FAQ About the Fabric Bat Quilt Pattern
Is the Fabric bat quilt pattern suitable for beginners?
Yes. The project is accessible to adventurous beginners who already understand basic straight stitching and a 1/4-inch seam allowance. The diagonal corner technique may require some practice, but it avoids many of the difficulties associated with sewing individually cut triangles.
What is the best fabric for a bat quilt block?
Quilting cotton is one of the easiest materials to use because it cuts accurately, presses well, and is available in countless colors and prints. Beginners may find solid or small-scale prints easier to work with because large patterns can make the bat silhouette less obvious.
What colors work best for a Halloween bat quilt?
Black and orange are classic choices, but they are not the only option. Purple, gray, cream, burgundy, mustard, deep green, and midnight blue can all work beautifully. The most important consideration is having enough contrast between the bat fabric and the background.
How can I make the bat block larger?
You can add background borders around the completed bat block without changing the internal construction. This is the easiest approach. If you want the actual bat motif to be larger, all pattern components should be enlarged proportionally, and you should make a test block to confirm the new measurements.
Why are my bat wing points disappearing?
Wing points are usually lost when the seam allowance extends too close to the tip of a triangle. Make sure there is approximately 1/4 inch of fabric beyond important points before joining units. This space allows the point to remain visible after the next seam is sewn.
Why does my quilt block look uneven after pressing?
Fabric can become distorted if diagonal seams are stretched or if the iron is pushed aggressively across the surface. Press with an up-and-down motion and allow the fabric to cool briefly before handling it again. Accurate cutting and consistent seam allowances also help prevent distortion.
Can I use fabric scraps for this pattern?
Absolutely. A scrap fabric bat quilt can be especially attractive because the wings and body do not necessarily need to come from identical fabric. Different black or dark scraps can create subtle variation while still reading visually as one bat.
How many bat blocks do I need for a quilt?
That depends on the intended quilt dimensions, the size of each finished block, and whether you plan to use sashing or borders. Rather than cutting every piece immediately, make one test block first, measure its actual finished dimensions, and then calculate the number required for your chosen quilt size.
Should I prewash the fabric?
Prewashing is a personal quilting preference. If you expect the finished project to be washed regularly, prewashing can help identify shrinkage or color bleeding before construction. Whatever method you choose, treating all the fabrics consistently is generally the most practical approach.
Can I make this pattern without batting?
If you are making a decorative patchwork panel that will not be quilted, batting is optional. For a quilt, table mat, wall hanging, or cushion front where you want traditional quilted texture, batting helps provide structure and dimension.
What batting should I use for a Halloween wall hanging?
A lightweight cotton, cotton-blend, or polyester batting can work well. Since a wall hanging does not require the warmth of a bed quilt, very thick batting is generally unnecessary unless you specifically want a puffier appearance.
How can I make the Fabric bat quilt pattern look more professional?
Focus on accurate cutting, consistent 1/4-inch seams, careful pressing, precise trimming, and strong fabric contrast. These details usually make a greater difference than complicated quilting techniques. Taking time to square each unit before final assembly can noticeably improve the finished result.
Conclusion
The Fabric bat quilt pattern is a fun way to combine seasonal creativity with practical patchwork skills. Beginning with carefully measured dark and background fabrics, the project builds the bat silhouette through rectangles, squares, and diagonal corner techniques. Constructing each wing separately makes the design easier to control, while the central body and head bring all the sections together into a recognizable Halloween motif.
Throughout this tutorial, you learned how to prepare the bat quilt block measurements, organize the fabric pieces, sew diagonal corners, shape the bat wings, construct the central body, maintain a consistent seam allowance, and add background fabric around the completed silhouette. Careful pressing and trimming were also important parts of achieving a clean and balanced block.
Most importantly, this pattern leaves plenty of room for personal creativity. Try different background colors, combine several dark fabric scraps, change the quilting design, or arrange multiple bats into your own original layout. If you make this Fabric bat quilt pattern, please leave your sincere opinion about the tutorial and share your suggestions. I would love to know which colors and finishing ideas you would choose and what other quilting projects you would like to see explained in future tutorials.