
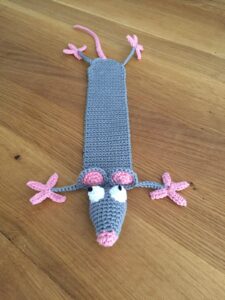
Crochet mouse bookmark pattern is a delightful way to combine a practical reading accessory with the charm of handmade crochet.
A well-made Crochet mouse bookmark pattern should be relatively thin, flexible, and lightweight. Unlike a stuffed amigurumi toy, the central portion of the bookmark needs to remain flat enough that it does not create unnecessary pressure between book pages.
This tutorial explains the process from selecting yarn to completing the final details, including a clear crochet stitch key, approximate stitch counts, shaping instructions, assembly suggestions, and customization ideas. The project can be made with neutral gray, brown, cream, or white yarn for a traditional mouse, but playful colors can work just as well. Before beginning, remember that crochet tension varies from person to person, so the finished dimensions may differ slightly. The goal is not to reproduce an exact measurement at all costs but to create a neat, flexible bookmark with balanced proportions and securely attached details.
Materials, Crochet Stitch Key, and Starting the Mouse Head
For this Crochet mouse bookmark pattern, a lightweight cotton or cotton-blend yarn is an excellent choice because it offers good stitch definition without creating excessive thickness. DK or sport-weight yarn works particularly well for a bookmark. You will need approximately 15–25 yards of the main mouse color, plus very small amounts of pink for the ears and nose and a darker yarn for the facial details. A 2.5 mm to 3.5 mm crochet hook is usually appropriate, depending on your yarn and tension.
Additional materials include scissors, a yarn needle, stitch markers, and a small measuring tape. If you want the head to have a little dimension, use only a tiny amount of fiber filling. Avoid heavily stuffing any part that will sit between the pages. For a completely flat bookmark, you can omit stuffing entirely and gently shape the head with your fingers after finishing.
The crochet stitch key for this project uses common US terminology. CH = chain, SC = single crochet, HDC = half double crochet, SL ST = slip stitch, ST/STS = stitch/stitches, INC = work 2 single crochet stitches into the same stitch, DEC = single crochet two stitches together, FO = fasten off, and MR = magic ring. These simple stitches provide everything needed to shape the mouse.
Begin the mouse head with the main color. Round 1: create an MR and work 6 SC into the ring. Pull the center closed. Round 2: INC in every ST around for a total of 12 STS. Round 3: SC in the next ST, INC in the following ST; repeat around for 18 STS. These increases gradually create the rounded back portion of the mouse’s head.
For Round 4, work SC in the next 2 STS, INC in the next ST and repeat around for 24 STS. Work Rounds 5 and 6 with 1 SC in each ST around, maintaining 24 STS. This short section establishes the width of the head. If you want a smaller mouse, you can stop increasing at 18 stitches and adjust the following shaping accordingly.
To begin forming the pointed muzzle, gradually decrease. Round 7: SC in the next 2 STS, DEC and repeat around for approximately 18 STS. Round 8: SC, DEC and repeat around for approximately 12 STS. If adding minimal stuffing, place a very small amount inside now. Round 9: DEC around until the opening becomes small, then FO and close the remaining opening securely with the yarn needle.
Crocheting the Flat Mouse Body and Long Bookmark Section
The body is the functional heart of the Crochet mouse bookmark pattern because this section rests between the pages. It should therefore remain fairly flat and narrow. Using the main color, CH 8. Beginning in the second CH from the hook, work 7 SC across. CH 1 and turn. This creates a simple foundation for the elongated body.
Row 2: SC across all 7 STS, CH 1, and turn. Repeat this row until the strip measures approximately 7–9 inches, depending on the books you typically read. A shorter strip works well for small paperbacks, while a slightly longer body is convenient for larger books. Keeping the stitch count at 7 produces a narrow bookmark that does not overwhelm the page.
If you prefer a more mouse-like body rather than a perfectly straight strip, subtle shaping can be added. After several rows, work an INC at both ends of one row to increase the width slightly. Continue straight for the middle section, then decrease toward the opposite end. Keep the changes gentle because dramatic shaping can make the bookmark bulky or cause it to curl.
Maintain relaxed, even tension while working the crochet bookmark body. Extremely tight stitches may make the strip rigid, while very loose stitches can stretch and lose their shape. Cotton yarn is useful here because it generally produces a defined fabric that stays relatively flat. If your bookmark curls significantly, try using a slightly larger hook or reducing your tension.
Once the body reaches the desired length, FO while leaving a long sewing tail. Position one end underneath the mouse head and sew it securely in place. Pass the needle through several stitches on both the head and body so the connection can withstand repeated handling. Keep the seam as flat as possible, especially if part of the head will rest close to the book’s pages.
At this stage, place the unfinished bookmark inside a book to evaluate the proportions. The mouse head should remain near or outside the top edge while most of the flat body lies between the pages. This quick test is valuable because you can still adjust the body length before adding the final details. A functional handmade crochet bookmark should look attractive without interfering with normal reading.
Making Mouse Ears, Paws, and a Crochet Tail
The ears give this Crochet mouse bookmark pattern much of its personality. Make two ears using the main color or pink yarn. Begin each ear with an MR and work 6 SC into the ring. Round 2: work 2 SC into every ST for 12 STS. SL ST to the first stitch and FO, leaving a long tail for sewing. You can leave the ears as small circles or gently fold the lower portion before attaching them.
Position the ears symmetrically on either side of the head. Before sewing, secure them temporarily with stitch markers and check the placement from the front. Small changes in ear position can dramatically change the expression of the mouse. Once satisfied, sew around the lower edge of each ear using small stitches and weave the yarn tails securely into the head.
For optional front paws, CH 5 with the main color. Beginning in the second CH from the hook, work SL ST, SC, SC, and HDC. FO and leave a sewing tail. Make a second identical piece. Sew the paws near the point where the head meets the flat bookmark body. Keeping them small prevents the design from becoming too thick.
The crochet mouse tail can be made in several ways. For the simplest version, attach the main yarn to the lower end of the bookmark body and CH approximately 30–40. Beginning in the second chain from the hook, work SL ST loosely into every chain. This reinforces the tail while keeping it thin and flexible.
For a slightly curled tail, work SC instead of SL ST and occasionally place 2 SC into one chain. The extra stitches naturally encourage the tail to curve. Do not increase in every chain unless you want a tightly curled spiral. A gentle curve often looks more natural and remains practical when the bookmark is used inside a book.
After completing the tail, FO and carefully weave in the end. Test the bookmark again by placing it between several pages. The head can peek from the top while the tail extends from the bottom, creating the playful impression that a little crocheted mouse has become trapped inside the book. This combination of functionality and personality is what makes the Crochet mouse bookmark pattern especially enjoyable.
Adding the Face, Finishing Details, and Customizing the Pattern
A few simple facial details can transform the finished crochet shape into an expressive mouse. Use dark embroidery yarn to create two tiny eyes. Small embroidered stitches are generally preferable for a bookmark because they remain flat. Position the eyes evenly and avoid pulling the embroidery thread too tightly, which could distort the shape of the head.
For the nose, use pink, brown, or black yarn and make several small stitches at the pointed end of the muzzle. A tiny triangular nose works particularly well. You can also embroider a short line underneath to suggest a mouth. Keep these features minimal because small details often look cleaner on compact crochet projects.
Whiskers are optional but can add character. Use thin embroidery thread and make short stitches extending from both sides of the muzzle. Avoid excessively long or loose whiskers because they may catch on pages or other objects. When the crochet mouse bookmark is intended for frequent use, practical finishing is just as important as appearance.
Check every yarn tail before considering the project complete. Weave each tail through several nearby stitches and change direction at least once before trimming. Pay special attention to the ears, paws, head connection, and tail. These areas receive the most movement during regular use, so careful finishing improves durability.
Color customization offers endless possibilities. A classic gray mouse with pink ears creates a familiar look, while brown, cream, white, or beige produces softer variations. You can even create colorful mice using blue, purple, yellow, or variegated yarn. The Crochet mouse bookmark pattern can also be personalized by adding a tiny bow, miniature flower, contrasting ear centers, or embroidered initials.
Blocking can help the long body remain flat. Lightly dampen the bookmark according to the care instructions for your chosen yarn, gently shape the body, and allow it to dry flat. Avoid aggressive stretching. Once dry, the stitches should look more even and the bookmark should sit comfortably between pages without significant curling.
FAQ About the Crochet Mouse Bookmark Pattern
Is the Crochet mouse bookmark pattern suitable for beginners?
Yes. The project uses basic crochet techniques such as chains, single crochet, slip stitches, increases, and decreases. Beginners who already understand these stitches should be able to follow the construction. The small size also makes it a manageable project for practicing shaping and assembly.
What is the best yarn for a crochet mouse bookmark?
Lightweight cotton or cotton-blend yarn is an excellent option because it provides good stitch definition and creates a relatively thin fabric. DK and sport-weight yarns are particularly useful. Very bulky yarn is generally less suitable because it can create a bookmark that is too thick for comfortable use.
How long should the bookmark be?
Approximately 7–9 inches works for many books, but there is no single required measurement. Consider the books you normally read and adjust the flat body accordingly. You can make a shorter bookmark for small paperbacks or extend the body for larger books.
Should I stuff the mouse head?
Stuffing is optional. If you want a slightly dimensional mouse head, use only a very small amount. If you want the entire project to remain extremely flat, leave the head unstuffed. The bookmark will still be recognizable once the ears, nose, eyes, and tail are added.
How do I keep the bookmark from curling?
Maintain relaxed tension and avoid using a hook that is too small for your yarn. Cotton yarn can help create a stable fabric. Gentle blocking after completion can also flatten minor curling and improve the overall appearance.
Can I make the entire mouse flat instead of crocheting the head in rounds?
Yes. A flat mouse head can be created as a circle or oval and attached to the body. This variation can make the finished bookmark even thinner. The dimensional head described in this tutorial provides more character, while a flat version emphasizes practicality.
Can I change the size of the mouse?
Absolutely. Use thinner yarn and a smaller hook for a miniature mouse or slightly thicker yarn for a larger version. Remember that increasing yarn thickness also increases bookmark thickness, so avoid making the section that sits between pages unnecessarily bulky.
How can I make the mouse tail curl?
When crocheting back along the foundation chain, occasionally work two stitches into the same chain. These controlled increases encourage the tail to curve. For a subtle curl, space the increases several stitches apart.
Why does my mouse head look uneven?
Uneven shaping often comes from missed increases, incorrect stitch counts, or inconsistent tension. Count your stitches at the end of each round and use a stitch marker to identify the beginning. This makes it easier to maintain symmetrical shaping.
Can I use leftover yarn for this project?
Yes. This small crochet project is particularly suitable for leftover yarn because it requires relatively little material. Just make sure the yarn used for the main body is comfortable, flexible, and not excessively thick.
Can the bookmark be washed?
That depends on the fiber content of your yarn. Follow the care instructions associated with the yarn you used. Gentle washing and flat drying are usually suitable for many handmade crochet accessories, but individual fibers may require different treatment.
Are safety eyes suitable for this project?
Embroidered eyes are generally more practical for a bookmark because they remain flat. Plastic safety eyes create additional thickness and may press against pages. Embroidery also allows you to create different expressions without adding hard components.
How do I make the bookmark more durable?
Use strong yarn, maintain consistent tension, securely sew all attached pieces, and carefully weave in every yarn tail. Reinforcing the connection between the head and body is particularly important because this area is frequently handled when moving the bookmark.
Can I add other details to the mouse?
Yes. Tiny bows, flowers, contrasting ears, embroidered cheeks, small patches of color, or a decorative tail can personalize the design. Keep embellishments lightweight and secure so the finished bookmark remains functional.
How long does a crochet mouse bookmark take to make?
The time varies according to experience and the amount of decoration. An experienced crocheter may complete a simple version relatively quickly, while beginners may prefer to work more slowly and carefully. Because the project is small, it is convenient for shorter crochet sessions.
Conclusion
The Crochet mouse bookmark pattern combines basic crochet skills with a creative design that can make reading a little more playful. Throughout this tutorial, you learned how to choose suitable lightweight yarn, understand the crochet stitch key, shape a small mouse head with increases and decreases, and create a long flat body that fits comfortably between book pages.
You also learned how to crochet and attach the mouse ears, optional paws, and a flexible crochet mouse tail. Simple embroidery techniques were used for the eyes, nose, mouth, and optional whiskers, helping the mouse develop personality without adding unnecessary bulk. Careful sewing and weaving of yarn ends were also emphasized because good finishing makes a significant difference in both appearance and durability.
The Crochet mouse bookmark pattern is ultimately a small project with plenty of room for creativity. It can help beginners practice essential techniques while giving more experienced crocheters an enjoyable way to use leftover yarn and experiment with personalized details. If you make your own crochet mouse bookmark, please leave your sincere opinion about the pattern and share your suggestions. What would you change, which colors would you choose, and what creative detail would you add to your little mouse? Your ideas can inspire even more charming variations of this practical handmade project.