
Crochet chicken bookmark pattern is a charming handmade project that combines practical reading accessories with the playful personality of a little crochet chicken.
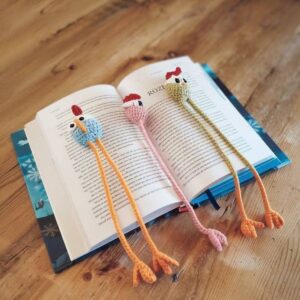
One of the best features of this Crochet chicken bookmark pattern is how easily it can be customized. Traditional chickens can be recreated with white, cream, brown, black, or golden yarn, while brighter colors can give the project a cheerful and modern appearance.
This tutorial is designed to make the crochet chicken bookmark approachable even if you have never crocheted a bookmark before. You should already feel comfortable making chains and basic crochet stitches, but the instructions explain the construction process carefully so you can understand how each section contributes to the finished design. Stitch counts are included as a practical starting point, although minor adjustments may be necessary depending on yarn weight, hook size, and personal tension. The objective is to create a bookmark that is flat enough to sit comfortably inside a book while still having enough texture to showcase the handmade chicken character. Prepare your yarn, crochet hook, tapestry needle, and scissors, and you can begin creating this fun little reading companion.
Materials, Crochet Abbreviations, and Preparation
For this Crochet chicken bookmark pattern, choose a lightweight yarn that produces a relatively flat fabric. DK or light worsted yarn works particularly well because it provides enough definition for the chicken without making the bookmark excessively thick. You will need approximately 20–30 yards of the main chicken color, plus small scraps of red, orange or yellow, and black yarn for the decorative features. Cotton yarn is an excellent choice because it creates defined stitches and usually holds its shape well.
Choose a crochet hook that matches your yarn while producing firm stitches. A 3.0 mm to 3.5 mm hook is a practical starting range for many lightweight yarns. You will also need scissors, a tapestry needle, and stitch markers if you prefer marking the beginning of rounds. For embroidered eyes, a small amount of black yarn is enough, eliminating the need for plastic pieces and helping the bookmark remain relatively flat.
The crochet abbreviations used throughout the pattern are: ch = chain, sl st = slip stitch, sc = single crochet, hdc = half double crochet, dc = double crochet, inc = increase by working two stitches into the same stitch, and dec = decrease by combining two stitches into one. The notation [ ] indicates the instructions that should be repeated or followed for the specified section. Understanding these basic terms before beginning will make the pattern much easier to follow.
Gauge is not extremely strict for a decorative bookmark, but consistent tension is important. Your stitches should be firm enough to prevent large spaces from forming while remaining flexible enough for the bookmark to lie naturally between pages. If your fabric feels stiff and difficult to bend, try using a slightly larger hook. If it looks loose or bulky, move down one hook size.
A useful finished size for the chicken body is approximately 2.5 to 3 inches wide, with a bookmark strip measuring around 7 to 9 inches long. These dimensions are only guidelines. The crochet bookmark pattern can easily be adapted for different book sizes by adding or removing rows from the long strip. Keep the chicken relatively small so it does not become heavy or awkward when placed inside a book.
Before beginning, decide on your color combination. A white chicken with a red comb and yellow beak creates a classic farmhouse appearance, while brown, beige, or speckled yarn can produce a rustic look. More imaginative combinations are equally welcome. Pink, blue, green, or multicolored chickens can turn the project into a playful handmade gift, especially for children, teachers, book lovers, and crochet enthusiasts.
How to Crochet the Chicken Body and Head
Begin the main section of the Crochet chicken bookmark pattern with the chicken body. Using your main color, make a magic ring. Round 1: [6 sc into magic ring] (6). Pull the ring closed carefully. Round 2: [inc in each stitch around] (12). The circle will begin expanding and will form the central portion of the chicken.
Continue shaping the body with Round 3: [(sc, inc) repeat around] (18). For Round 4: [(2 sc, inc) repeat around] (24). At this stage, the circle should remain reasonably flat. If it begins curling significantly, check that you have completed the correct number of increases. The growing circle creates a simple rounded chicken body that will remain decorative without becoming too bulky.
For Round 5: [(3 sc, inc) repeat around] (30). If you want a larger chicken, one additional increase round can be added using [(4 sc, inc) repeat around] (36). However, keeping the chicken compact is usually preferable for a bookmark. Finish with a slip stitch and leave a long tail for later assembly or edging.
The head can be integrated into the upper portion of the body instead of being made as a heavily stuffed separate piece. Attach the main yarn near the upper edge and work [ch 1, 6 sc across selected body stitches, turn]. For the next row, work [ch 1, dec, 2 sc, dec, turn] (4). Finish with [ch 1, dec twice] (2) and fasten off. This small extension gives the chicken a recognizable head shape while keeping the design flat.
Now create the beak using yellow or orange yarn. Attach the yarn near the center side or front of the head and work [ch 3, sl st in second ch from hook, sc in next ch]. Slip stitch back into the head and fasten off. Alternatively, the beak can be embroidered with several small stitches if you prefer an even flatter finished bookmark.
For the eyes, use black embroidery yarn or a strand of thin black yarn. Make one or two tiny stitches on each visible side of the head, depending on how your chicken is positioned. Avoid creating oversized knots because thick details can press against book pages. Small embroidered eyes maintain the lightweight character of this handmade crochet bookmark while giving the chicken a friendly expression.
Creating the Bookmark Strip, Wings, Comb, and Details
The long strip is what transforms a small crochet chicken into a functional Crochet chicken bookmark pattern. Attach your main yarn to the bottom center of the chicken body. Row 1: [ch 1, 4 sc across] (4). Turn the work. Row 2: [ch 1, sc in each stitch across] (4). Continue repeating Row 2 until the strip measures approximately 7 to 9 inches, or reaches your preferred bookmark length.
Keep the strip narrow because a wide crochet section can add unnecessary thickness between book pages. Four single crochet stitches generally create a practical width, although three stitches can be used with thicker yarn. Maintain consistent tension throughout the rows so the bookmark does not twist. When the desired length is reached, fasten off securely and weave the yarn tail into the back of the fabric.
Next, make two small wings. Using the chicken’s main color or a contrasting shade, [ch 5, sc in second ch from hook, hdc in next ch, dc in next ch, 3 dc in final ch]. Continue along the opposite side of the foundation chain with [dc, hdc, sc], then finish with a slip stitch. This creates a small oval or feather-like shape. Make a second wing in the same manner.
Position the wings on either side of the chicken body and sew them in place with a tapestry needle. Sew mainly around the upper portion of each wing, leaving the lower edge slightly free if you want a subtle three-dimensional effect. For a flatter bookmark, stitch the entire wing securely against the body. Both methods work well, so the choice depends on your preferred appearance.
To create the red comb, attach red yarn to the top of the chicken’s head. Work [ch 3, sl st into same base stitch, ch 4, sl st into next stitch, ch 3, sl st into next stitch]. These small chain loops form the characteristic chicken comb. If the loops appear too large for your chicken, reduce each chain by one stitch.
A small wattle can be added beneath the beak using red yarn. Attach the yarn below the beak and work [ch 3, sl st back into the attachment point]. Fasten off and carefully hide the yarn ends. This tiny detail can dramatically improve the chicken’s recognizable appearance without adding much thickness to the finished crochet chicken bookmark.
You can also add feet or a decorative element to the end of the bookmark strip. For simple feet, attach orange yarn at the lower end and work [ch 4, sl st back toward the base] three times to create little toes. Another option is adding a small tassel. Keep any embellishments lightweight so they hang naturally outside the book without pulling excessively on the bookmark.
Assembly, Finishing, Customization, and Practical Tips
Once every component has been crocheted, inspect the entire Crochet chicken bookmark pattern before weaving in the final yarn tails. Make sure the chicken body lies flat, the strip hangs straight, and the wings are positioned evenly. Small adjustments are much easier before all yarn ends have been completely secured. Use the tapestry needle to reinforce any loose attachment points.
Weave each yarn tail through several stitches on the wrong side of the work. Change direction once or twice before trimming the yarn. This method helps prevent small pieces such as the comb, beak, and wings from loosening during regular handling. Avoid large knots whenever possible because they can create uncomfortable bumps between the pages of a book.
Blocking can improve the final appearance considerably. Lightly dampen the bookmark and gently arrange it on a flat surface. Straighten the long strip and shape the chicken body, wings, comb, and beak with your fingers. Allow the project to dry completely before using it. Always follow the care recommendations for the specific yarn fiber you selected.
One advantage of this easy crochet chicken bookmark is its flexibility. You can transform the basic pattern into several different chicken styles. A white body, yellow beak, and bright red comb creates a classic hen. Brown and cream yarn produces a farmhouse-inspired chicken, while black yarn combined with colorful details can create a bold modern version. Small embroidered spots can even imitate patterned feathers.
The bookmark can also become a thoughtful handmade gift. Pair it with a favorite book, journal, or notebook for birthdays, teacher appreciation gifts, reading clubs, holiday baskets, or small handmade surprises. Because the project uses relatively little yarn, several bookmarks can be made from leftover materials. Each chicken can have a different color scheme, making every finished piece feel unique.
Most importantly, prioritize function as well as appearance. A beautiful bookmark should still fit comfortably between pages. Avoid excessive stuffing, heavy beads, thick buttons, or bulky embellishments. Flat embroidery and lightweight crochet pieces are usually better choices. When finished carefully, this Crochet chicken bookmark pattern provides an appealing balance between decorative crochet and a practical everyday reading accessory.
Frequently Asked Questions About the Crochet Chicken Bookmark Pattern
Is the Crochet chicken bookmark pattern suitable for beginners?
Yes. The pattern mainly uses chains, slip stitches, single crochet, half double crochet, double crochet, increases, and decreases. Beginners who already understand these basic techniques should be able to complete the project with patience.
What is the best yarn for a crochet chicken bookmark?
Cotton or cotton-blend yarn is particularly useful because it provides clear stitch definition and good structure. Lightweight acrylic yarn can also work. DK or light worsted yarn is generally preferable to very bulky yarn because bookmarks should remain relatively thin.
What crochet hook size should I use?
A hook between approximately 3.0 mm and 3.5 mm works well with many lightweight yarns. However, always consider your yarn label and personal tension. The goal is to create firm, neat stitches without producing an excessively stiff fabric.
How long should the bookmark strip be?
Approximately 7 to 9 inches works for many books. You can customize the length by simply repeating the strip row until it fits the books you plan to use. For smaller notebooks, make it shorter; for larger books, add additional rows.
Can I make the chicken body smaller?
Absolutely. Stop the increase rounds earlier to create a smaller body. For example, you can stop after reaching 24 stitches instead of continuing to 30. Remember to reduce the size of the wings, head details, and comb proportionally.
Does the chicken need stuffing?
No. For this crochet bookmark pattern, keeping the chicken flat is usually more practical. Stuffing can make the bookmark bulky and may place unnecessary pressure on book pages. The flat construction also makes the project quicker to complete.
Can I use safety eyes instead of embroidered eyes?
Embroidered eyes are recommended because they remain flatter. Safety eyes can create hard raised areas that are less suitable for something placed inside a closed book. Small embroidered stitches provide expression while preserving functionality.
How can I stop the bookmark strip from curling?
Consistent tension is important. If the strip curls significantly, your stitches may be too tight. Try relaxing your tension or moving to a slightly larger hook. Gentle blocking after completion can also help straighten the strip.
Can this pattern be turned into other farm animals?
Yes. The basic round body and long bookmark construction can inspire other designs. By changing the ears, facial features, colors, and decorative elements, you can experiment with different animal-themed bookmarks while maintaining the same practical structure.
How much yarn is needed for one bookmark?
The project uses a relatively small amount. Around 20–30 yards of the main color is generally enough for many versions, along with scraps for the comb, beak, eyes, and other details. Exact quantities depend on yarn weight, hook size, tension, and finished dimensions.
Can I wash the finished crochet bookmark?
That depends on the fiber used. Many cotton and acrylic yarns can be gently hand washed, but you should always follow the yarn manufacturer’s care instructions. Reshape the bookmark after washing and allow it to dry flat.
How can I make my Crochet chicken bookmark pattern look more professional?
Use consistent tension, carefully hide all yarn ends, keep facial embroidery symmetrical, and block the finished piece. Clean finishing often makes a bigger difference than adding extra decorations. Keeping the design simple and balanced can produce a polished handmade result.
Conclusion
The Crochet chicken bookmark pattern is a creative way to combine crochet, reading, and a charming farm-inspired design in one practical project. Throughout this tutorial, you learned how to choose suitable yarn and hook sizes, understand the essential crochet abbreviations, construct a flat circular chicken body, shape the head, and create a long narrow strip that functions as the actual bookmark.You also learned how to make small wings, a beak, embroidered eyes, a red comb, a wattle, and optional feet or decorative details. These simple elements transform basic crochet shapes into a recognizable little chicken while keeping the finished project thin enough to use comfortably inside a book.
Remember that the measurements and colors are flexible. You can make your handmade chicken bookmark longer, shorter, smaller, brighter, or more traditional depending on your personal style. Experimenting with yarn colors and small embroidered details is one of the easiest ways to make each bookmark unique.This project is also a practical opportunity to use leftover yarn while practicing increases, decreases, shaping, embroidery, and neat assembly. Whether you create one bookmark for yourself or several as handmade gifts, careful finishing will help each chicken look polished and remain durable through regular use.
After completing your Crochet chicken bookmark pattern, place it inside your favorite book and check how comfortably it sits between the pages. If necessary, use what you learned to adjust the width, length, or thickness of your next version. Crochet projects often become even better through small personal adjustments.If you make this crochet chicken bookmark, please leave your sincere opinion about the pattern and share your suggestions. Which colors would you choose for your chicken? Your ideas, experiences, and creative variations can inspire new ways to personalize this fun crochet bookmark pattern and make every little chicken completely unique.