
Crochet Cutlery Holder Pattern is a charming handmade project that can transform an ordinary table setting into something warm, decorative, and personal.
One of the best features of this Crochet Cutlery Holder Pattern is how easily it can be customized. Cotton yarn in neutral shades can create an elegant farmhouse appearance, while brighter colors can make the holders suitable for birthdays, summer parties, or casual family dinners.
The pattern below focuses on creating a rectangular crochet pocket that is large enough for standard cutlery while remaining compact enough to sit comfortably beside or directly on top of a dinner plate. The finished size can be adjusted depending on your utensils, yarn thickness, and preferred presentation. Beginners should read through the entire pattern before starting because understanding the construction makes each stage easier to follow. Throughout this tutorial, you will learn the basic crochet abbreviations, how to create the foundation, how to build the front and back sections, how to assemble the pocket, and how to finish the edges neatly. By the end, you should have all the information needed to make one holder or an entire coordinated table set.
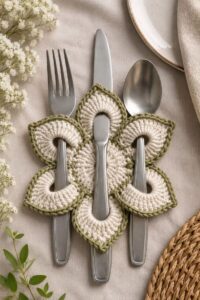
Materials, Crochet Key, and Preparation for the Crochet Cutlery Holder Pattern
For this Crochet Cutlery Holder Pattern, cotton yarn is an excellent choice because it produces defined stitches and generally creates a sturdy fabric. Approximately 30–45 yards of medium-weight cotton yarn should be enough for one holder, although the exact amount depends on your gauge, hook size, and finished dimensions. If you plan to make a complete set, purchasing yarn from the same dye lot can help keep the colors consistent. A 4.0 mm to 4.5 mm crochet hook is a practical starting point for medium-weight cotton yarn.
You will also need scissors, a yarn needle, and a measuring tape. Stitch markers are optional but helpful, especially when counting rows or marking assembly points. Before beginning the main piece, measure the utensils you intend to place inside the holder. A useful finished measurement is approximately 4 inches wide by 8 inches tall, but this should be considered a flexible guideline rather than a fixed requirement.
The crochet key for this project uses common US crochet terminology: ch = chain, sc = single crochet, hdc = half double crochet, sl st = slip stitch, st = stitch, sts = stitches, FO = fasten off, and rep = repeat. The main body can be worked almost entirely in single crochet, making the pattern especially suitable for beginners. Half double crochet can optionally be used for decorative sections or borders.
To make a chain stitch (ch), create a slip knot, place it on the hook, yarn over, and pull the yarn through the loop already on the hook. To make a single crochet (sc), insert the hook into the selected stitch, yarn over, pull up a loop, yarn over again, and pull through both loops. Single crochet creates a compact fabric that works particularly well for a cutlery pocket because utensils are less likely to push through large openings.
Gauge does not need to be as exact as it would be for fitted clothing, but it still matters. A holder that is crocheted too loosely may stretch excessively, while very tight stitches can create a stiff fabric that curls. Try making a small swatch first. Your stitches should feel firm and structured without becoming difficult to work into. Adjust your hook size slightly if necessary.
Before starting multiple holders, complete one crochet cutlery holder from beginning to end and test it with your actual utensils. Place a fork, spoon, and knife inside and check whether the pocket is wide enough and deep enough. Making adjustments at this stage is much easier than discovering a sizing problem after completing an entire set.
Step-by-Step Crochet Instructions for the Main Holder
Begin the Crochet Cutlery Holder Pattern with ch 17 using your chosen yarn. This starting chain should create a piece approximately 4 inches wide with medium-weight yarn, although individual tension varies. If you need additional width, add chains until the foundation measures slightly wider than your group of utensils. Remember that the final edging may add a small amount of extra width.
For Row 1, work 1 sc in the second ch from the hook, then work 1 sc in each remaining chain across. You should have 16 sc at the end of the row. Ch 1 and turn. For Row 2, work 1 sc in each st across, ch 1, and turn. Keep your tension consistent and avoid pulling the turning chain too tightly.
Continue repeating Row 2 until the rectangle measures approximately 8 inches long. Depending on your yarn and tension, this may require roughly 34–40 rows. Rather than relying exclusively on the row count, use your measuring tape because different crocheters can produce noticeably different row heights. This rectangle will become the main foundation of the handmade cutlery holder.
Once the rectangle reaches the desired length, fasten off and leave a tail long enough to weave in comfortably. Lay the piece flat and inspect the edges. If the rectangle appears slightly uneven, gently shape it with your hands. Minor irregularities are normal in handmade crochet and can often be improved later during blocking and edging.
Next, crochet the front pocket. Ch 17, then repeat the same first row: work 1 sc in the second ch from the hook and 1 sc in each ch across (16 sc). Ch 1 and turn. Continue working 16 sc across each row until the pocket measures approximately 4½ to 5 inches tall. This creates enough depth to secure the utensils while allowing their handles or decorative ends to remain visible.
Place the smaller rectangle over the bottom portion of the larger rectangle. Align the bottom and side edges carefully. The upper edge of the smaller piece should remain open because this is where the utensils will be inserted. At this stage, place your fork, knife, and spoon inside temporarily. If they fit comfortably without stretching the pocket dramatically, you are ready to assemble the two pieces.
Assembling, Edging, and Customizing the Crochet Cutlery Holder
Thread a yarn needle with a matching strand of yarn or use your crochet hook to join the pieces directly. Starting at one upper corner of the pocket, work single crochet stitches evenly down the first side, across the bottom, and up the opposite side, passing through both layers. Do not crochet across the top opening. This joining method creates a clean decorative seam while simultaneously strengthening the pocket.
At each bottom corner, you may work 2 sc in the corner stitch to help the edging turn smoothly. Continue keeping the front and back layers aligned as you crochet. Avoid pulling the joining stitches too tightly because this can cause the holder to curve. When you reach the opposite upper corner of the pocket, fasten off securely and weave in the yarn tail.
For a more finished appearance, add an edging around the exposed upper section of the back panel. Attach the yarn near one upper side and work evenly spaced sc around the remaining outer edge. A simple single crochet border complements the dense texture of the holder without distracting from the utensils. For a slightly more decorative result, you can substitute reverse single crochet or a small picot-style edge.
Color customization is one of the easiest ways to adapt this Crochet Cutlery Holder Pattern for different occasions. Neutral cream, beige, gray, and natural cotton shades create a timeless appearance. Autumn holders can combine rust, mustard, brown, and forest green. Holiday versions can feature deep red, white, green, or metallic-inspired yarn accents, while spring tables can use lavender, pale yellow, pink, and soft green.
You can also incorporate simple stripes while making the main rectangle. For example, work several rows in your primary color, change yarn for two rows, and then return to the original shade. When changing colors, complete the final yarn-over of the previous stitch with the new yarn. This creates a cleaner transition and helps the stripes appear intentional and professionally finished.
Small crochet decorations can personalize the holder even further. A tiny flower, leaf, heart, pumpkin, star, or bow can be sewn onto the front pocket. Keep embellishments positioned away from the opening so they do not interfere with inserting the utensils. For a coordinated handmade table setting, match these decorative elements with napkins, placemats, table runners, or other crochet accessories.
Finishing Techniques, Care, and Ideas for Using Your Crochet Cutlery Holders
Once the crochet work is complete, carefully weave in every loose yarn end using a yarn needle. Pass the yarn through several stitches on the wrong side, change direction, and pass through a few more stitches before trimming the excess. Properly secured ends are especially important for reusable table accessories because they may be handled and washed frequently.
Blocking can noticeably improve the finished appearance of your Crochet Cutlery Holder Pattern. Check the yarn label for care instructions first. For washable cotton, lightly dampen the holder, gently shape it into an even rectangle, and allow it to dry flat. Avoid overstretching the crochet fabric. The goal is simply to straighten the edges and encourage the stitches to settle evenly.
Before using the finished holder, insert your cutlery again and evaluate the fit. The utensils should slide into the pocket without excessive resistance while remaining secure enough that they do not immediately fall out. If the opening feels slightly loose, a short row of slip stitches along the inside edge can sometimes add structure without significantly changing the appearance.
For a coordinated dinner table, make one crochet cutlery holder for each place setting. Repeating the same yarn color creates a formal, unified arrangement, while using several complementary colors produces a relaxed handmade style. You could also make each holder in a different shade from the same color family, creating a subtle gradient around the table.
These holders can also make thoughtful handmade gifts. A set of four or six can be bundled with fabric napkins or placed inside a reusable basket. Because the design is practical rather than purely decorative, recipients can use the pieces for family dinners, celebrations, picnics, and seasonal gatherings. Handmade table accessories are particularly appealing because even a relatively small crochet project can noticeably change the presentation of a meal.
When caring for your finished pieces, follow the washing instructions provided for your yarn. Cotton holders are often washable, but temperature and drying recommendations vary between manufacturers. Reshape the pieces after washing and allow them to dry thoroughly before storing. Keeping them flat rather than tightly folded can help preserve their rectangular shape and neat edges.
Frequently Asked Questions About the Crochet Cutlery Holder Pattern
Is the Crochet Cutlery Holder Pattern suitable for beginners?
Yes. This pattern primarily uses chain stitches and single crochet, two fundamental techniques that beginners commonly learn first. The rectangular construction also means there is very little complicated shaping involved.
What is the best yarn for a crochet cutlery holder?
Cotton yarn is a practical option because it offers good stitch definition and can create a firm, durable fabric. Medium-weight cotton is particularly convenient for this project because it provides enough structure without making the holder excessively bulky.
How much yarn do I need for one holder?
Approximately 30–45 yards should be sufficient for many medium-sized holders. However, yarn consumption changes according to stitch tension, hook size, dimensions, edging, and embellishments.
What size should a crochet cutlery holder be?
A useful starting measurement is approximately 4 inches wide and 8 inches tall, with a front pocket around 4½ to 5 inches deep. Always measure your own utensils before committing to these dimensions because cutlery sizes can vary.
Can I make the holder wider?
Absolutely. Add additional foundation chains to increase the width. The important point is to maintain the same stitch count on every subsequent row so that the sides remain straight.
Can I use half double crochet instead of single crochet?
Yes, but half double crochet produces a slightly taller and often more flexible stitch. If you substitute it throughout the project, you may need fewer rows to reach the required length. Single crochet is recommended when you want a particularly dense and structured pocket.
How do I stop the sides from becoming uneven?
Count your stitches after every row, especially while learning the pattern. Accidentally skipping the first or last stitch is one of the most common reasons crochet rectangles gradually become narrower.
Why is my crochet holder curling?
Curling can result from tight tension, a hook that is too small, or uneven stitches. Try relaxing your tension or moving up slightly in hook size. Gentle blocking after completion can also help straighten minor curling.
Can these holders be made for Christmas or other holidays?
Yes. The basic Crochet Cutlery Holder Pattern is easy to adapt for seasonal decorating. Change the yarn colors and add small flat embellishments that represent the occasion. Pumpkins can work for autumn, stars for celebrations, flowers for spring, and festive color combinations for holiday dinners.
Can I make reusable holders for everyday meals?
Definitely. Choose durable washable yarn and avoid delicate decorations if the holders will be used frequently. A simple single crochet version can be practical enough for regular family meals while still adding handmade character to the table.
How can I make the finished project look more professional?
Consistent tension makes one of the biggest differences. Count stitches carefully, keep the edges straight, weave in yarn ends securely, and finish with an even border. Blocking the completed holder can also make the rectangle appear cleaner and more symmetrical.
Can I adjust this pattern for larger serving utensils?
Yes. Measure the widest utensil or group of utensils first, then increase the foundation chain accordingly. You can also increase the height of both the back panel and front pocket. The same basic construction method works even when the dimensions change.
Conclusion
The Crochet Cutlery Holder Pattern is a simple way to combine practical crochet with attractive table decoration. Throughout this tutorial, you learned how to choose appropriate materials, understand the crochet stitch key, create a foundation chain, work consistent single crochet rows, construct the main rectangle and front pocket, assemble the pieces, and add a clean finishing border. These techniques can be reused in many other small crochet projects, making the holder useful not only as a finished item but also as a way to practice essential skills.The most important part of achieving a neat result is paying attention to measurements and stitch counts. Beginning with ch 17 and working 16 sc across provides a practical starting point, but the pattern is intentionally flexible. Your utensils, yarn, crochet hook, and personal tension may require adjustments. Measuring the project while you work is therefore more reliable than depending entirely on a predetermined number of rows.You also learned several ways to personalize a handmade crochet cutlery holder, including color changes, stripes, decorative borders, and small crochet embellishments. The same basic pattern can be transformed into an everyday accessory, an elegant neutral table decoration, or a colorful seasonal piece simply by changing the yarn and finishing details.
Whether you make one holder as a practice project or create a complete set for your dining table, this pattern offers plenty of room for creativity. If you try this Crochet Cutlery Holder Pattern, leave your sincere opinion about the project and share any suggestions you may have. Your ideas about colors, stitch variations, sizes, and decorative details can inspire even more creative versions of this useful crochet pattern.