
Ocean-themed crochet bracelet pattern is a charming handmade project that brings the relaxing colors and playful details of the sea into a lightweight accessory you can wear throughout the year.
One of the biggest advantages of making an ocean-themed crochet bracelet is the freedom to experiment with yarn colors and combinations.
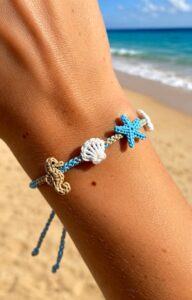
This Ocean-themed crochet bracelet pattern is designed around simple construction rather than complicated shaping. The foundation is a narrow crocheted band that wraps comfortably around the wrist, followed by decorative stitches and optional miniature ocean details. Beginners can create a basic version using chains, single crochet, slip stitches, and double crochet, while more experienced makers can add textured waves, tiny shells, miniature starfish-inspired shapes, or layered decorative edging. Throughout the tutorial, stitch counts are treated as a guide because wrist measurements and yarn thickness can vary. Taking a quick measurement before beginning will produce a much better fit than relying on a universal number of stitches. By the end of the project, you will have a flexible handmade accessory and a useful foundation that can be adapted into many different crochet bracelet patterns.
Materials, Crochet Key, and Sizing for the Bracelet
Before starting your Ocean-themed crochet bracelet pattern, gather lightweight cotton yarn in two or three ocean-inspired colors. For a delicate bracelet, crochet thread or fingering-weight cotton works particularly well. Sport-weight cotton can be used when you want a slightly wider and more visible accessory. Approximately 10 to 20 yards of yarn is usually enough for a basic bracelet, although decorative motifs may require small additional amounts. You will also need a crochet hook appropriate for your chosen yarn, scissors, a yarn needle, and a removable stitch marker. A small button is optional if you prefer a traditional button closure.
The main crochet abbreviations used in this pattern are straightforward. CH means chain, SL ST means slip stitch, SC means single crochet, HDC means half double crochet, DC means double crochet, and ST means stitch. When the instructions say CH 1, make one chain stitch. When they say SC across, work one single crochet into each available stitch until reaching the opposite end. Understanding these basic terms before beginning will make the instructions much easier to follow.
For the foundation, measure comfortably around the wrist without pulling the measuring tape too tightly. The finished bracelet should sit securely while still allowing normal movement. Crochet a foundation chain approximately 0.5 inch shorter than the wrist measurement because crochet fabric often stretches slightly. As an example, you might begin with approximately CH 30–38 using fingering-weight yarn, but your exact count should always be based on your gauge and wrist size rather than the example alone.
After creating the chain, place it gently around the wrist to check the approximate length. Remember that the closure will add a small amount of additional space. If the chain feels excessively loose, remove several chains before continuing. If it feels too short, add chains until the fit improves. Spending a minute checking the foundation can prevent having to unravel the completed crochet ocean bracelet later.
For a neat and firm foundation row, work SC in the second CH from the hook, then SC in each CH across. Keep the tension consistent without making the stitches extremely tight. The bracelet needs enough structure to support decorative details, but it should remain flexible. At the end of the row, CH 1 and turn. This creates the simple base that will support the wave-inspired texture in the following rows.
Color selection plays an important role in the ocean theme. Try a turquoise foundation with white edging to suggest breaking waves, or use deep navy with seafoam green for a more dramatic coastal look. Another attractive combination is aqua, cream, and coral. The important principle is contrast: using at least one lighter or darker accent color helps the decorative stitches stand out and makes the handmade crochet bracelet visually interesting.
Step-by-Step Ocean Wave Crochet Bracelet Pattern
Once the foundation row is complete, begin creating the body of the Ocean-themed crochet bracelet pattern. For Row 2, work CH 1, SC in each ST across, then turn. This uncomplicated row strengthens the bracelet and establishes an even surface. Count your stitches before continuing because accidentally skipping the first or last stitch can cause the bracelet to narrow gradually. Maintaining the original stitch count keeps both edges straight.
For Row 3, introduce a gentle wave texture. Work CH 1, then repeat a sequence of SL ST in the next ST, SC in the next ST, HDC in the next ST, DC in the next ST, HDC in the next ST, SC in the next ST. Repeat this sequence as evenly as your stitch count allows. The changing stitch heights create subtle rises and dips that resemble moving ocean water. Finish any remaining stitches with SC and turn.
For Row 4, return to a stabilizing row by working CH 1 and SC across. This helps flatten the decorative wave pattern and gives the bracelet a comfortable underside. If you are using multiple colors, this is a good place to switch from turquoise to white or seafoam green. To make a clean color change, complete the final pull-through of the last stitch using the new yarn color.
A narrow bracelet may already be wide enough after three or four rows. If you prefer a wider crochet bracelet, repeat Rows 3 and 4 once more. Keep in mind that additional rows will make the accessory more noticeable and provide more room for decorative motifs. A finished width of approximately 0.5 to 1 inch works well for many designs, although there is no strict requirement. Personal comfort should determine the final width.
Next, create a clean border along the bracelet. With your contrasting yarn, attach the yarn at one corner and work SL ST evenly around the outer edge. Place approximately one slip stitch into each stitch across the long sides and distribute stitches carefully along the short ends. Avoid overcrowding the corners because too many stitches can cause the fabric to ripple. This border gives the ocean-inspired crochet accessory a polished appearance while reinforcing the edges.
Before adding embellishments, weave in any loose yarn ends using a yarn needle. Pass each end securely through several stitches on the wrong side of the bracelet and trim the excess carefully. Avoid simply cutting yarn close to a knot because normal movement can loosen unfinished ends over time. Good finishing techniques are especially important for wearable crochet projects that experience regular stretching and handling.
Adding Ocean Details, Shells, Waves, and a Secure Closure
The simplest decoration for this Ocean-themed crochet bracelet pattern is a contrasting wave edge. Attach white yarn to one long edge and work SL ST, SC, HDC, DC, HDC, SC repeatedly across the bracelet. This sequence creates small rolling curves reminiscent of ocean waves. If the edging becomes too pronounced, replace the DC with HDC. For stronger waves, use a taller DC stitch at the center of each repeat.
A miniature shell-inspired embellishment can be created directly along the edge. Insert the hook into your chosen stitch and work 5 DC into the same ST, skip one stitch, and secure the shell with SL ST in the next ST. Repeat only a few times rather than covering the entire bracelet unless you want a highly textured result. Cream or pale pink yarn can give these decorative sections the appearance of tiny seashells.
You can also crochet a tiny circular accent resembling a bubble or pearl. Make a magic ring, work 6 SC into the ring, and join with a SL ST. Fasten off while leaving a tail for sewing. Create two or three circles in different ocean colors and sew them onto the bracelet. These simple shapes add visual interest without making the accessory excessively bulky.
For a tiny starfish-inspired accent, begin with a magic ring and work 5 SC into the ring. Join with SL ST. For each small point, work CH 3, then SL ST into the second CH from the hook and SL ST into the next CH, followed by SL ST into the next base stitch. Repeat around until five small points are formed. Fasten off and sew the motif securely onto the bracelet using the yarn tail.
A button loop is one of the easiest closures for the crochet bracelet pattern. At one short end, attach the yarn and CH 5–8, depending on the button size. Join the chain back to the bracelet with SL ST to form a loop. Sew a small button securely to the opposite end. Test the closure before weaving in the yarn because you can easily increase or decrease the chain length if the loop is too tight or too loose.
If you prefer a bracelet without a button, crochet two ties instead. Attach yarn to one corner and CH 15–20, then SL ST back along the chain for extra strength. Repeat on the opposite corner or create matching ties on both short ends. The bracelet can then be tied comfortably around the wrist. This adjustable approach is particularly useful when making the Ocean-themed crochet bracelet as a handmade gift and the recipient’s exact wrist measurement is unknown.
Customization, Finishing Tips, and Creative Ocean Color Ideas
Customization is where the Ocean-themed crochet bracelet pattern becomes especially enjoyable. A tropical version could combine bright turquoise, coral, and cream, while a deeper ocean design might use navy blue, teal, and gray. For a soft coastal style, try pale aqua, sandy beige, white, and muted blue. These combinations allow the same basic pattern to produce completely different finished accessories without changing the crochet construction.
Yarn texture also affects the appearance of the bracelet. Smooth cotton provides crisp stitch definition and works especially well for miniature shell and starfish-inspired motifs. Mercerized cotton can create a slightly shinier finish that reflects light beautifully. If using thicker yarn, increase the hook size and reduce the number of foundation chains. Always base your starting chain on the actual wrist measurement rather than copying a fixed stitch count.
If the bracelet begins curling while you work, check your tension. Very tight stitches can pull the fabric inward, while too many edging stitches can create unwanted waves. Gentle blocking can improve the finished shape. Lightly dampen the bracelet, arrange it flat at the desired dimensions, and allow it to dry completely. Follow the care instructions recommended for the yarn fiber you selected.
The crochet ocean bracelet can also be turned into a coordinated handmade collection. Use the same yarn colors and wave sequence for anklets, bookmarks, bag decorations, keychain straps, or small decorative bands. Keeping the same color palette creates visual consistency across different projects. This is also an effective way to use small yarn remnants that might otherwise be too short for larger crochet projects.
When attaching decorative motifs, keep comfort in mind. Sew each embellishment firmly so that loose edges do not catch easily on clothing. Position larger decorations on the top of the wrist rather than underneath it. The inside surface should remain relatively smooth because this is the section that stays in contact with the skin. A beautiful handmade ocean bracelet should be attractive while still being comfortable enough for normal everyday movement.
Finally, inspect every part of the finished project before wearing or gifting it. Check that the button is secure, yarn ends are properly woven in, decorative motifs are firmly attached, and the closure opens and closes comfortably. Small finishing details can make a major difference in the overall quality of handmade accessories. Once everything is secure, your Ocean-themed crochet bracelet pattern is complete and ready to bring a small touch of seaside inspiration to your handmade collection.
Frequently Asked Questions About the Ocean-Themed Crochet Bracelet Pattern
Is the Ocean-themed crochet bracelet pattern suitable for beginners?
Yes. The basic bracelet uses beginner-friendly stitches including chain, slip stitch, single crochet, half double crochet, and double crochet. Someone who is still learning can skip the miniature motifs initially and make a simple striped bracelet with a wave border. The decorative elements can be added later as crochet confidence improves.
What yarn is best for a crochet bracelet?
Cotton yarn is an excellent option because it generally offers good stitch definition, durability, and a comfortable texture for small accessories. Fingering-weight or sport-weight cotton works particularly well for this project. Crochet thread can also be used when you want an especially delicate bracelet.
How much yarn do I need for one bracelet?
A bracelet uses relatively little yarn. Approximately 10 to 20 yards can be enough for many basic versions, although the amount depends on wrist size, yarn thickness, bracelet width, and the number of decorative elements. Small leftover yarn balls are often sufficient for contrasting shells, waves, and tiny motifs.
How do I make the crochet bracelet larger or smaller?
Adjust the foundation chain according to the wrist circumference. Instead of relying entirely on a specific chain count, crochet until the foundation is slightly shorter than the desired finished circumference, allowing room for the closure and natural stretch. Always test the chain around the wrist before beginning the body rows.
Can I make the bracelet without a button?
Absolutely. Crochet ties provide an easy adjustable alternative. Create chains at the short ends of the bracelet and tie them together around the wrist. You can also design a loop-style closure entirely from crochet, depending on the structure and stretch of your chosen yarn.
How can I make the wave effect more visible?
Increase the difference between the shortest and tallest stitches in the wave repeat. A sequence moving from SL ST to SC, HDC, and DC creates noticeable changes in height. Contrasting colors can make the effect even clearer. White waves against turquoise or navy yarn provide a classic ocean-inspired appearance.
Can I add beads to the Ocean-themed crochet bracelet?
Beads can be incorporated as optional decorative details if they are securely attached and appropriate for the intended wearer. Small pearl-like or ocean-colored beads can complement the theme. However, the bracelet works perfectly well without them, and crocheted circles or shell motifs provide a completely yarn-based alternative.
Why is my crochet bracelet curling?
Curling often results from tight tension, an unsuitable hook size, or uneven stitch placement along the border. Try relaxing your tension or using a slightly larger hook. Gentle blocking after completion can also help the bracelet lie flatter.
Can I wash a handmade crochet bracelet?
Washability depends primarily on the yarn and any additional materials used. Cotton crochet bracelets can often be gently hand washed, but always follow the yarn manufacturer’s care recommendations. If the bracelet includes buttons or decorative additions, treat those materials carefully as well.
How can I make this pattern look more like the ocean?
Use recognizable coastal colors and textures. Turquoise and aqua can represent shallow water, navy can suggest deeper ocean areas, white can imitate foam, and beige can represent sand. Adding wave stitches, shell-inspired clusters, bubbles, or a tiny starfish-inspired motif reinforces the theme while keeping the bracelet handmade and unique.
Can I use this pattern to make an anklet?
Yes. The construction can easily be adapted into an anklet. Measure around the ankle and increase the foundation chain until it reaches the required length. Keep the same stitch sequence and decorative techniques, then choose an adjustable closure for comfortable wear.
How long does an Ocean-themed crochet bracelet take to make?
The time depends on experience and the amount of decoration. A simple bracelet can be completed relatively quickly, while versions featuring multiple miniature motifs require additional time for crocheting and sewing. Because it is a compact project, it is also convenient for practicing new stitch combinations without committing to a large piece.
Conclusion
The Ocean-themed crochet bracelet pattern combines simple crochet construction with creative coastal details, making it an approachable project for anyone who enjoys small handmade accessories. Beginning with a measured foundation chain, the bracelet develops through rows of single crochet and textured stitches before receiving a decorative border. The combination of SC, HDC, DC, SL ST, and CH stitches creates enough variety to keep the project interesting while remaining manageable for crocheters who are still building their skills.
Throughout this tutorial, you learned how to measure the bracelet for a comfortable fit, select ocean-inspired yarn colors, crochet a stable foundation, create wave-like texture, add shell and starfish-inspired details, and finish the project with either a button loop or adjustable ties. You also learned how small changes in yarn weight, hook size, stitch height, and color can transform the same basic crochet bracelet pattern into a completely different accessory.Most importantly, consider the pattern a creative starting point rather than a rigid design. Experiment with turquoise waves, sandy neutrals, deep ocean blues, colorful coastal accents, or your own favorite combination. You can keep the bracelet minimalist or decorate it with several miniature motifs to create a more detailed seaside theme.
If you make your own Ocean-themed crochet bracelet, leave your sincere opinion about the pattern and share your suggestions. Which ocean colors would you choose, and what small sea-inspired motif would you add? Your ideas can inspire new variations and help make future crochet projects even more creative and enjoyable.