
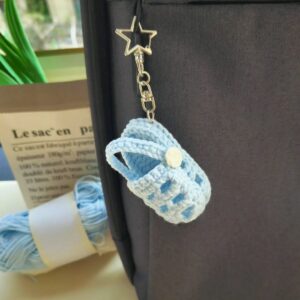
Crochet Crocs keychain pattern is a playful miniature crochet project inspired by the familiar shape of a casual clog-style shoe.
The appeal of this Crochet Crocs keychain pattern comes from combining recognizable footwear-inspired shaping with simple crochet techniques.
Throughout this tutorial, you will learn how to select the yarn and hook, understand the crochet stitch key, build an oval sole, shape the sides of the miniature shoe, create the raised toe area, leave an opening at the heel, add the back strap, and finish the project with decorative details and secure keychain hardware. Careful stitch counting is particularly important because a difference of only one or two stitches can noticeably change such a small design. Work slowly, keep your tension consistent, and shape the piece with your fingers as you crochet. With these simple habits, the crochet clog keychain can become a neat and charming addition to your collection of handmade accessories.
Materials, Crochet Stitch Key, and Project Preparation
To make this Crochet Crocs keychain pattern, prepare approximately 20 to 30 yards (18 to 28 meters) of DK or light worsted-weight yarn. Cotton yarn is an excellent option because it provides crisp stitch definition and helps the miniature shoe maintain its shape. Acrylic can also work well if you prefer a softer finish. Bright pink, lime green, turquoise, yellow, orange, lavender, red, blue, white, and black are all fun choices for this project.
A 2.75 mm to 3.25 mm crochet hook works well with many DK and light worsted yarns. Using a slightly smaller hook than you might normally choose creates a firm crochet fabric, which is desirable for a miniature keychain. You will also need a yarn needle, scissors, stitch markers, a small amount of polyester fiberfill if you want additional structure, and a metal keychain ring or lobster clasp.
The crochet stitch key for this tutorial is: MR = magic ring, ch = chain, sl st = slip stitch, sc = single crochet, hdc = half double crochet, inc = increase, dec = decrease, BLO = back loop only, FLO = front loop only, st = stitch, and sts = stitches. The instructions use standard US crochet terminology.
An increase means working two single crochet stitches into the same stitch. A decrease means combining two stitches into one. When the pattern asks you to crochet in the BLO, insert your hook only through the back loop of the stitch. This technique creates a visible ridge and helps the sole transition upward into the sides of the miniature shoe.
Gauge is not essential because the finished item is decorative rather than wearable. However, firm and consistent tension is important. The stitches should be tight enough that the finished shoe maintains its form. If your fabric feels loose or large spaces appear between stitches, switch to a smaller hook before continuing.
Before starting, decide whether you want the miniature clog completely flat or slightly dimensional. A tiny amount of stuffing inserted into the toe can help preserve the rounded silhouette. Avoid overstuffing, because the mini crochet shoe keychain should remain lightweight and should not become excessively bulky around the keyring.
Crocheting the Oval Sole and Building the Shoe Body
Begin the sole by making ch 9. Starting in the second chain from the hook, work 2 sc in the first ch, then 1 sc in each of the next 6 chains. Work 4 sc into the final chain. Instead of turning your work, continue along the opposite side of the foundation chain.
Work 1 sc in each of the next 6 chains, then place 2 sc into the final available chain space. You should now have an elongated oval. Place a stitch marker in the first stitch so you can identify the beginning of the round. The exact stitch count can vary slightly depending on how you interpret the turning ends, but aim for approximately 20 stitches around the sole.
For the second round, work increases around both curved ends while keeping the long sides relatively straight. A useful sequence is inc, inc, 6 sc, inc in each of the next 4 sts, 6 sc, inc, inc. If your stitch count differs slightly, distribute the increases evenly around the toe and heel curves. The goal is a smooth miniature sole rather than a perfectly mathematical oval.
Work one additional round of sc around, adding only one or two increases near the rounded toe if necessary to keep the sole flat. When finished, the sole should measure approximately 2.5 to 3 inches (6.5 to 7.5 cm) long. If the piece becomes wavy, you may have too many increases. If it curls upward prematurely, add another evenly placed increase.
To begin creating the sides, work the next round in BLO, making 1 sc in each st around. Crocheting only through the back loops produces a ridge along the outer edge of the sole. This ridge visually separates the bottom from the upper portion and encourages the new stitches to stand vertically.
For the following round, work 1 sc in each st around through both loops. The piece should now resemble a shallow miniature shoe. Place a tiny amount of fiberfill or scrap yarn against the toe area if you want extra structure, but do not completely fill the shoe. The heel should remain relatively open and flexible.
To begin shaping the upper, identify the front half of the shoe. Work single crochet stitches around the sides and use several evenly distributed dec stitches across the front. For example, crochet to the toe, repeat (1 sc, dec) approximately four times across the front section, and then continue with single crochet stitches around the remaining side. This draws the upper inward and begins forming the rounded clog shape.
Shaping the Toe, Heel Opening, and Crochet Back Strap
Continue shaping the front in the next round by crocheting normally along the sides and placing another 2 to 4 decreases across the toe area. Do not decrease around the heel unless the opening is unusually wide. The objective is to create a rounded enclosed front while maintaining enough space at the back to suggest the characteristic open-heel design.
For the next round, crochet only around approximately the front two-thirds of the shoe rather than completely around the heel. Attach yarn near one rear side, sc around the side and toe, and stop at the opposite rear side. Turn the work. This creates an upper section that remains higher at the front while leaving the heel more open.
Work another short row across this upper area using sc, placing one decrease near each side of the toe if additional shaping is needed. Turn and repeat once more. Depending on your yarn thickness, two or three short rows are usually sufficient. Avoid building the upper too high, because the finished project should maintain the low profile of a clog-style shoe.
Fasten off the main yarn and use the tail to tidy any small gaps around the upper. If the toe looks too flat, gently insert a very small amount of fiberfill through the heel opening and push it toward the front with the blunt end of your crochet hook. Shape the toe with your fingers until it has a smooth rounded appearance.
To create the crochet heel strap, attach yarn to one rear side of the shoe and ch 10 to 14, depending on the width of your finished piece. Stretch the chain gently around the back of the heel and determine the best length before attaching it. The strap should curve around the opening without pulling the sides inward.
Once you are satisfied with the strap length, attach it to the opposite rear side using a secure sl st. For a thicker strap, turn and work sl st or sc back across the chain, then fasten off. Sew both attachment points securely with a yarn needle. You can position the strap around the back or angle it forward over the upper for a different appearance.
Finally, use contrasting embroidery thread or yarn to add several tiny stitch details across the upper section to suggest ventilation openings. Keep these decorative marks small and evenly spaced. For a cleaner minimalist version, leave the upper plain. Either approach preserves the recognizable silhouette while allowing your Crochet Crocs keychain pattern to have its own handmade character.
Adding the Keychain, Finishing Details, and Customization Ideas
To add the keychain hardware, identify a strong point near the upper heel area. Attach yarn securely and ch 8 to 10. Pass the chain through your metal keyring, return to the base, and join with a sl st. Make sure the loop is positioned so that the miniature shoe hangs naturally rather than turning completely sideways.
Reinforce the hanging loop by working sl st back across the chain or by sewing along it with the yarn tail. Because the keychain loop receives more tension than any other part of the project, this reinforcement is important. Weave the final yarn tail through several different stitches inside the shoe before trimming the excess.
Customization is one of the most enjoyable aspects of the Crochet Crocs keychain pattern. Make a collection in different colors or combine two shades by using one color for the sole and another for the upper. You can also create a contrasting heel strap, add tiny embroidered hearts, flowers, stars, initials, or simple geometric motifs to the top.
If you want to create a matching pair, carefully record the number of foundation chains, increases, decreases, and strap chains used in your first shoe. Small crochet projects can change size significantly with minor tension differences, so using the same yarn, hook, and stitch counts will help the second shoe match the first more closely.
If the finished shoe curls or twists, inspect the sole first. Too many increases can cause rippling, while insufficient increases can make the sole cup prematurely. Uneven tension can also pull one side higher than the other. Gently reshape the project with your fingers and make adjustments during the early rounds rather than waiting until the upper is complete.
For cleaning, gently hand wash the crochet shoe keychain in cool or lukewarm water using a mild detergent appropriate for your yarn. Avoid twisting or aggressively rubbing the small strap. Press away excess moisture with a towel, reshape the toe and sole with your fingers, and allow the project to dry naturally on a flat surface.
Once you understand the construction, you can experiment with thinner yarn for an even smaller charm or thicker yarn for a larger decorative shoe. The same basic miniature crochet clog pattern can also be adapted into bag charms, ornaments, zipper decorations, party favors, or decorative accessories for craft displays.
Frequently Asked Questions About the Crochet Crocs Keychain Pattern
Is the Crochet Crocs keychain pattern suitable for beginners?
Yes, although it is most comfortable for beginners who already understand basic crochet stitches. You should be familiar with chains, single crochet, slip stitches, increases, decreases, and working in the back loop only. The small scale requires careful stitch counting, but the techniques themselves are straightforward.
How much yarn do I need for one miniature crochet shoe?
Approximately 20 to 30 yards (18 to 28 meters) should be enough for most versions. This makes the project useful for leftover yarn that may not be sufficient for larger crochet items.
What yarn is best for this crochet keychain?
Cotton yarn provides excellent stitch definition and a structured result. Acrylic yarn also works and generally creates a softer miniature shoe. DK or light worsted-weight yarn is a practical starting point.
What hook size should I use?
A 2.75 mm to 3.25 mm crochet hook works well for many DK and light worsted yarns. Select a size that creates dense stitches without making the crochet process uncomfortable.
How large will the finished keychain be?
The miniature shoe will generally measure approximately 2.5 to 3.5 inches (6.5 to 9 cm) long. Your finished dimensions will depend on yarn weight, hook size, stitch tension, and any modifications you make.
Do I need to stuff the crochet shoe?
No. Stuffing is optional. A very small amount placed in the toe can provide extra shape, but the project can also remain completely unstuffed for a flatter and lighter result.
How do I keep the sole flat?
Distribute increases evenly around the curved ends of the foundation chain. If the sole becomes wavy, reduce the number of increases. If it begins curling too early, add one or two additional increases around the curved areas.
Why is my miniature shoe too wide?
Too many increases or very loose tension can create excess width. Check your stitch count after every round and consider using a slightly smaller hook.
How can I make the heel strap stronger?
After creating the chain, work slip stitches or single crochet stitches back across it. Reinforce both attachment points by sewing through several stitches on the sides of the shoe.
Can I make the back strap movable?
You can attach the ends more loosely so the strap has some flexibility, although a permanently positioned strap will generally be more durable for a keychain that receives frequent handling.
Can I make the project in several colors?
Absolutely. Try a contrasting sole, upper, strap, or decorative embroidery. Bright color combinations can make the small shape more noticeable when attached to a backpack or handbag.
How do I create the small decorative holes?
Instead of cutting actual holes, use small embroidery stitches in a contrasting or matching yarn to suggest ventilation openings. This approach helps maintain the strength of the miniature upper.
Can I use thinner crochet thread?
Yes. Crochet thread and a smaller hook can create a miniature version, although the smaller stitches require more precision. Adjust the keychain loop accordingly so that it remains strong enough to support the finished piece.
Can this pattern be used without a keychain ring?
Yes. Omit the hanging loop and use the finished miniature as a decorative charm, ornament, craft embellishment, or part of another handmade project.
How can I make two identical crochet shoes?
Use the same yarn and hook, record every stitch count, and maintain consistent tension. Measuring the first finished sole before starting the second can also help you identify differences early.
Why does my upper look too tall?
You may have added too many straight or short rows after forming the sides. A clog-style miniature generally looks better with a low upper. Remove one row or stop shaping earlier if the front becomes too tall.
Can I wash the finished keychain?
Usually yes, provided the yarn and keychain materials are washable. Gentle hand washing is a cautious approach. Always consider the care requirements of the specific yarn and hardware used.
Conclusion
The Crochet Crocs keychain pattern is a compact crochet project that combines creative shaping with useful foundational techniques. Throughout this tutorial, you learned how to select suitable yarn and hook sizes, understand the crochet abbreviations, build an oval sole from a foundation chain, use increases to create smooth curves, and work in the back loop only to establish a defined edge.
You also learned how to build the sides of the miniature shoe, decrease around the toe to create a rounded upper, preserve the characteristic heel opening, and crochet a narrow back strap. These shaping techniques are particularly useful because they can be adapted to many other miniature crochet accessories.The finishing process covered adding decorative upper details, attaching reinforced keychain hardware, securing yarn tails, correcting common shaping problems, and caring for the completed project. You can personalize the crochet clog keychain with different colors, embroidery, contrasting straps, and alternative yarn weights to create many unique variations.
After completing your first Crochet Crocs keychain pattern, try experimenting with different sizes and color combinations or make a matching pair. If you create this project, please leave your sincere opinion about the pattern and share your suggestions, modifications, or creative ideas. Your experiences with colors, yarn types, shaping, straps, and decorative details can inspire even more variations of this playful miniature crochet project.