
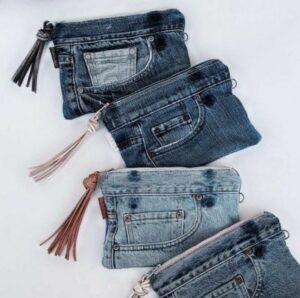
Small zippered pouch pattern made from denim is a practical sewing project that turns sturdy denim fabric, including pieces saved from old jeans, into a compact organizer that can be used every day.
Another advantage of this Small zippered pouch pattern made from denim is that it teaches several valuable sewing techniques within a manageable project.
The design in this tutorial combines a denim exterior, lightweight cotton lining, and a nylon coil zipper for a simple but polished result. You can use new denim by the yard or carefully cut reusable sections from jeans that are no longer being worn. When repurposing jeans, areas around the lower legs often provide relatively flat fabric, while pockets, seams, labels, and contrasting topstitching can be incorporated as decorative elements. Throughout the tutorial, measurements are provided in both inches and centimeters where helpful, and each construction stage is explained carefully so that your denim zippered pouch has straight seams, a functional zipper, tidy corners, and a clean interior.
Materials, Measurements, and Preparing the Denim
For this Small zippered pouch pattern made from denim, prepare two exterior denim rectangles measuring 8 x 5.5 inches (20.3 x 14 cm). Cut two lining rectangles to the same dimensions. These pieces include seam allowances and will create a compact pouch suitable for everyday organization. If your denim is particularly thick, avoid cutting directly through heavy original jeans seams because those bulky areas can make zipper installation and final assembly unnecessarily difficult.
You will need one 8-inch (20 cm) nylon coil zipper, although a slightly longer zipper can also be used and trimmed after installation. Nylon coil zippers are convenient for small fabric projects because they are flexible and relatively easy to sew across when necessary. You will also need coordinating polyester thread, fabric scissors or a rotary cutter, ruler, pins or sewing clips, an iron, sewing machine, denim needle, and zipper foot.
For the lining, choose lightweight cotton or quilting cotton. A lighter lining balances the heavier denim exterior and helps prevent the seams from becoming excessively bulky. You can use a contrasting print to make the inside more decorative. Approximately 1/4 yard (23 cm) of lining fabric is generally more than enough for one pouch, and fabric scraps may be sufficient depending on their dimensions.
Interfacing is optional because denim already provides substantial structure. If your denim comes from lightweight stretch jeans or feels unusually soft, apply lightweight fusible interfacing to the wrong side of the two exterior rectangles. Avoid heavy interfacing unless you intentionally want a very rigid pouch. Too many thick layers can make the zipper area difficult to sew neatly.
If you are repurposing jeans, wash and dry them before cutting. Open the legs along one seam to create larger flat sections of fabric, then press gently with appropriate heat. Examine the material and choose areas without excessive wear. Slight fading can add character, but weakened or extremely thin sections may not provide enough durability for a pouch that will be handled frequently.
Before moving to the sewing machine, compare all four rectangles and trim them so their dimensions match precisely. Mark the top edge of each piece if the denim has a visible direction or faded pattern. Accurate preparation is one of the simplest ways to improve the appearance of a DIY denim zipper pouch, because correctly matched pieces make the zipper installation and final seams much easier to align.
Installing the Zipper and Creating a Clean Top Edge
Place one exterior denim rectangle right side up on your work surface. Position the zipper along the top edge with the zipper right side facing the denim. The zipper teeth should sit slightly below the raw edge while the zipper tape aligns with the fabric. If the zipper is longer than the fabric, center it so the excess extends evenly beyond both ends.
Place one lining rectangle on top with its right side facing downward. You should now have a layered sandwich consisting of denim, zipper, and lining. Align all three top edges carefully and secure them with sewing clips. Clips are particularly convenient with denim because they avoid creating unnecessary pin holes and are easier to reposition around thick layers.
Attach a zipper foot to your sewing machine. Sew along the zipper tape using approximately a 1/4-inch (6 mm) seam allowance. When you approach the zipper pull, stop with the needle down, lift the presser foot, and carefully move the slider behind the foot. Lower the presser foot and continue sewing. This helps maintain a straight seam instead of curving around the zipper pull.
Fold the denim and lining away from the zipper and press them gently. Be cautious with heat around synthetic zipper teeth. Topstitch approximately 1/8 inch (3 mm) from the folded fabric edge. This row of stitching helps prevent the lining from becoming caught in the zipper and gives the exterior a crisp, professional appearance.
Repeat the process on the opposite zipper side. Place the second exterior rectangle right side up, position the free zipper edge right side down along its top edge, and place the second lining rectangle right side down over everything. Align the edges, clip them securely, and stitch along the zipper tape using the same seam allowance.
Fold the second exterior and lining pieces away from the zipper, press carefully, and add matching topstitching. Lay the project flat and test the zipper several times. Both sides should remain even, and the lining should stay clear of the zipper teeth. A carefully installed zipper is the central feature of the Small zippered pouch pattern made from denim, so correct any uneven stitching before continuing.
Sewing the Pouch Body, Lining, and Corners
Before sewing around the pouch, open the zipper at least halfway. This is an essential step because the partially open zipper will provide the route for turning the completed pouch right side out. Forgetting to open it can make the turning process unnecessarily difficult after the exterior and lining seams have been completed.
Arrange the project so the two denim pieces face each other with right sides together. At the same time, place the two lining pieces right sides together. The zipper will sit across the center between these sections. Match the side edges and corners carefully, making sure the zipper seam allowances point toward the lining if possible.
Clip around the entire perimeter. Sew using approximately a 3/8-inch (1 cm) seam allowance, beginning along the lining. Continue around the exterior and back toward the lining, but leave a 3-inch (7.5 cm) opening along the bottom of the lining. This opening will later allow you to turn the pouch. Backstitch at both ends of the opening for additional strength.
When sewing across the zipper ends, move slowly. A nylon coil zipper can usually be sewn across carefully, but avoid forcing the needle through a metal zipper stop. If your zipper is longer than the pouch, make a few securing stitches across the tape within the seam allowance before trimming the excess. Keep your fingers safely away from the needle while controlling the bulky layers.
Clip the four main corners diagonally without cutting through the stitching. If the denim is particularly heavy, carefully grade bulky seam allowances by trimming one layer slightly narrower than another. Reducing unnecessary thickness allows the corners to turn more cleanly and prevents the finished small denim pouch from developing bulky lumps along its edges.
Reach through the opening in the lining and carefully pull the pouch right side out. Then gently push out the exterior corners using a blunt turning tool or the rounded end of a suitable object. Avoid sharp tools that could puncture the fabric. Smooth the exterior, check the zipper, and press the pouch lightly to establish the finished shape.
Closing the Lining, Finishing, and Customizing the Pouch
After turning the project, locate the opening in the lining. Fold the raw edges inward by approximately 3/8 inch (1 cm) and press them flat. Close the opening with a narrow machine stitch close to the folded edge. Alternatively, use small invisible hand stitches if you prefer a nearly seamless lining finish.
Push the lining completely inside the denim exterior and use your fingers to position the corners. The lining should sit smoothly without pulling heavily against the zipper. If there is a small amount of extra lining fabric, distribute it evenly rather than creating one large fold. Press the finished pouch carefully while protecting the zipper from excessive heat.
Check the zipper again by opening and closing it several times. Inspect the topstitching and side seams for loose threads. If any stitching near the zipper ends appears weak, reinforce it before using the pouch. Denim accessories often experience repeated handling, so strong seams are more important than purely decorative stitching.
You can personalize the Small zippered pouch pattern made from denim by adding embroidery, fabric appliqués, decorative patches, labels, contrasting thread, or small pieces of patterned fabric. These decorative details should ideally be attached to the exterior denim rectangles before installing the zipper because working on a flat fabric piece is significantly easier.
Another attractive option is incorporating an original jeans pocket into the exterior. Cut around the pocket while leaving enough surrounding denim to create your required rectangle. A small original pocket adds visual interest and provides an additional storage compartment. You can also preserve characteristic jeans topstitching as part of the design.
Once you are comfortable with the basic construction, experiment with different sizes. A smaller version can become a coin purse, while a longer design can hold pencils or crochet hooks. Increasing both dimensions creates a practical travel organizer. The construction principles of this denim pouch sewing pattern remain essentially the same, making it a useful foundation for many future projects.
Frequently Asked Questions About the Small Zippered Pouch Pattern Made from Denim
Is the Small zippered pouch pattern made from denim suitable for beginners?
Yes. This project is suitable for beginners who are comfortable using a sewing machine and sewing straight seams. Zipper installation may initially seem challenging, but working slowly with a zipper foot makes the process much easier. Because the project is small, it is also an excellent way to practice before attempting a larger zippered bag.
Can I make this pouch from old jeans?
Yes. Repurposed jeans are an excellent source of fabric for this project. Choose sections that are still strong and relatively flat. Lower leg areas often work well because they usually contain fewer pockets and bulky seam intersections.
What size zipper should I use?
An 8-inch (20 cm) nylon coil zipper works well with the measurements provided in this pattern. A longer zipper can also be used and trimmed after being secured. Avoid cutting through metal teeth or metal zipper stops with your sewing machine needle.
What needle is best for sewing denim?
A denim or jeans sewing machine needle, commonly in size 90/14 or 100/16 depending on fabric thickness, is a practical choice. Heavy denim may require the larger size, while lighter denim can often be sewn comfortably with 90/14.
Do I need interfacing for a denim pouch?
Not necessarily. Medium or heavyweight denim already provides considerable structure. Lightweight or stretch denim may benefit from light fusible interfacing, particularly if you want the pouch to maintain a more defined shape.
What fabric should I use for the lining?
Lightweight cotton or quilting cotton works very well. It is easy to sew, adds minimal bulk, and is available in many prints. A bright lining can also make small objects easier to see inside the finished pouch.
Why does my zipper look wavy after sewing?
A wavy zipper can result from stretching the fabric or zipper tape during installation. Avoid pulling either layer while sewing. Gentle pressing after installation can help, but always use an appropriate temperature for both the fabric and zipper.
Why is my sewing machine struggling with thick denim seams?
Multiple denim layers can become very bulky. Use a suitable denim needle, sew slowly, and reduce unnecessary seam allowance thickness where appropriate. Keeping the presser foot level when crossing thick intersections can also improve stitch consistency.
Can I make the pouch larger?
Absolutely. Increase the exterior and lining rectangles equally and select a zipper that fits the new width. The same basic assembly method can be used for many dimensions.
Can I add a wrist strap?
Yes. Cut a narrow fabric strip, fold and topstitch it into a sturdy strap, and position the raw ends inside one side seam before sewing the pouch perimeter. Reinforce the attachment area with additional stitching.
How can I make the pouch stand up?
You can create boxed bottom corners by pinching the lower exterior corners and stitching across them evenly. Another option is adding firmer interfacing. Both techniques provide additional depth and structure.
Can I use a metal zipper?
Yes, but extra care is necessary when working near metal teeth and stops. Never intentionally sew directly across metal zipper components, as doing so can damage or break the sewing machine needle.
What can I store in a small denim zipper pouch?
The pouch can hold coins, keys, charging cables, earbuds, cosmetics, small sewing tools, stationery, craft supplies, or other lightweight personal items. Its compact size makes it particularly useful inside larger handbags or backpacks.
How can I make my handmade pouch look professional?
Precise cutting, straight zipper installation, even topstitching, careful pressing, clipped corners, matching seam allowances, and a smooth lining all contribute to a polished appearance. Taking extra time around the zipper is especially worthwhile.
Is denim upcycling useful for small sewing projects?
Yes. Small projects can use sections of fabric that might not be large enough for clothing or bigger bags. Pouches, keychains, organizers, and similar accessories can transform durable leftover denim into practical handmade items.
Conclusion
The Small zippered pouch pattern made from denim is a practical sewing project that combines simple construction with useful bag-making techniques. Throughout this tutorial, you learned how to select suitable denim, reuse fabric from old jeans, prepare matching exterior and lining rectangles, choose an appropriate zipper, and decide whether interfacing is necessary.You also learned how to create the zipper sandwich, use a zipper foot, add clean topstitching, arrange the exterior and lining correctly, sew around the pouch perimeter, manage bulky denim seams, clip the corners, and turn the project through an opening left in the lining.
The finishing stages included closing the lining neatly, pressing the completed pouch, checking the zipper, reinforcing important seams, and exploring customization ideas. Original jeans pockets, contrasting thread, embroidery, appliqués, wrist straps, and decorative fabric combinations can all give the same denim zippered pouch pattern a completely different appearance.
Once you understand this construction method, you can easily experiment with larger or smaller versions and turn leftover denim into useful handmade accessories. If you try this Small zippered pouch pattern made from denim, please leave your sincere opinion about the project and share your suggestions or creative modifications. Your ideas about fabrics, zipper styles, sizes, decorations, and finishing techniques can inspire even more possibilities for future denim sewing projects.