
Shoulder fabric bag pattern is a practical sewing project for anyone who wants to create a comfortable handmade bag that combines everyday usefulness with the freedom to choose fabrics, colors, dimensions, and finishing details.
One of the advantages of following a Shoulder fabric bag pattern is that you can select materials according to how you intend to use the finished project.
For the medium-sized shoulder fabric bag described in this tutorial, the outer panels will begin at approximately 14 x 15 inches (35.5 x 38 cm), with matching lining and interfacing pieces. The strap can begin at approximately 5 x 36 inches (12.5 x 91.5 cm), although its length should always be adjusted according to the preferred carrying position. A 3/8-inch (1 cm) seam allowance works well for the primary seams. These measurements are flexible rather than restrictive, which means you can increase or decrease them after understanding the construction. The most important principle is to keep matching pieces identical, sew with consistent seam allowances, and press each stage before proceeding to the next step.
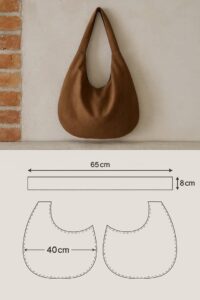
Materials, Measurements, and Preparing the Fabric Pieces
Begin your Shoulder fabric bag pattern by gathering approximately half a yard to one yard of outer fabric, depending on fabric width and whether you need to match a directional print. You will also need a similar amount of lining, fusible interfacing if additional structure is desired, coordinating sewing thread, fabric scissors or a rotary cutter, a cutting ruler, pins or sewing clips, an iron, and a sewing machine. A removable fabric marker is useful for marking pocket placement and strap positions. Choose a sewing-machine needle appropriate for the fabric weight, particularly if you are working with denim or canvas.
Press all fabrics before measuring and cutting. Wrinkles can subtly distort measurements, and accurate cutting is essential when constructing a symmetrical handmade shoulder bag. If your fabric is washable and you expect to wash the finished bag, consider prewashing and drying it before construction. This helps reduce unexpected shrinkage later. After pressing, place the fabric on a flat cutting surface and straighten the grain before measuring the individual pieces.
Cut two outer panels measuring 14 x 15 inches, two lining panels measuring the same size, and two interfacing panels slightly smaller than the exterior pieces if you are using fusible interfacing. Cut one strap rectangle approximately 5 x 36 inches. For an interior pocket, cut an additional rectangle measuring approximately 8 x 10 inches (20 x 25.5 cm). These dimensions produce a useful medium bag, but they can be modified depending on your preferred finished size.
Apply the interfacing to the wrong sides of both outer panels according to the type of interfacing you are using. Work carefully with the iron so the material adheres evenly without wrinkles. Interfacing helps the fabric shoulder bag maintain its silhouette and can be particularly useful with quilting cotton or other lightweight fabrics. If you are using sturdy canvas or medium-weight denim, interfacing may not be necessary.
Prepare the optional interior pocket before assembling the lining. Fold the pocket rectangle in half with right sides facing so it measures approximately 8 x 5 inches. Sew around the edges while leaving a small opening for turning. Clip the corners carefully, turn the pocket right side out, press it flat, and topstitch along the folded upper edge. Position it on the right side of one lining panel and stitch around the two sides and bottom, leaving the top open.
Before sewing the bag body, place all components on your work surface and check that the dimensions correspond. Confirm the direction of any printed designs and identify the top edge of each panel. This is particularly important with florals, animals, lettering, or other directional motifs. A few minutes spent checking the pieces at this stage can prevent having to undo seams later in the Shoulder fabric bag pattern.
Sewing the Outer Bag and Creating a Strong Shoulder Strap
Place the two outer panels right sides together and align their edges carefully. Pin or clip along both sides and across the bottom. Sew these three edges using a consistent 3/8-inch seam allowance, leaving the entire upper edge open. Backstitch at the beginning and end of the seam for additional security. If your fabric frays significantly, finish the raw edges with a zigzag stitch or another appropriate seam-finishing method.
For a simple flat bag, you can keep the lower corners as they are. If you prefer a shoulder bag with a wider base, create boxed corners. With the outer bag still wrong side out, pinch one bottom corner so the side seam aligns with the bottom seam. Flatten the resulting triangle and measure approximately 1½ inches (3.8 cm) from the point. Draw a line perpendicular to the seam and repeat the same measurement on the opposite corner.
Sew directly across each marked corner line and backstitch securely. Check that both corners are equal before trimming away the excess fabric, leaving approximately 3/8 inch beyond the new seam. When the bag is turned right side out, these seams create a modest flat base and additional interior capacity. Accurate corner measurements are important because unequal boxed corners can cause the finished bag to lean toward one side.
Next, prepare the strap for the Shoulder fabric bag pattern. Take the 5 x 36-inch strap rectangle and fold it in half lengthwise with wrong sides together. Press the fold to establish a center guideline. Open the strip again, fold both long raw edges inward until they meet at the center crease, and press carefully. Fold the entire strip in half once more so the raw edges are completely enclosed.
Topstitch along both long sides of the folded strap, sewing approximately 1/8 inch (3 mm) from each edge. This creates a strong strap with a neat appearance on both sides. If the fabric is lightweight, you can add a narrow strip of interfacing before folding. For heavier canvas or denim, the multiple folded layers may already provide sufficient strength without additional reinforcement.
Try the strap against your shoulder before attaching it permanently. The suggested 36-inch length creates a standard shoulder-style handle for many users, but body proportions and carrying preferences vary considerably. Shorten it for a bag that sits closer beneath the arm or make it longer for a lower carrying position. Remember that part of each end will disappear into the upper seam, so include approximately one inch of extra length for attachment.
Constructing the Lining and Joining the Bag Together
Place the two lining panels right sides together. Pin along both sides and the bottom, but leave an opening approximately 4 to 5 inches (10 to 12.5 cm) wide along the bottom edge. Sew the remaining edges using the same 3/8-inch seam allowance. The opening will later allow you to turn the entire assembled bag right side out, so do not accidentally sew it closed.
If you created boxed corners on the outer bag, repeat exactly the same process on the lining. Matching the corner depth ensures that the lining sits comfortably inside the exterior without excessive fabric gathering at the bottom. Measure carefully rather than estimating by eye. Sew across the marked lines, trim the excess, and press the seams as neatly as the fabric allows.
Turn the outer fabric shoulder bag right side out while leaving the lining wrong side out. Position one strap end approximately 2½ inches (6.5 cm) from the left side seam and the opposite end the same distance from the right side seam. The strap should hang downward against the exterior of the bag rather than extending upward beyond the raw edge. Make sure the strap is not twisted.
Baste each strap end to the upper edge using a narrow seam allowance of approximately 1/4 inch (6 mm). Sew across each strap end several times if desired for temporary reinforcement. Because the strap will support the contents of the bag, secure attachment is important. Check again that the strap forms one smooth loop and that both ends are positioned at equal distances from their nearest side seams.
Slide the right-side-out outer bag inside the wrong-side-out lining. The right sides of the outer fabric and lining should now face each other. Match the side seams and upper raw edges, then pin or clip around the entire opening. The strap will be sandwiched safely between the two fabric layers. Stitch around the complete upper edge using the 3/8-inch seam allowance, reinforcing the areas directly over both strap ends.
Reach through the opening left at the bottom of the lining and carefully pull the exterior bag through it. Continue turning until both the lining and exterior are completely right side out. Push out the corners gently and press the upper seam. Close the lining opening with a narrow machine stitch or an invisible hand-sewn stitch, then place the lining inside the bag and smooth it into position.
Finishing Details, Customization, and Caring for the Finished Bag
Once the lining is inside, press the top edge carefully so the seam sits evenly. Topstitch approximately 1/8 inch from the upper edge around the entire opening. This decorative stitching helps prevent the lining from rolling outward and provides an additional layer of reinforcement where the strap joins the bag. Sew slowly over thicker areas and keep the stitching distance consistent for a professional result.
Inspect the completed Shoulder fabric bag pattern from all sides. Check that the strap is secure, the lining sits smoothly, and the boxed corners are symmetrical if you included them. Trim any visible thread tails. If the bag looks slightly wrinkled after turning, press it again using a temperature appropriate for your chosen materials. Pressing the finished project can dramatically improve its overall appearance.
Customization is where this simple pattern becomes especially versatile. You can add an exterior patch pocket, divide the interior pocket into smaller compartments, include a magnetic closure, or create a decorative fabric panel across the front. Patchwork can also be used instead of a single outer fabric. Sew smaller fabric pieces together first, press the seams, and then trim the completed patchwork panel to the required dimensions.
The shoulder fabric bag can also be adapted with contrasting straps. A solid strap can balance a highly patterned body, while a colorful printed strap can add personality to a neutral bag. For additional strength, make the strap from canvas or denim even when the main bag uses quilting cotton. Decorative topstitching around the strap edges can further emphasize this feature.
When resizing the Shoulder fabric bag pattern, remember that both the exterior and lining must change together. Add width for a roomier bag and height for a deeper design. If making a significantly larger bag, consider using heavier interfacing and a wider strap to distribute the weight more comfortably. For a smaller bag, reduce the dimensions proportionally while keeping enough room at the top for comfortable access.
Care instructions depend primarily on the materials you select. If all fabrics, interfacing, and thread are washable, gentle cleaning may be appropriate. Empty the bag completely before cleaning and reshape it while drying. For structured or heavily decorated versions, spot cleaning may help preserve the shape. Thoughtful material selection at the beginning of the project makes maintaining your handmade fabric bag much easier.
Frequently Asked Questions About the Shoulder Fabric Bag Pattern
Is the Shoulder fabric bag pattern suitable for beginners?
Yes. The basic design relies primarily on straight stitching, simple rectangles, a lined construction, and an easy folded strap. A beginner who can maintain a consistent seam allowance should be able to complete the project with patience.
What fabric is best for a shoulder bag?
Quilting cotton is excellent for easy sewing, while canvas, denim, and home-decor-weight cotton provide greater structure. Lightweight fabrics can also work when combined with suitable interfacing.
Should I use interfacing?
Interfacing is optional, but it can significantly improve the structure of lightweight fabric. Medium or lightweight fusible interfacing is usually sufficient for an everyday shoulder bag. Very heavy fabric may not require additional support.
How long should the shoulder strap be?
The ideal strap length depends on personal preference and body proportions. Approximately 30 to 40 inches is a useful starting range for many shoulder-style bags, but test the strap against your body before sewing it permanently.
Can I turn this pattern into a crossbody bag?
Yes. Create a longer strap and test the length before attachment. Crossbody straps often require considerably more length than standard shoulder straps, so measuring according to the intended wearer gives the best result.
How do I make the bottom of the bag flat?
Use boxed corners. After sewing the side and bottom seams, flatten each lower corner into a triangle, mark equal measurements, stitch across both corners, and trim the excess. This adds depth to the bag.
Why is my lining bunching inside the bag?
The lining may be slightly larger than the exterior, or its boxed corners may not match the outer bag. Consistent seam allowances and identical corner measurements usually prevent this problem.
Can I add a zipper to this shoulder bag?
Yes, although a zipper changes the upper construction and adds another sewing stage. Beginners may prefer completing the open-top version first before adapting the pattern with a zipper closure.
Can I add more pockets?
Absolutely. Interior and exterior pockets are easy ways to customize a fabric bag pattern. Attach pockets to the flat panels before assembling the main bag so they are easier to position and stitch.
Can I make this project from leftover fabric?
Yes. Larger scraps can form individual panels, while smaller pieces can be sewn together into patchwork. Press the patchwork carefully and trim it to the required panel measurements before continuing with the regular instructions.
How can I reinforce the shoulder strap?
Use interfacing inside the strap, choose sturdy fabric, and stitch securely across the attachment points. Topstitching along both long edges also helps the strap maintain its shape.
How can I make the finished bag look more professional?
Accurate cutting, consistent seam allowances, careful pressing, matching side seams, symmetrical strap placement, neat topstitching, and properly trimmed thread ends all contribute to a polished result. Taking time with each stage is usually more important than sewing quickly.
Conclusion
The Shoulder fabric bag pattern is a versatile project that combines fundamental sewing techniques with plenty of opportunities for personal creativity. In this tutorial, you learned how to select appropriate outer fabric and lining, calculate practical measurements, cut matching panels, apply optional interfacing, prepare an interior pocket, and organize all the pieces before assembly.You also learned how to sew the exterior body, create optional boxed corners, construct a strong folded shoulder strap, assemble the lining, and securely position the strap before joining the exterior and interior sections. These techniques form a useful foundation that can be applied to many other handmade bag designs.
Finishing details such as careful pressing and topstitching help give the bag a cleaner appearance, while customization options such as patchwork, pockets, contrasting fabrics, different strap lengths, and decorative stitching allow the same basic pattern to produce many different results. Once you understand the construction, you can easily adjust the dimensions to create smaller or larger versions.
Now that you know the complete process for making this Shoulder fabric bag pattern, experiment with your favorite fabrics and create a version that reflects your personal sewing style. After completing your bag, leave your sincere opinion about the project and share your suggestions. Your ideas about fabric combinations, pockets, strap styles, dimensions, and other creative variations can inspire even more possibilities for future handmade bags.