
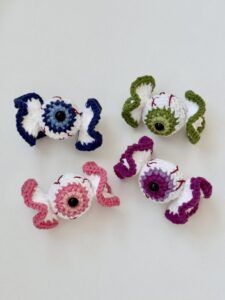
Bullet-shaped crochet eye pattern for Halloween is a creative way to make a spooky, playful crochet decoration with an elongated shape, a bold eyeball detail, and plenty of personality for the Halloween season.
One of the best things about this Halloween crochet pattern is how easily you can personalize it. A traditional combination might use white or cream yarn for the body, red embroidery for spooky veins, black for the pupil, and a bright color such as green, blue, orange, or purple for the iris.
This Bullet-shaped crochet eye pattern for Halloween is worked primarily in the round, beginning at one rounded end, increasing until the desired circumference is reached, continuing through a straight middle section, and then decreasing to close the opposite end. The eye can be crocheted separately in several circular layers and sewn onto the body, which makes it easier to control its size and position. Throughout this tutorial, the instructions use standard US crochet terminology and a simple amigurumi construction method. Stitch counts are provided in parentheses whenever they are helpful, but small adjustments may be necessary depending on yarn thickness, hook size, and personal tension. The finished project should look handmade and expressive rather than perfectly manufactured, which is part of its Halloween charm.
Materials, Crochet Abbreviations, and Preparation
For this crochet eye Halloween decoration, gather medium-weight cotton or acrylic yarn in white or cream for the main body, black yarn for the pupil, and one bright color for the iris. You can also keep a small amount of red yarn or embroidery floss available if you want to add vein details around the eye. A 3.0 mm to 3.5 mm crochet hook usually works well with medium yarn when making amigurumi because using a slightly smaller hook creates dense stitches. You will also need polyester fiberfill, a yarn needle, scissors, and stitch markers.
Before beginning, become familiar with the crochet abbreviations used throughout the Bullet-shaped crochet eye pattern for Halloween. MR means magic ring, ch means chain, sc means single crochet, inc means work two single crochet stitches into the same stitch, dec means single crochet decrease, sl st means slip stitch, FO means fasten off, and BLO means back loop only. The notation [sc 2, inc] x6, for example, means repeat two single crochets followed by one increase six times.
Start the main body using white, cream, or your chosen Halloween color. The basic beginning can be written in crochet keys as follows: {R1: 6 sc in MR (6)}, {R2: inc x6 (12)}, {R3: [sc 1, inc] x6 (18)}, {R4: [sc 2, inc] x6 (24)}, and {R5: [sc 3, inc] x6 (30)}. Pull the magic ring firmly closed after the first round. Use a stitch marker to identify the beginning of each round because the body is worked continuously rather than joined after every round.
Once you reach 30 stitches, begin creating the elongated central section. Work {R6–R16: sc around (30)}. These eleven rounds without increases create the recognizable long, rounded silhouette. If you want a shorter ornament, work approximately eight straight rounds instead. For a longer version, add another three or four rounds. Keeping your stitch tension consistent is particularly important here because uneven tension can make one side of the body appear wider than the other.
The shape can also be adjusted by changing the maximum stitch count. A miniature version might stop increasing at 24 stitches, while a larger decorative version could continue with {[sc 4, inc] x6 (36)} before beginning the straight section. Whenever you change the circumference, remember that the decrease sequence at the opposite end needs to reverse the increases. This balanced construction helps both ends maintain a smooth, rounded appearance.
Do not stuff the piece completely at this stage. Instead, add small portions of fiberfill as the body develops, distributing the stuffing evenly with your fingers. Avoid packing the fiberfill too tightly because excessive stuffing can stretch the stitches and create visible gaps. At the same time, using too little filling may leave the Halloween crochet eye looking flat. Aim for a firm but slightly squeezable shape that maintains its form when placed on a table.
Shaping the Body and Closing the Crochet Piece
After completing the straight rounds, begin decreasing gradually. Use the following sequence: {R17: [sc 3, dec] x6 (24)}, {R18: [sc 2, dec] x6 (18)}, {R19: [sc 1, dec] x6 (12)}. These gradual decreases mirror the increases from the beginning of the pattern. Invisible decreases are especially useful for amigurumi because they help create a smoother surface with fewer noticeable gaps.
Pause after Round 19 and finish stuffing the body. Push small pieces of fiberfill toward the first rounded end before adding more to the center and closing end. Roll the piece gently between your palms to distribute the stuffing. Look at the silhouette from several angles and adjust the filling until the body is symmetrical. The goal of the Bullet-shaped crochet eye pattern for Halloween is a rounded capsule-like decorative shape rather than a sharp or rigid form.
Complete the final closure with {R20: dec x6 (6)}. Cut the yarn, leaving a tail of approximately 15 cm or 6 inches. Thread the tail through a yarn needle and pass it through the front loops of the remaining six stitches. Pull gently until the opening closes. Insert the needle through the center of the closed opening and bring it out through another area of the body, then trim the excess yarn so the end disappears inside.
Now gently massage and reshape the crocheted body. Crochet fabric naturally responds to small adjustments, so this step can significantly improve the finished appearance. If one end seems slightly flatter, redistribute the stuffing with your fingers. If the center feels too soft, you can sometimes carefully insert a little additional stuffing before the final closure is completely tightened. A smooth shape creates a better surface for attaching the crocheted eye later.
For a more colorful Halloween collection, repeat the body pattern using different yarn combinations. White creates a classic eyeball-inspired look, while pale green offers a monster theme. Purple, orange, gray, and black can also create striking seasonal variations. Making several pieces from the same Halloween amigurumi pattern allows you to create coordinated decorations while experimenting with different iris colors.
At this point, inspect the stitches and make sure there are no large openings where fiberfill can escape. Small gaps can sometimes be reduced by gently redistributing the surrounding stitches with a yarn needle. Avoid using glue to repair the crochet fabric because sewing generally provides a cleaner and more durable result. Once the body is properly shaped, you can move on to the most expressive part of the project: the eye.
Crocheting and Attaching the Halloween Eye
Begin the eye with black yarn to create the pupil. Make {R1: 6 sc in MR (6)} and then work {R2: inc x6 (12)}. Fasten off if you want clearly defined color changes. Alternatively, you can change directly to the iris color during the final stitch. Bright green, blue, yellow, purple, and orange are excellent choices for a dramatic crochet Halloween eye, especially when contrasted against a light-colored body.
With the iris color attached, work {R3: [sc 1, inc] x6 (18)}. If you want a slightly larger eye, continue with {R4: [sc 2, inc] x6 (24)} using white yarn around the iris. This outer white section helps define the eyeball against the body. For a smaller project, you can stop at 18 stitches. The exact size is flexible, but the eye should be large enough to become the main visual feature without wrapping too far around the body.
Fasten off while leaving a sewing tail approximately 25 cm or 10 inches long. Position the eye on the side of the crocheted body before sewing anything permanently. Try placing it slightly above the exact center for a whimsical monster expression, or directly in the middle for a more symmetrical appearance. Pinning the eye temporarily can help you decide which position works best for your particular Bullet-shaped crochet eye pattern for Halloween.
Using the long yarn tail, sew around the outer edge of the eye with small, evenly spaced stitches. Insert the needle through the body without pulling excessively tight. Over-tightening can cause the eye to sink into the stuffing and distort the shape. After completing the circumference, gently tug the sewing thread until the eye sits securely against the surface. Knot discreetly and hide the remaining yarn tail inside the body.
To create spooky veins, thread a yarn needle with red yarn or embroidery floss. Make several irregular lines extending outward from the eye. Rather than creating perfectly straight lines, vary their length and direction. You can also branch one line into two smaller lines for a more organic appearance. Keep these decorative stitches relatively loose so they sit naturally against the crochet surface without pulling the body inward.
Additional details can completely change the personality of this Halloween crochet project. A tiny white embroidered stitch on the black pupil can imitate a light reflection and make the eye look more dimensional. You can add a thin black outline around the iris, create small embroidered eyelashes, or use contrasting stitches around the outer eye. When making decorations for homes with small children or pets, embroidered and crocheted details are often preferable to detachable plastic embellishments.
Finishing, Decorating, Displaying, and Customizing the Pattern
Once all decorative stitching is complete, inspect the entire project and weave in every remaining yarn end. Run each tail underneath several nearby stitches before trimming it. Good finishing makes a substantial difference in handmade amigurumi because loose ends can become visible over time. Gently reshape the piece one final time and make sure the attached eye lies evenly against the body.
The finished size depends on the yarn and hook combination. With medium-weight yarn and approximately a 3.25 mm hook, you can expect a small handheld decoration, although individual tension can change the final measurements considerably. If accurate sizing matters, make a small gauge sample first. For decorative amigurumi, however, matching an exact gauge is generally less important than producing tight stitches that securely contain the stuffing.
You can transform this Bullet-shaped crochet eye pattern for Halloween into several different seasonal decorations. Sew a crochet loop onto the top for hanging, incorporate several finished pieces into a Halloween garland, or arrange them with crocheted pumpkins, ghosts, bats, and other handmade decorations. If adding hardware such as a key ring, sew the attachment point securely through multiple stitches so the crochet fabric is not strained by a single loop.
Color experimentation is one of the easiest ways to make the pattern feel original. A cream body with a green iris creates a classic spooky eye, while a purple body and orange iris produce a bold Halloween palette. Black and neon green create stronger contrast, and gray with a bright blue iris gives the project a mysterious appearance. Using leftover yarn makes this small pattern particularly practical for reducing craft-room scraps.
If your finished piece looks uneven, check the three most common causes: inconsistent tension, uneven stuffing, and misplaced decreases. Small tension differences usually become less visible after the project is stuffed and shaped. Larger bumps can often be corrected by moving the fiberfill internally. Counting every round carefully is the best way to prevent shape problems, which is why the stitch totals in this crochet eye pattern are worth checking as you work.
Most importantly, treat the instructions as a foundation for your own creative interpretation. Handmade Halloween decorations do not need to look identical to be successful. Slight differences in stitch tension, embroidery, color placement, and eye position can give each piece its own character. Once you understand the basic increase-straight-decrease construction, you can easily create an entire collection of expressive crochet eyes for your seasonal handmade décor.
Frequently Asked Questions About the Bullet-Shaped Crochet Eye Pattern for Halloween
Is the Bullet-shaped crochet eye pattern for Halloween suitable for beginners?
Yes, it can be a good project for an adventurous beginner who already understands the magic ring, single crochet, increases, and decreases. The construction is repetitive, and most of the body consists of simple single crochet rounds. Keeping an accurate stitch count is the most important part.
What yarn works best for this Halloween crochet pattern?
Cotton and acrylic yarn are both practical options. Cotton usually provides crisp stitch definition and a firm surface for embroidery, while acrylic can feel softer and may be easier to find in a broad selection of Halloween colors. Choose a yarn that allows you to create dense stitches without uncomfortable tension.
Can I make the crochet eye larger?
Yes. Continue increasing beyond 30 stitches using the established formula. For example, after [sc 3, inc] x6 (30), you can work [sc 4, inc] x6 (36). Add more straight rounds to increase the length, and reverse the increase sequence when decreasing toward the opposite end.
How do I make a smaller version?
Use thinner yarn and a smaller hook, or stop increasing at 18 or 24 stitches. Reduce the number of straight middle rounds proportionally. Mini versions can be useful for garlands, small ornaments, or other lightweight decorative projects.
Why is fiberfill visible between my stitches?
This usually happens when the hook is too large for the yarn, the stitches are too loose, or the body has been overstuffed. Try using a slightly smaller crochet hook and adding fiberfill gradually. Dense stitches are particularly helpful when working with white yarn because gaps can be more noticeable.
How can I make the decreases less visible?
Try an invisible decrease, especially when working amigurumi. Instead of a traditional decrease, work through the front loops of the next two stitches before completing the single crochet. This technique often produces a smoother surface.
Do I have to use red yarn for the veins?
No. Red creates a recognizable spooky-eyeball effect, but purple, black, green, or even orange embroidery can complement different Halloween palettes. You can also omit the veins entirely for a cleaner, cartoon-inspired design.
Can I crochet the eye directly onto the body?
The eye can be incorporated in different ways, but crocheting it separately is usually simpler. A separate eye allows you to position it carefully before sewing and makes color changes easier to manage. It also adds a subtle layered texture that helps the eye stand out.
How can I make several pieces look consistent?
Use the same yarn weight, hook size, stitch counts, and approximate amount of stuffing for every piece. Keep brief notes about the number of straight rounds and the eye size. Even then, slight differences are normal and contribute to the handmade appearance.
Can I customize this pattern for other seasons or themes?
Absolutely. Although the Bullet-shaped crochet eye pattern for Halloween is designed around a spooky seasonal theme, changing the colors and embroidery can create fantasy monsters, colorful cartoon eyes, or playful amigurumi decorations. The basic capsule construction is versatile and easy to adapt.
Conclusion
The Bullet-shaped crochet eye pattern for Halloween combines straightforward amigurumi construction with plenty of opportunities for creative customization. You learned how to begin with a magic ring, build the rounded first end through systematic increases, crochet the elongated middle section, decrease and stuff the body, and close the final opening neatly. Following the stitch counts carefully helps create a balanced shape while still leaving room for personal adjustments.
You also learned how to crochet a layered eye using a black pupil, colorful iris, and optional white outer section before sewing it securely onto the main body. Details such as embroidered veins, highlights, contrasting outlines, and creative color combinations can transform the same basic pattern into many different Halloween characters. By changing the yarn thickness, maximum stitch count, or number of straight rounds, you can also create several sizes from one basic construction method.
This project is a fun opportunity to practice amigurumi increases and decreases, consistent tension, stuffing, embroidery, color changes, and finishing techniques in one compact design. Try making your own version and experimenting with different Halloween color combinations. After finishing your Bullet-shaped crochet eye pattern for Halloween, leave your sincere opinion about the project and share your suggestions for colors, details, or creative variations you would like to try next.