
Crocheted Rabbit Pattern is a delightful project for anyone who loves creating soft handmade animals with yarn, a crochet hook, and a little imagination.
One of the advantages of this Crocheted Rabbit Pattern is the opportunity to practice shaping three-dimensional crochet pieces.
This Crocheted Rabbit Pattern is written with clear crochet keys and stitch counts so that the construction can be followed one stage at a time. Before beginning, it is helpful to read through the entire pattern and prepare all materials. You will generally need cotton or acrylic yarn, an appropriately sized crochet hook, polyester fiberfill, scissors, a yarn needle, stitch markers, and embroidery yarn for facial details. If the rabbit is intended for a young child, embroidered facial features are generally a practical alternative to detachable decorative pieces. Consistent tension is especially important in amigurumi because closely worked stitches help create a smooth surface and keep the stuffing from showing through the fabric.
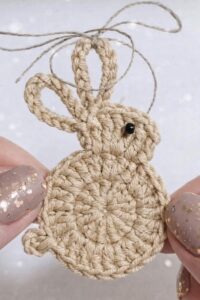
Materials, Crochet Keys, and Making the Rabbit Head
For this crochet rabbit, choose a smooth DK or light worsted-weight yarn and a hook slightly smaller than you might normally use for that yarn. A 2.75 mm to 3.5 mm hook is a useful starting range. You will also need approximately 50–100 yards of yarn depending on the desired size, fiberfill stuffing, a yarn needle, scissors, and a stitch marker. The finished dimensions will vary according to yarn thickness, hook size, and personal crochet tension, so treat measurements as flexible rather than absolute.
The crochet keys used throughout this Crocheted Rabbit Pattern are: MR = magic ring, ch = chain, sc = single crochet, inc = increase, dec = decrease, sl st = slip stitch, st = stitch, sts = stitches, FO = fasten off, and [ ] = repeat the instructions inside the brackets. An inc means working two single crochet stitches into one stitch. A dec means combining two stitches into one; an invisible decrease is especially useful for amigurumi because it produces a smoother surface.
Begin the rabbit head with R1: MR, 6 sc into MR [6]. Pull the ring firmly closed and place a stitch marker into the first stitch. Continue with R2: inc x 6 [12]. For the next round work R3: [sc 1, inc] x 6 [18], followed by R4: [sc 2, inc] x 6 [24]. Continue expanding with R5: [sc 3, inc] x 6 [30] and R6: [sc 4, inc] x 6 [36]. These increases form a rounded foundation for the head.
Once the desired width has been reached, work R7–R13: sc around [36]. These seven even rounds create the central portion of the rabbit’s head. Try to maintain consistent tension, and count the stitches at the end of each round. If you want to embroider the eyes, you can mark their approximate positions between rounds 9 and 11. Leaving several stitches between the eyes usually creates a gentle, friendly facial expression.
Begin shaping the lower part of the head with R14: [sc 4, dec] x 6 [30], R15: [sc 3, dec] x 6 [24], and R16: [sc 2, dec] x 6 [18]. Begin adding small amounts of fiberfill stuffing before the opening becomes too narrow. Distribute the stuffing around the sides rather than pushing one large piece into the center. This helps maintain a rounded shape without creating visible lumps in the crochet fabric.
Finish with R17: [sc 1, dec] x 6 [12] and R18: dec x 6 [6]. Add additional stuffing before completing the final decreases if necessary. FO, leaving a yarn tail if the head will be sewn to the body later. Close the remaining opening by passing the yarn through the front loops of the final six stitches, pulling gently, and securing the tail inside the head.
Crocheting the Rabbit Body, Arms, and Legs
The body of the Crocheted Rabbit Pattern begins similarly to the head but develops into a slightly longer shape. Start with R1: MR, 6 sc [6], R2: inc x 6 [12], R3: [sc 1, inc] x 6 [18], R4: [sc 2, inc] x 6 [24], and R5: [sc 3, inc] x 6 [30]. Keep the beginning of each round marked so that the increases remain evenly distributed.
For the middle of the body, work R6–R12: sc around [30]. These rounds create the rabbit’s belly and torso. If you prefer a longer bunny, add one or two additional even rounds at this stage. For a shorter and rounder rabbit, work fewer even rounds. This flexibility makes the amigurumi rabbit pattern easy to personalize without changing the overall construction method.
Begin narrowing the shoulders with R13: [sc 3, dec] x 6 [24], followed by R14: sc around [24]. Continue with R15: [sc 2, dec] x 6 [18] and R16: sc around [18]. Begin stuffing the body firmly but gradually. Pay particular attention to the base so the rabbit can maintain a balanced shape after assembly. Finish with R17: [sc 1, dec] x 6 [12], then FO, leaving a long yarn tail for sewing the head to the body.
For each arm, work R1: MR, 6 sc [6], R2: [sc 1, inc] x 3 [9], and R3–R8: sc around [9]. Add a very small amount of stuffing to the lower portion of the arm while leaving the upper portion relatively flat. Fold the opening together and crochet or sew through both sides to close it. FO, leaving enough yarn for attaching the arm securely to the torso. Make a second arm using the same instructions.
Create the legs slightly larger than the arms. For each leg work R1: MR, 6 sc [6], R2: inc x 6 [12], R3–R5: sc around [12], R6: [sc 2, dec] x 3 [9], and R7–R10: sc around [9]. Stuff the foot and lower leg lightly. Keeping the upper part less firmly stuffed makes positioning easier when the legs are sewn to the body.
Before permanently attaching the limbs, arrange the head, body, arms, and legs on a flat surface. Position both arms at approximately the same height and make sure the legs are balanced relative to the lower body. Pinning the pieces temporarily can help prevent uneven placement. Sew each component using small stitches and the matching yarn tails, checking the rabbit from the front and side throughout the assembly process.
Making the Long Rabbit Ears, Tail, and Facial Details
The long ears are one of the most recognizable features of this Crocheted Rabbit Pattern. Begin the first ear with R1: MR, 6 sc [6] and R2: [sc 1, inc] x 3 [9]. Continue with R3: [sc 2, inc] x 3 [12] and R4: [sc 3, inc] x 3 [15]. The gradual increases create a softly rounded ear tip rather than a sharp point.
Continue the ear with R5–R12: sc around [15]. For a longer-eared rabbit, add two or three more even rounds. Begin narrowing with R13: [sc 3, dec] x 3 [12], followed by R14–R16: sc around [12]. Finish with R17: [sc 2, dec] x 3 [9]. Do not heavily stuff the ears; leaving them flat allows them to bend naturally. FO, leaving a long tail, and repeat the complete instructions for the second ear.
Flatten each ear gently and position it on top of the rabbit’s head. The placement changes the character dramatically. Ears placed close together create a traditional upright bunny appearance, while slightly wider positioning produces a relaxed look. Sew around the base of each ear with small, secure stitches. If desired, use a contrasting shade of yarn to embroider a simple line inside each ear to suggest the inner ear detail.
For the tail, begin with R1: MR, 6 sc [6], followed by R2: inc x 6 [12] and R3: sc around [12]. Then work R4: dec x 6 [6]. Add a tiny amount of stuffing before closing. FO, leaving a long yarn tail, and sew the tail securely to the lower back of the rabbit. A small fluffy-looking crochet sphere complements the rounded body and gives the finished bunny a classic silhouette.
Create the face after the main pieces have been assembled so you can judge the proportions accurately. Embroider a small triangular or oval nose around the center of the face using pink, brown, or black yarn. Add a short vertical stitch beneath the nose and two small curved stitches for the mouth. The eyes can also be embroidered using dark yarn. Keeping the facial elements symmetrical helps produce a polished handmade crochet rabbit.
Once the face is complete, inspect every seam and gently shape the rabbit with your hands. Adjust the stuffing if any areas appear uneven before closing remaining openings completely. Weave yarn tails through several stitches inside the body and trim excess yarn. Optional accessories such as a tiny scarf, bow, flower, or crocheted collar can be added without changing the fundamental Crocheted Rabbit Pattern.
Finishing Tips, Customization Ideas, FAQ, and Final Thoughts
The finished size of your crochet bunny depends heavily on yarn weight and hook size. Using thin cotton yarn with a small hook creates a miniature rabbit, while thicker yarn produces a larger project using the same stitch counts. If changing yarn thickness, choose a hook that creates dense stitches with minimal gaps. This prevents the fiberfill from becoming visible through the finished crochet fabric.
Color selection offers another opportunity for personalization. White, cream, beige, caramel, light brown, and gray are classic rabbit colors, while pastel pink, blue, lavender, mint, or yellow can create a playful decorative bunny. You can also use contrasting yarn for the inner ears, paws, or accessories. When combining colors, weave the ends securely so that transitions remain neat and durable.
If your rabbit looks uneven after assembly, the issue can often be corrected by gently shaping the stuffing and adjusting the seams. Amigurumi does not always look perfect immediately after the final stitch. Roll the stuffed pieces gently between your hands and reposition the limbs if necessary. Taking time during the finishing stage often makes a noticeable difference in the overall appearance of the Crocheted Rabbit Pattern.
FAQ: Is the Crocheted Rabbit Pattern suitable for beginners? Yes. A beginner who understands single crochet, increases, decreases, and working in the round can follow this project. The most challenging stage is usually assembly rather than the crochet itself. Working slowly, counting every round, and using stitch markers can make the process considerably easier.
FAQ: Why are there gaps between my stitches? Visible gaps generally indicate that the crochet fabric is too loose for the chosen yarn and stuffing. Try using a slightly smaller hook or adjusting your tension. You should not crochet so tightly that inserting the hook becomes uncomfortable, but the stitches should be dense enough to contain the stuffing without large openings.
FAQ: How do I make my rabbit larger or smaller? The easiest method is changing yarn and hook size while retaining the original stitch counts. Thicker yarn and a larger suitable hook create a larger rabbit, while thinner yarn and a smaller hook produce a miniature version. You can also modify the number of rounds, but maintaining proportional changes between the head, body, ears, and limbs will give more balanced results.
Frequently Asked Questions About the Crocheted Rabbit Pattern
What is the best yarn for a crocheted rabbit?
Cotton and acrylic yarn are both practical choices. Cotton provides excellent stitch definition and a structured appearance, while acrylic can create a softer finish. Choose a yarn that is comfortable to work with and select a hook that produces a dense amigurumi fabric.
How much yarn do I need for this rabbit?
Approximately 50–100 yards may be enough for a small rabbit, although the exact amount depends on yarn thickness, crochet tension, hook size, and the finished dimensions. Keep a little extra matching yarn available for sewing the pieces together.
Should I stuff the ears?
Usually, no. Flat ears tend to look more natural and are easier to position. If you want slightly firmer ears, you can add a very small amount of stuffing, but avoid filling them as firmly as the head or body.
How can I keep the head from becoming floppy?
Stuff the neck area firmly and sew the head securely around the complete opening of the body. Add several reinforcing stitches if necessary. Make sure the stitches are evenly distributed so the head remains centered rather than leaning toward one side.
Why does my rabbit look different from the expected shape?
Crochet tension has a major influence on amigurumi. Two people can follow identical stitch counts and obtain slightly different shapes. Yarn thickness, hook size, stuffing density, and assembly position also influence the finished appearance. Small differences are normal in handmade projects.
Can I make longer rabbit ears?
Yes. Add extra sc around rounds before beginning the decreases. For example, instead of stopping the straight section at Round 12, continue for another three or four rounds. Make the same adjustment to both ears to maintain symmetry.
How firmly should the rabbit be stuffed?
The head and body should feel firm enough to maintain their shape without stretching the crochet stitches apart. Add small pieces of stuffing gradually rather than inserting one large amount. The arms and legs can usually be stuffed more lightly, especially near their attachment points.
Can I embroider all the facial features?
Yes. Embroidery is an excellent way to create the eyes, nose, mouth, and even eyebrows or eyelashes. Different placements can create different expressions, so experiment carefully before securing the final stitches.
How can I make both ears and legs the same size?
Use the same yarn, hook, stitch count, and number of rounds for matching pieces. Counting carefully is essential. It can also help to crochet matching pieces consecutively while the tension and construction method are fresh in your mind.
Can I customize this Crocheted Rabbit Pattern?
Absolutely. You can change colors, ear length, body length, accessories, facial embroidery, and yarn thickness. A small bow, scarf, flower, vest, or collar can give the bunny a distinctive personality without changing its basic construction.
Conclusion
The Crocheted Rabbit Pattern combines simple crochet techniques with careful shaping to create a charming three-dimensional bunny. Throughout this project, you learned how to use a magic ring, controlled increases, straight single crochet rounds, decreases, stuffing, embroidery, and assembly techniques to build the head, body, arms, legs, long ears, and tail.
The most important elements are consistent tension and careful stitch counting. Following the indicated stitch totals helps each piece maintain the intended proportions, while gradual stuffing creates smooth shapes. Taking extra time when positioning the ears, limbs, tail, and facial features can transform a simple crochet project into a beautifully finished amigurumi rabbit.
This pattern is also easy to personalize. Different yarn weights can change the finished size, while new colors, embroidered expressions, longer ears, bows, scarves, flowers, or other small accessories can make each bunny unique. Once you understand the basic construction, you can use the techniques from this Crocheted Rabbit Pattern as a foundation for many other handmade amigurumi animals.If you create your own rabbit using this pattern, leave your sincere opinion about the project and share your suggestions. Tell us which colors and details you chose, which part of the pattern you enjoyed most, and what variations you would like to try next. Creative suggestions and personal experiences can inspire new ideas and help other crochet lovers discover their own favorite version of this adorable handmade rabbit.