
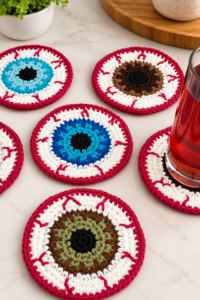
Crochet eye-shaped coaster pattern is a creative way to turn a small amount of yarn into an eye-catching handmade accessory that can decorate a coffee table, Halloween display, craft room, or everyday living space.
One of the advantages of this crochet eye-shaped coaster pattern is the opportunity to personalize almost every detail.
This tutorial explains the project using clear crochet stitch keys, approximate stitch counts, shaping guidance, assembly suggestions, and finishing techniques. The construction begins with the center pupil and iris, expands outward, and then develops into the recognizable pointed eye silhouette. Beginners can simplify the design by using fewer colors, while experienced crocheters can add surface embroidery, eyelashes, contrasting outlines, or textured details. Before beginning, read through the complete instructions so you understand where increases and shaping occur. Small adjustments may be necessary because individual crochet tension varies, but keeping both sides symmetrical will help produce a balanced and polished eye-shaped crochet coaster.
Materials, Crochet Stitch Keys, and Preparation
For this Crochet eye-shaped coaster pattern, prepare approximately 20 to 30 grams of worsted or DK-weight cotton yarn divided among your chosen colors. A practical combination is black for the pupil, one bright shade for the iris, white or cream for the eye, and black or another contrasting color for the outline. You will also need a crochet hook suitable for your yarn, usually between 3.0 mm and 4.5 mm, scissors, a yarn needle, and stitch markers. Cotton is recommended because its firm structure helps the coaster maintain its shape after finishing.
Before crocheting, become familiar with the abbreviations used throughout the pattern. MR = magic ring, ch = chain, sl st = slip stitch, sc = single crochet, hdc = half double crochet, dc = double crochet, inc = increase by working two stitches into one stitch, dec = decrease, st = stitch, sts = stitches, FO = fasten off, and BLO = back loop only. These crochet stitch keys make the instructions shorter and easier to follow while maintaining consistent terminology throughout the project.
Start with black yarn for the pupil. Round 1: MR, ch 1, work 6 sc into MR, sl st to first sc [6 sts]. Pull the magic ring closed firmly so that there is no visible hole in the center. Round 2: ch 1, inc in every st around, sl st [12 sts]. This creates a compact circular pupil. If you want a larger pupil, add another controlled increase round before changing colors, but remember that an oversized center can reduce the visible portion of the iris.
Change to your selected iris color without cutting the black yarn too close to the fabric. Round 3: ch 1, (sc in next st, inc in next st) repeat around [18 sts]. Round 4: ch 1, (sc in next 2 sts, inc in next st) repeat around [24 sts]. These evenly distributed increases produce a flat circle. If the work begins curling upward, your tension may be too tight; if it becomes noticeably wavy, you may have too many stitches or your tension may be too loose.
For additional visual interest, Round 5 can introduce simple iris texture. Work (sc, hdc, sc) combinations at evenly spaced points or alternate regular sc stitches with occasional surface details. Another option is to complete the round in sc and later embroider short straight lines radiating from the pupil toward the outer edge of the iris. Keep embellishment relatively flat because a coaster should provide a stable surface for a cup or glass.
Before continuing, place the circular center on a flat surface and check the tension. The pupil should remain centered, the iris should form a reasonably smooth circle, and the fabric should not cup dramatically. Minor unevenness can usually be corrected during blocking. Once the central portion looks balanced, fasten off the iris color and weave in loose ends securely before beginning the white eye section.
Building the Eye Shape Step by Step
Attach white or cream yarn to any stitch along the iris. The next stage transforms the round center into the distinctive shape that defines this crochet eye-shaped coaster pattern. Round 6: ch 1, sc around the iris, distributing approximately 24 to 30 sc evenly depending on the size of your center. Join with a sl st. This round creates a clean transition between the colorful iris and the lighter outer eye.
For the next round, begin varying stitch heights. Work sc in the first 4 sts, hdc in the next 3 sts, dc in the next 5 sts, hdc in the next 3 sts, and sc across the remaining stitches, adjusting the distribution so the taller stitches sit across one side of the eye. On the opposite side, mirror this sequence as closely as possible. Taller stitches expand the center areas, while shorter stitches help control the ends.
To create the first pointed corner, work (sc, ch 2, sc) into the stitch selected for one end of the eye. Continue along the lower edge using sc and hdc stitches, then create the opposite corner with another (sc, ch 2, sc) combination. The two chain-2 spaces act as turning points and visually extend the eye horizontally. Count the stitches between each point to ensure that the upper and lower halves remain reasonably symmetrical.
Continue shaping with another round. Beginning near one corner, work sc in the first 3 sts, hdc in the next 4 sts, dc across the center section, hdc in the next 4 sts, and sc toward the opposite point. In each ch-2 corner space, work (sc, ch 2, sc). Repeat the same progression along the second half. The exact number of center dc stitches can be adjusted according to your gauge, but both halves should contain the same number.
Lay the piece flat again. At this stage, the coaster should resemble an almond or stylized eye rather than a circle. If the corners are not pointed enough, the next round can use (sc, hdc, ch 2, hdc, sc) in each corner space. If the eye is becoming too long, use only (sc, ch 1, sc). Crochet patterns often benefit from these small gauge-based adjustments because yarn thickness and personal tension can significantly affect the final proportions.
Complete the white section with one round of sc around the entire shape, maintaining the corner increases. This stabilizing round creates a clean foundation for the outline and reduces irregularities caused by changing stitch heights. Do not add unnecessary increases along the straight portions, because excessive stitches can make the coaster ripple. Fasten off the white yarn once the eye lies flat and the two pointed ends appear balanced.
Adding the Outline, Details, and Professional Finish
A contrasting border gives the Crochet eye-shaped coaster pattern greater definition. Attach black yarn at one pointed end and work one sc into each stitch around the eye. At each corner, work (sc, ch 1, sc) into the corner space. Maintain relaxed tension while crocheting the border. Pulling the edging too tightly can cause the finished coaster to curl inward, while an excessively loose border may create unwanted waves.
If you prefer a thinner outline, use sl st loosely around the outer edge instead of sc. This technique produces a subtle dark line without noticeably increasing the overall dimensions. Another option is reverse single crochet, sometimes called crab stitch, although this creates a more textured border. For a coaster intended for frequent use, a simple sc or sl-st edge generally provides the flattest and most practical finish.
The iris can now receive additional surface decoration. Thread a yarn needle with a slightly lighter or darker version of the iris color and embroider short lines from near the pupil toward the edge. Space them irregularly to create an organic appearance rather than a perfectly mechanical pattern. Keep all knots and yarn tails securely hidden on the back. Thick knots should be avoided because they can make the coaster wobble when placed on a hard surface.
Optional eyelashes can transform the basic eye-shaped crochet coaster into a more decorative design. Along the upper edge, attach black yarn and repeat combinations such as sl st, ch 4, sl st back into the edge at evenly spaced intervals. For shorter lashes use ch 3; for longer lashes use ch 5 or ch 6. If the coaster will be used daily under large mugs, consider omitting long lashes so the edges remain easy to clean and maintain.
After all decorative work is complete, weave in every yarn end carefully. Use a yarn needle to pass each tail through several stitches on the wrong side, change direction, and pass it through a second section before trimming. Secure finishing is especially important for crochet coasters, which may be handled and washed frequently. Avoid leaving long loose tails underneath the project because they can become visible or gradually work free.
Blocking provides the final refinement. Lightly dampen the cotton coaster, gently reshape the iris and pointed ends, and place it flat on a suitable blocking surface. Adjust both sides until they appear symmetrical and allow the project to dry completely. Follow the yarn manufacturer’s care instructions regarding washing and heat. Once dry, the stitches should look more even, the eye shape should be clearer, and the entire handmade piece should have a cleaner appearance.
Customizing and Using Your Crochet Eye-Shaped Coaster
Color selection is one of the easiest ways to create variations from the same Crochet eye-shaped coaster pattern. A realistic version might combine a black pupil, green or blue iris, white eye section, and black border. For a Halloween-inspired design, consider orange, purple, lime green, red, or other seasonal combinations. A pastel palette can create a softer decorative style, while high-contrast colors make the individual crochet sections especially noticeable.
You can also modify the finished size. For a larger coaster, add another increase round to the iris before beginning the white section, then proportionally increase the number of stitches along the outer eye. For a smaller version, stop the iris one round earlier. Remember that changing the center size affects the entire project, so adjustments should be distributed evenly rather than adding many stitches to only one area.
Yarn choice also changes the personality of the project. Mercerized cotton provides crisp stitch definition and a smooth surface, while ordinary cotton produces a softer handmade texture. Acrylic can be used for decorative versions, although fiber properties and heat tolerance vary. When creating an item that may come into contact with warm drinkware, always consider the characteristics and care recommendations of the specific yarn you are using.
For a coordinated handmade set, crochet several eye coasters using different iris colors while keeping the outer eye and border consistent. This creates variety without making the collection appear disconnected. You could make one blue, one green, one brown, and one amber, for example. Maintaining the same yarn weight, hook size, and number of rounds helps all the coasters finish at approximately the same dimensions.
A frequent issue when making this pattern is curling. Curling usually indicates that the stitch count, hook size, or tension needs adjustment. If the project cups upward, slightly loosen your tension or add carefully placed increases. If the edge ripples dramatically, reduce unnecessary increases. Making these corrections during construction is easier than trying to completely reshape an uneven coaster through blocking afterward.
Once you understand the basic construction, the pattern becomes an excellent foundation for experimentation. The same technique can inspire eye appliqués, decorative patches, garlands, small wall decorations, or themed table accessories. The most important principles remain consistent: keep the pupil centered, distribute iris increases evenly, mirror the upper and lower shaping, create balanced pointed corners, and finish with a neat border.
FAQ – Frequently Asked Questions About the Crochet Eye-Shaped Coaster Pattern
Is the Crochet eye-shaped coaster pattern suitable for beginners?
Yes. A confident beginner who understands the magic ring, single crochet, half double crochet, double crochet, increases, slip stitches, and basic color changes should be able to complete the project. The unusual eye shape may require more attention than a standard circular coaster, but stitch markers and careful counting make the construction much easier.
What is the best yarn for an eye-shaped crochet coaster?
Cotton yarn is a practical choice because it offers clear stitch definition, good structure, and relatively easy care. DK or worsted-weight cotton works particularly well. Always check the yarn label for its specific washing instructions and temperature recommendations.
What size should the finished coaster be?
A practical finished width is approximately 4.5 to 6 inches (11.5 to 15 cm). However, there is no mandatory size. Measure the mugs or glasses you commonly use and adjust the outer rounds accordingly.
Why is my crochet eye curling?
Curling can result from tight tension, too few stitches, or a border that is worked more tightly than the main piece. Try moving up one hook size, relaxing your tension, or adding a few evenly distributed stitches where necessary. Blocking can correct minor curling but cannot always compensate for a significantly incorrect stitch count.
How can I make the eye more pointed?
Increase the emphasis at each corner. Instead of (sc, ch 1, sc), try (sc, ch 2, sc) or (sc, hdc, ch 2, hdc, sc) in the corner space. Keep both ends identical so the finished eye remains symmetrical.
Can I change the iris color?
Absolutely. The iris is one of the most customizable parts of this crochet eye-shaped coaster pattern. Blue, green, brown, amber, purple, red, orange, and multicolored combinations can all create distinctive results.
How do I keep the coaster flat?
Count stitches carefully, distribute increases evenly, and avoid making the outer border too tight. Check the project on a flat surface after every major round. Correcting a problem immediately usually produces better results than continuing several rounds before making adjustments.
Can I add eyelashes to the pattern?
Yes. Crochet eyelashes can be created with short chains attached along the upper edge. Embroidered lashes are another option and tend to remain flatter. For functional everyday coasters, shorter details are usually more convenient than very long decorative chains.
How can I make several coasters the same size?
Use the same yarn brand and weight, hook size, stitch counts, and tension for every coaster. Measure each piece after completing the iris and again before adding the final border. Consistency during each stage is more reliable than trying to correct major size differences at the end.
How should I wash a handmade crochet coaster?
Always follow the care instructions printed on your yarn label. Many cotton yarns can be gently washed, but recommended water temperature, drying method, and heat tolerance differ between products. Reshape the coaster after washing when necessary and allow it to dry according to the fiber manufacturer’s instructions.
Conclusion
The Crochet eye-shaped coaster pattern combines basic crochet techniques with creative shaping to produce a small project that is both decorative and useful. Beginning with a magic ring, you build the pupil and iris with controlled increases, add the lighter outer eye, shape the pointed corners using different stitch heights, and complete the project with a contrasting border. The stitch keys—MR, ch, sl st, sc, hdc, dc, inc, dec, st, sts, and FO—provide a straightforward framework that can also be applied to many future crochet projects.
The most important lesson is to focus on balance rather than following measurements blindly. Yarn thickness, hook size, and personal tension can change the final dimensions, so checking the piece after each round helps you maintain a flat, symmetrical shape. Careful stitch counting, controlled corner increases, securely woven ends, and gentle blocking can turn a simple handmade project into a polished crochet coaster.
Once you have completed your first version, experiment with different iris colors, borders, embroidered details, and seasonal palettes. The same Crochet eye-shaped coaster pattern can look completely different simply by changing the colors or decorative finishing. If you make this project, leave your sincere opinion about the pattern and share your suggestions. Your ideas about colors, stitch combinations, sizes, and creative variations can inspire even more ways to personalize this fun crochet design.