
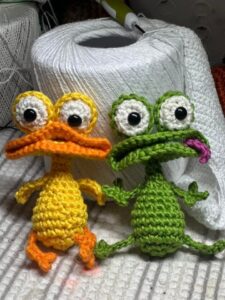
The Crocheted lizard keychain pattern is a charming project for anyone who enjoys turning simple yarn and basic stitches into a tiny handmade character full of personality.
One of the best things about this crochet lizard keychain is the opportunity to customize it. Green yarn creates a classic reptile-inspired appearance, but turquoise, orange, purple, yellow, or variegated yarn can transform the same pattern into a playful fantasy lizard.
This Crocheted lizard keychain pattern uses common amigurumi techniques, including the magic ring, single crochet, increases, and decreases. The body is worked primarily in continuous rounds so that there is no obvious joining seam. Small amounts of stuffing give the head and body dimension without making the keychain bulky. The legs can be crocheted directly onto the body or created separately and sewn into position. Beginners should work slowly and count stitches at the end of every round, while experienced crocheters can easily adapt the measurements. Before beginning, remember that the stitch counts below serve as a practical handmade guide and can be adjusted slightly according to yarn thickness and desired finished size.
Materials, Crochet Abbreviations, and Preparation
For this Crocheted lizard keychain pattern, prepare approximately 20–30 yards of DK or sport-weight cotton yarn in your preferred main color. You will also need a crochet hook around 2.5–3.0 mm, fiberfill, a yarn needle, scissors, stitch marker, and a metal keychain ring. If your yarn is thicker, choose a hook that creates tight stitches rather than following the yarn label automatically. A dense crochet fabric helps prevent stuffing from showing between stitches.
The main crochet abbreviations used throughout the pattern are: MR = magic ring, ch = chain, sc = single crochet, inc = increase, dec = invisible decrease, sl st = slip stitch, st = stitch, and FO = fasten off. When the instructions say inc, work two single crochet stitches into the same stitch. When they say dec, combine the next two stitches into one. Brackets indicate a sequence that should be repeated around the round.
Gauge is not extremely important for a small crochet keychain pattern, but tension matters. The stitches should be firm enough to create a solid surface. If large spaces appear between stitches, move down one hook size. If inserting the hook becomes uncomfortable, increase the hook size slightly. Consistent tension is more valuable than trying to match an exact gauge measurement for this miniature project.
The lizard is designed from the head toward the tail, which reduces the amount of assembly required. Place a stitch marker in the first stitch of every round because the body is worked in a spiral. Move the marker upward as each round is completed. Counting regularly is particularly important around the head because the increases and decreases determine the final shape.
Choose the eye style before stuffing the head. Small safety eyes may be used when the keychain is intended for adults or older users, while embroidered eyes are a simple alternative when you prefer to avoid detachable components. Black embroidery thread can create tiny eyes with only a few stitches. A small contrasting yarn stitch can also be added for the mouth if desired.
Before starting, unwind enough yarn to ensure there are no knots or damaged sections. Keep the keychain hardware nearby, but attach it only after the crochet work has been completed and inspected. This prevents the metal ring from getting in the way while you crochet. With the materials prepared and the abbreviations understood, you are ready to begin shaping the lizard.
Step-by-Step Crochet Pattern for the Head and Body
Start the Crocheted lizard keychain pattern with the head. R1: MR, 6 sc into MR {6}. R2: inc in each st around {12}. R3: [sc 1, inc] × 6 {18}. R4–R6: sc around {18}. These rounds create a compact rounded head. If you are using safety eyes, position them between approximately R4 and R5, leaving enough space between them to create a recognizable lizard expression.
Begin narrowing the head toward the neck. R7: [sc 1, dec] × 6 {12}. R8: sc around {12}. Add a small amount of fiberfill before the opening becomes narrower. The head should feel softly firm rather than tightly packed. Overstuffing can stretch the stitches and make the head look disproportionately large compared with the slim body.
Continue into the neck and upper body without fastening off. R9–R11: sc around {12}. R12: [sc 2, inc] × 4 {16}. R13–R17: sc around {16}. The slight increase creates the lizard’s torso. As you crochet these rounds, add stuffing gradually. Using small pieces of fiberfill makes it easier to maintain an even shape than pushing one large piece into the body.
Now taper the lower body. R18: [sc 2, dec] × 4 {12}. R19–R21: sc around {12}. R22: [sc 1, dec] × 4 {8}. At this point, finish stuffing the torso. The lower body should transition naturally into the tail rather than ending abruptly. Use the blunt end of the crochet hook or a stuffing tool to distribute the fiberfill carefully.
Create the beginning of the tail with R23–R27: sc around {8}. R28: [sc 2, dec] × 2 {6}. R29–R34: sc around {6}. For a longer lizard, add two to five additional rounds of six single crochet stitches. The narrow tube naturally forms a flexible tail. Stuff only the first section lightly and leave the final portion unstuffed so it remains easy to bend.
Finish the tail by decreasing gradually or closing the final six stitches with the yarn needle. R35: [sc 1, dec] × 2 {4}. FO, leaving a yarn tail. Thread the remaining yarn through the front loops of the final stitches and pull gently to close. Weave the end securely inside the tail. You now have the basic head, torso, and tail structure of the crocheted lizard.
Making the Legs, Feet, and Keychain Attachment
The four small legs give this Crocheted lizard keychain pattern its distinctive reptile shape. To make one leg, attach the yarn to the side of the body or create it separately. Ch 5. Starting in the second ch from hook: sl st 1, sc 3. Fasten the leg to the body with a slip stitch if working directly onto the torso. This creates a slim limb that extends outward naturally.
For more detailed feet, modify the end of each leg by creating tiny toes. After reaching the end of the leg, {ch 2, sl st into the same base point} × 3. These miniature chain loops suggest three toes. Keep the chains loose enough that they remain visible. Because this is a keychain rather than a large toy, oversized toes may catch on clothing or objects, so compact details work best.
Place the front legs near the transition between the neck and upper torso. Position one on each side, making sure they appear approximately symmetrical. The back legs should sit around the lower half of the torso before the body narrows into the tail. Pinning the legs temporarily before sewing can help you evaluate their placement from both the front and back.
If you prefer separate limbs, make four identical pieces using {ch 5, sl st 1, sc 3}, leaving a long yarn tail on each one. Sew the legs onto the torso using several small stitches. Pass the needle through the body rather than only through the outer loops of the crochet fabric. A secure attachment is particularly important because keychains experience frequent handling.
To install the keychain attachment, create a reinforced crochet loop at the upper back or top of the head. Join yarn securely and ch 8–10, sl st into the original attachment point, forming a loop. Work sl st around the chain loop if additional thickness is desired. Slide the metal key ring through this crochet loop. Alternatively, a jump ring can connect the crocheted loop to standard keychain hardware.
Check every attachment before considering the project complete. Gently pull the legs, tail, and hanging loop to make sure nothing feels loose. Weave all yarn ends through several stitches and trim only after they are secure. This final inspection improves durability and gives the crochet lizard keychain a clean handmade finish suitable for everyday decorative use.
Finishing Details, Customization, and Pattern Tips
Facial details can completely change the personality of your crocheted lizard. Embroider two small black eyes if you did not use safety eyes. A short horizontal stitch can form the mouth, while two tiny darker stitches near the front of the face can suggest nostrils. Keep the features minimal because too many details can overwhelm such a small crochet project.
Color selection is another easy way to personalize the pattern. Traditional green works beautifully, but a lime-green body with yellow toes creates a brighter appearance. Purple and orange can create a fun seasonal variation, while blue and turquoise produce a whimsical look. You can even change yarn colors every few rounds to make a striped crochet lizard keychain.
For subtle texture, crochet the body in one color and add small surface stitches afterward. Tiny contrasting stitches along the back can imitate reptile markings without complicating the main pattern. Another option is to embroider a thin line from the head toward the tail. These decorative elements require very little yarn and are excellent for using leftover scraps.
If the finished lizard twists unexpectedly, the tension may have changed during the narrow body or tail rounds. Gently shape the piece with your fingers after stuffing. The tail can intentionally be curved to one side for a more animated appearance. Because the final section is left mostly unstuffed, it should be flexible enough to form a soft natural curve.
The pattern can also be resized. For a miniature version, use fingering-weight yarn and a smaller hook while keeping the same stitch counts. For a larger decorative lizard, use worsted-weight yarn and an appropriately sized hook. Remember that changing yarn thickness also changes the amount of stuffing required and the finished dimensions.
Once complete, lightly shape the head, body, legs, and tail with your fingers. Make sure the legs sit evenly and the keychain loop remains centered. Avoid aggressive pressing or heat, especially when using synthetic yarn. A carefully finished Crocheted lizard keychain pattern should maintain visible stitch definition while still looking soft, playful, and handmade.
FAQ – Frequently Asked Questions About the Crocheted Lizard Keychain Pattern
Is this Crocheted lizard keychain pattern suitable for beginners?
Yes. The project uses fundamental crochet techniques such as the magic ring, single crochet, increases, decreases, chains, and slip stitches. A beginner who is already comfortable working in continuous rounds can follow the construction. The most important habit is counting the stitches after every round.
What is the best yarn for a crochet lizard keychain?
Cotton or cotton-blend yarn is an excellent choice because it produces clear stitches and a firm finished shape. DK and sport-weight yarns are particularly convenient for a small keychain. Acrylic can also work, especially when you want a softer texture or a wider variety of colors.
How much yarn do I need?
This project requires only a small quantity. Approximately 20–30 yards of the main color is generally enough for a compact lizard, although the exact amount depends on yarn thickness, hook size, tension, and tail length. Small leftover yarn balls are often sufficient.
Why can I see stuffing through my crochet stitches?
Visible stuffing usually means the stitches are too loose, the hook is too large, or too much fiberfill has been inserted. Try using a slightly smaller hook and adding stuffing gradually. The fabric should remain firm without becoming stretched.
Can I make the lizard without stuffing?
Yes, but the appearance will be flatter. You can leave the entire project unstuffed for a slim keychain or add fiberfill only to the head. Light stuffing generally gives the body better definition while keeping the finished accessory compact.
How can I make the tail longer?
Simply repeat additional rounds of six single crochet stitches before completing the final decreases. Adding three to eight rounds can noticeably lengthen the tail. You can also leave the longer section unstuffed and curve it gently for extra character.
Can I change the size without rewriting the pattern?
Yes. Using thinner yarn and a smaller hook produces a smaller lizard, while thicker yarn and a larger hook create a larger version. The same stitch sequence can usually be maintained, although the finished proportions may vary slightly depending on the yarn.
How do I keep the legs securely attached?
If the legs are made separately, leave generous yarn tails and sew each limb through several body stitches. Reinforce the attachment with multiple passes before weaving in the end. If the legs are crocheted directly onto the body, make sure the joining stitch is tight and secure.
Where should I attach the keychain ring?
The upper back or top rear section of the head works well because it helps the lizard hang vertically. A reinforced chain loop can hold the metal ring. Check the loop carefully and make sure the yarn is securely fastened before using the keychain regularly.
Can I sell finished lizards made from this type of project?
Handmade selling requirements can depend on the specific pattern source, local rules, marketplace policies, and any applicable pattern terms. If you are working from your own adaptation, keep accurate notes about materials, construction time, and costs before pricing your finished pieces.
How can I make each lizard look different?
Experiment with yarn colors, stripes, embroidered spots, eye styles, toe colors, tail length, and facial expressions. Even small changes can dramatically alter the finished appearance. Making several color combinations is also a fun way to practice the same crochet techniques.
Conclusion
The Crocheted lizard keychain pattern shows how a relatively small amount of yarn can become a detailed and useful handmade accessory. Starting with a magic ring, you learned how to increase stitches to shape the head, decrease them for the neck, expand the torso, and gradually taper the body into a long flexible tail. Consistent tension and careful stitch counting are the main techniques that help the project maintain clean proportions.
You also learned how to make simple crochet legs and tiny feet, position them around the torso, add facial details, stuff the body correctly, and create a reinforced loop for the keychain hardware. These finishing steps are just as important as the main body because they give the crochet lizard keychain its recognizable character and help improve durability.
Most importantly, this pattern leaves plenty of room for creativity. Try different yarn colors, embroidered markings, longer tails, contrasting feet, or different facial expressions to create your own variation. If you make this Crocheted lizard keychain pattern, leave your sincere opinion about the project and share your suggestions for future crochet patterns. Your ideas and creative variations can inspire even more enjoyable handmade projects.