
Crocheted cherry keychain pattern is a charming and practical project that turns a small amount of yarn into a colorful handmade accessory.
Another advantage of this Crocheted cherry keychain pattern is the opportunity to practice several essential crochet techniques within one small project.
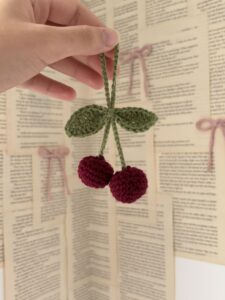
The completed crochet cherry keychain can be customized in many ways without changing the fundamental pattern. You can make larger cherries by using thicker yarn, create miniature fruit with fingering-weight yarn, lengthen the stems, add an extra leaf, or embroider tiny highlights onto the fruit. The instructions below are written as a practical crochet guide rather than a strict gauge-dependent design, so minor adjustments are easy to make. With DK yarn and a hook around 2.5 to 3.0 mm, each cherry should remain small enough for a comfortable keychain. The most important elements are consistent tension, accurate stitch counting, light stuffing, and secure finishing, especially around the loop that connects the crochet piece to the metal keychain hardware.
Materials, Crochet Stitch Key, and Project Preparation
For this Crocheted cherry keychain pattern, prepare red cotton or cotton-blend yarn for the fruit and green yarn for the stems and leaf. Approximately 10 to 15 yards of red and 5 to 10 yards of green should be sufficient for most small versions. You will also need a 2.5–3.0 mm crochet hook, polyester fiberfill, scissors, a yarn needle, stitch marker, and suitable keychain hardware.
The stitch key used throughout the pattern is: MR = magic ring, ch = chain, sc = single crochet, inc = increase, dec = invisible decrease, hdc = half double crochet, dc = double crochet, sl st = slip stitch, st = stitch, sts = stitches, R = round, and FO = fasten off. When you see instructions inside brackets followed by a multiplication symbol, repeat that sequence the specified number of times.
The cherries are worked in continuous spiral rounds rather than joining each round with a slip stitch. Place a stitch marker into the first stitch of every round and move it upward as you crochet. This simple habit is especially important in amigurumi because an accidental extra or missing stitch can change the shape noticeably within only a few rounds.
Choose a hook that produces tight, compact stitches. If you can easily see large spaces between your single crochet stitches, try moving down one hook size. The goal is to create a dense fabric that holds stuffing securely without becoming so tight that inserting the hook becomes uncomfortable. Amigurumi crochet generally benefits from slightly firmer tension than garments or blankets.
Before starting, separate the fiberfill into several very small portions. Small crochet pieces are easier to shape when stuffing is added gradually instead of being pushed inside as one large ball. Overstuffing can stretch the stitches and turn a rounded cherry into an uneven shape. A cherry should feel firm enough to hold its form while remaining slightly soft when squeezed.
It is also helpful to decide how the final keychain will be assembled before crocheting. The two cherries can hang at slightly different heights from separate green stems that meet at a central loop. This arrangement creates a natural fruit-cluster appearance and keeps both cherries visible. Once the materials are organized, you can begin the first fruit.
Step-by-Step Crochet Pattern for Making the Cherries
Begin the first cherry with red yarn. R1: MR, 6 sc into MR {6}. R2: inc in each st around {12}. R3: [sc 1, inc] × 6 {18}. Pull the magic ring completely closed after the first few rounds. These increases form the rounded upper portion of the fruit.
Continue expanding the cherry with R4: [sc 2, inc] × 6 {24}. R5–R7: sc around {24}. These three even rounds provide height and allow the fruit to develop its spherical shape. Depending on your yarn and tension, you may add one additional round of 24 single crochet stitches if you want a slightly larger cherry.
Begin shaping the lower half with R8: [sc 2, dec] × 6 {18}. R9: [sc 1, dec] × 6 {12}. Use invisible decreases whenever possible because they produce a smoother surface than standard single crochet decreases. At this stage, pause before the opening becomes too small and begin adding fiberfill.
Stuff the cherry gradually, distributing the filling around the sides as well as through the center. Continue with R10: dec × 6 {6}. Add a final tiny amount of stuffing if necessary before completely closing the opening. The fruit should appear rounded rather than stretched or extremely firm.
Cut the red yarn, leaving a tail approximately 6 inches long. Thread the tail through a yarn needle and pass it through the front loops of the remaining six stitches. Pull gently until the opening closes. Insert the needle through the center of the cherry and bring it out through another stitch, then weave the yarn end securely inside the piece.
Make the second cherry using exactly the same instructions: {MR 6 sc; inc around {12}; [sc 1, inc] × 6 {18}; [sc 2, inc] × 6 {24}; sc around for 3 rounds; [sc 2, dec] × 6 {18}; [sc 1, dec] × 6 {12}; dec × 6 {6}}. Stuff and close it securely. You should now have two similarly sized fruit pieces ready for the stems.
Crocheting the Stems, Leaf, and Keychain Loop
Using green yarn, attach the yarn securely near the top center of the first cherry. Ch 16, keeping the chain relatively firm but not excessively tight. Starting in the second chain from the hook, work sl st in each ch back toward the cherry. This creates a narrow reinforced stem that is stronger than a simple chain.
Repeat the stem process for the second cherry, but consider making it slightly shorter. Attach green yarn and ch 13–14, then slip stitch back through the chain. Having stems of different lengths prevents the cherries from sitting directly on top of each other and creates a more natural hanging arrangement.
Bring the free ends of the two stems together. Secure them with several stitches using green yarn. At their meeting point, create the hanging loop with ch 10–12, sl st into the original joining point. Work slip stitches around the loop if you want additional thickness. This reinforced loop will eventually connect to the metal keychain ring.
To make the leaf, use green yarn and ch 8. Starting in the second chain from the hook, work sc 1, hdc 1, dc 3, hdc 1, sc 1. You have now completed one side of the leaf. Instead of turning the work, continue around the opposite side of the foundation chain.
Along the second side, work sc 1, hdc 1, dc 3, hdc 1, sc 1, then sl st near the beginning of the leaf. This produces a narrow oval with pointed ends. For a more defined central vein, work a row of surface slip stitches along the original foundation chain using a slightly darker green yarn.
Leave a long yarn tail and sew the leaf near the point where the two stems meet. Secure it with several small stitches, but avoid sewing the entire leaf flat. Allowing the outer half to remain loose gives it more dimension. Finally, attach the metal ring through the reinforced crochet loop and gently test the connection.
Finishing Details, Customization, and Keychain Tips
A few small finishing details can make the Crocheted cherry keychain pattern look especially polished. Use your fingers to reshape both cherries after assembly. If one side appears slightly flat, gently redistribute the stuffing from the opposite side. The fruit should look round while maintaining a small natural indentation where each stem is attached.
For additional personality, embroider a tiny curved highlight onto each cherry using cream, pale pink, or white yarn. One or two small stitches are enough to suggest shine. Keep this detail subtle because oversized embroidery can overwhelm such a compact crochet fruit keychain.
Color variations offer another simple customization. Deep burgundy produces realistic dark cherries, while bright red creates a cheerful classic design. Pink can transform the pattern into a cute decorative accessory, and combining two slightly different red shades makes each fruit distinct while preserving the recognizable cherry theme.
You can also adjust the finished size without changing the stitch counts. Fingering yarn and a smaller hook produce miniature cherries, while worsted yarn and a larger hook create a chunkier accessory. Remember that thicker yarn also creates heavier fruit, so reinforce the stems and hanging loop carefully if you increase the size significantly.
Durability is especially important for crochet keychain patterns because the finished item may be handled frequently. Weave every yarn tail through multiple stitches and change direction at least once before trimming. Check the leaf, stems, and hanging loop by applying gentle pressure. If anything moves noticeably, reinforce the area before attaching the hardware.
When the keychain is complete, inspect it from every side. Make sure the two cherries hang naturally, the leaf faces outward, and the metal ring does not pull directly against a weak crochet stitch. A carefully finished Crocheted cherry keychain pattern combines cute proportions with secure construction, making it a satisfying project for gifts, accessories, craft collections, or simply practicing miniature crochet techniques.
FAQ: Frequently Asked Questions About the Crocheted Cherry Keychain Pattern
Is the Crocheted cherry keychain pattern suitable for beginners?
Yes. This project is appropriate for adventurous beginners who already understand the basic single crochet stitch. The main techniques are the magic ring, increases, decreases, chains, slip stitches, and working in continuous rounds. Keeping track of the stitch count is the most important part of shaping the cherries correctly.
What yarn is best for a crochet cherry keychain?
Cotton and cotton-blend yarn are excellent choices because they create clearly defined stitches and maintain their shape well. Smooth acrylic can also work. DK and sport-weight yarns produce compact cherries that are comfortable for keychain use.
How much yarn do I need?
Only small quantities are required. Approximately 10–15 yards of red yarn and 5–10 yards of green yarn are generally enough, depending on yarn thickness, hook size, tension, and stem length. This makes the pattern ideal for leftover yarn.
Why is my cherry not perfectly round?
Uneven tension, incorrect stitch counts, or too much stuffing can distort the shape. Count each round carefully and add fiberfill gradually. After closing the piece, gently roll and shape it between your fingers to redistribute the stuffing.
Can I make the cherries without stuffing?
You can, although they will look flatter. Fiberfill creates the rounded amigurumi cherry appearance. If you prefer an extremely lightweight accessory, use only a tiny amount of stuffing rather than filling the fruit firmly.
How can I make smaller cherries?
Use thinner yarn and a smaller crochet hook while keeping the same stitch sequence. Alternatively, stop increasing at 18 stitches rather than 24 and begin the decrease section earlier. This produces a genuinely smaller construction rather than simply changing yarn thickness.
Can I make larger cherries?
Yes. After reaching 24 stitches, continue increasing with [sc 3, inc] × 6 {30}, then work several rounds of 30 stitches before beginning symmetrical decreases. This creates a larger fruit while maintaining a rounded shape.
How do I prevent stuffing from showing?
Use a hook slightly smaller than you might choose for a garment made with the same yarn. Maintain firm, consistent tension and avoid overstuffing. If the fabric stretches enough to reveal white fiberfill, remove a small amount.
Can I add faces to the cherries?
Certainly. Small embroidered eyes and a simple mouth can transform the cherries into cute character accessories. Embroidery is particularly useful because it allows you to create facial details without adding bulky components.
How long should the stems be?
A chain of approximately 13–16 stitches works well for many miniature cherries. However, stem length depends on yarn thickness and personal preference. Making one stem slightly longer than the other helps the fruit hang naturally.
How do I make the keychain attachment stronger?
Reinforce the crochet loop with slip stitches and weave the yarn tails thoroughly through the joining area. The loop should connect to several secure stitches rather than relying on a single strand of yarn. Test it gently before regular use.
Can I add more than two cherries?
Yes. Make a third cherry and attach it with another stem of a different length. Three fruits create a fuller cluster, although the accessory will naturally become heavier. Reinforce the central joining point if adding extra pieces.
Can the same pattern be used without keychain hardware?
Absolutely. The cherry cluster can become a bag charm, zipper decoration, decorative garland element, or embellishment for another handmade project. Simply change or omit the final hanging loop according to its intended use.
How can I make a more realistic leaf?
Use two shades of green and embroider a central vein after crocheting the leaf. You can also lengthen the foundation chain and use taller stitches near the center to produce a longer, more pointed leaf shape.
How should I care for the finished crochet keychain?
Care depends on the yarn and filling used. For many handmade crochet accessories, gentle spot cleaning is the easiest way to maintain the shape. If washing is necessary, follow the care recommendations for your specific yarn and allow the piece to dry completely before using it again.
Conclusion
The Crocheted cherry keychain pattern combines simple amigurumi construction with small decorative details to create a colorful handmade accessory. Throughout this tutorial, you learned how to begin each cherry with a magic ring, use strategic increases to form the rounded upper section, work even rounds for height, and apply invisible decreases to close the fruit smoothly.You also learned how to stuff the cherries without distorting their shape, crochet reinforced green stems, create a dimensional leaf, and join the separate pieces into a balanced cluster. The reinforced hanging loop is particularly important because it provides a secure connection between the soft crochet construction and the keychain hardware.
This project can easily be personalized through color, size, stem length, embroidered highlights, facial details, or additional cherries. Once you understand the basic construction, you can create several variations using the same crochet cherry pattern while giving every finished accessory its own personality.
The most important elements are consistent tension, accurate stitch counting, moderate stuffing, and secure finishing. With these techniques, this Crocheted cherry keychain pattern becomes a fun way to practice miniature crochet while creating something decorative and practical. If you make your own cherry keychain, leave your sincere opinion about the pattern and share your suggestions for future crochet projects. Your ideas about colors, sizes, details, and creative variations can inspire even more handmade designs.