
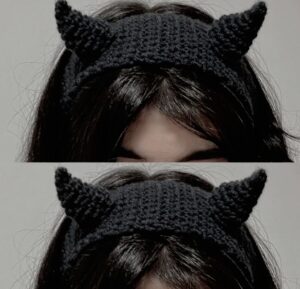
Crocheted horn headband pattern is a creative crochet project for anyone who enjoys making playful handmade accessories with texture, shape, and personality.
The main idea behind this crocheted horn headband pattern is to create three separate elements: the headband base and two matching crochet horns.
Choosing suitable materials makes the construction easier and gives the project a cleaner finish. A smooth worsted-weight cotton or acrylic yarn is an excellent option because the stitches remain visible and the horns maintain their shape. A 3.5 mm to 4.5 mm crochet hook will work for many medium-weight yarns, although using a hook slightly smaller than the yarn label recommends can produce the dense fabric needed for stuffed pieces. You will also need a yarn needle, scissors, stitch marker, fiberfill, and either a plain headband or additional yarn for a completely crocheted band. The finished measurements can be adjusted, but horns approximately 4 to 5 inches tall provide a noticeable decorative effect without becoming overly heavy.
Materials, Crochet Abbreviations, and Preparing the Headband
Before beginning the crocheted horn headband pattern, prepare approximately 80 to 120 yards of yarn for an average adult-sized project. The exact quantity depends on the width of the band and the size of the horns. Choose one main color for a coordinated design, or use contrasting shades for the horns and headband. Black, red, cream, brown, purple, orange, and deep green are popular choices for fantasy-inspired accessories. For a softer appearance, pastel colors can completely transform the character of the project. The ability to personalize the palette is one of the reasons this pattern is so versatile.
The crochet key used throughout this pattern follows standard US terminology: CH = chain, SC = single crochet, HDC = half double crochet, DC = double crochet, SL ST = slip stitch, ST = stitch, STS = stitches, INC = two single crochets worked into the same stitch, DEC = single crochet decrease, MR = magic ring, and FO = fasten off. When a sequence appears inside brackets, repeat those instructions for the specified number of times. For example, [SC 2, INC] x 3 means work two single crochets followed by one increase, repeating the complete sequence three times.
If you are using a rigid headband as the foundation, begin by crocheting a rectangular cover. Make a foundation chain long enough to reach from one end of the headband to the other when slightly stretched. For a medium headband, approximately CH 65–75 may be appropriate, although measuring the actual base is much more reliable than relying on a universal number. Starting in the second chain from the hook, work SC across, CH 1, and turn. Continue making rows until the rectangle is wide enough to wrap completely around the headband.
Wrap the crocheted rectangle around the rigid band and use a yarn needle to seam the long edges together on the underside. Keep the seam reasonably snug so that the crochet covering cannot rotate around the base. At both ends, fold the remaining fabric inward and sew the openings closed. This creates a smooth crochet-covered headband that provides a sturdy foundation for attaching the horns later. Before cutting the yarn, check that the covering is evenly distributed without noticeable wrinkles.
For a completely crocheted version, measure around the intended wearer’s head where the band will naturally sit. Create a foundation chain approximately 1 to 2 inches shorter than that measurement because crochet fabric will usually stretch. Join carefully without twisting the chain and work HDC in each stitch around. Continue for approximately 4 to 6 rounds, depending on the desired width. Slip stitch to finish and weave in the ends securely. This produces a softer crochet headband suitable for smaller or lightweight horns.
Gauge is not extremely strict for this project, but stitch density matters when making the horns. Loose stitches may allow the stuffing to show through and can make the shapes feel floppy. If this happens, switch to a crochet hook approximately 0.5 mm smaller. Before starting the horns, make a small swatch of single crochet stitches and stretch it gently. If the openings between stitches remain small, the fabric should work well for the stuffed sections of this crocheted horn headband pattern.
Step-by-Step Crochet Horn Pattern and Shaping Technique
Begin the first horn with an MR. Work R1: 4 SC into MR [4]. Pull the magic ring tightly but avoid fastening off. For R2: SC around [4]. This narrow beginning creates the pointed tip of the horn. Place a stitch marker in the first stitch of every round because the horn is worked in a continuous spiral. Keeping track of the beginning of each round prevents accidental increases and helps ensure that both horns are identical.
Continue with R3: [SC 1, INC] x 2 [6]. Work R4: SC around [6]. Then make R5: [SC 2, INC] x 2 [8] and R6: SC around [8]. The alternating increase and plain rounds create gradual expansion instead of an abrupt cone. This method produces a natural tapered appearance and gives the horn enough height before the base becomes wider. Avoid stuffing the tip at this stage because the narrow opening will make the work difficult to handle.
For the next section, work R7: [SC 3, INC] x 2 [10], followed by R8: SC around [10]. Continue with R9: [SC 4, INC] x 2 [12] and R10: SC around [12]. At this point, begin adding very small pieces of fiberfill to the narrow end. Use the blunt end of your crochet hook or another smooth tool to push the stuffing carefully toward the tip. The goal is firmness without stretching the crochet fabric.
Continue widening the horn with R11: [SC 5, INC] x 2 [14], R12: SC around [14], R13: [SC 6, INC] x 2 [16], and R14: SC around [16]. For a taller horn, add one or two additional plain rounds before making the next increase. For a shorter horn, stop increasing here. This flexibility makes the crochet horn pattern adaptable to children, adults, costume accessories, or decorative headpieces of different proportions.
To create a wider base, work R15: [SC 7, INC] x 2 [18], followed by R16: SC around [18]. Add enough stuffing to make the horn hold its shape while still allowing the base to flatten slightly during attachment. Do not overfill the final half inch because a very hard base is more difficult to sew neatly onto the headband. When satisfied with the shape, FO, leaving a yarn tail approximately 12 to 15 inches long for sewing.
Make the second horn by repeating exactly the same rounds. Place the two finished pieces beside each other before attaching them and compare their height, width, and firmness. Minor differences can often be corrected by redistributing the stuffing. If one horn is noticeably taller, removing its final plain round may help. Matching stitch counts carefully is the easiest way to achieve symmetry, making this an important habit when following any crocheted horn headband pattern with paired components.
Attaching the Horns and Creating a Professional Finish
Before sewing anything permanently, position both horns on the headband. A practical starting point is approximately 2.5 to 3.5 inches apart, although this distance should be adjusted according to the headband size and horn dimensions. Use removable stitch markers or small pieces of contrasting yarn to mark the positions. Put the headband on briefly and check the horns in a mirror. Looking at the project while it is being worn is much more useful than judging alignment only on a flat table.
Thread the long yarn tail from the first horn through a yarn needle. Flatten the bottom opening slightly and begin sewing it to the crochet headband base using small whip stitches. Pass through the headband covering rather than around the entire rigid headband whenever possible. Work around the horn base twice if additional stability is needed. Keep your stitches firm but not excessively tight, as pulling too strongly can distort the circular base.
Attach the second horn using exactly the same technique. After several stitches, stop and compare its angle with the first horn before completing the seam. The horns can point directly upward, lean slightly outward, or curve toward each other depending on the desired appearance. Because handmade pieces naturally contain tiny variations, perfect mathematical symmetry is unnecessary. However, maintaining similar placement and angles gives the crocheted horn headband a polished, intentionally designed appearance.
If you want curved horns, shaping can be introduced while stuffing. Instead of packing the fiberfill evenly, place slightly more stuffing along one side and gently bend the horn while working upward. Another option is to position increases consistently toward one side during selected rounds. This creates a subtle curve directly in the crochet fabric. Beginners may find the stuffing method easier because adjustments can be made before the base is sewn closed.
For extra decoration, consider adding small crocheted flowers, leaves, bows, stars, or contrasting edging around the base of each horn. These additions can transform the same fundamental pattern into a woodland, fantasy, festive, or whimsical accessory. Decorative pieces should remain lightweight so they do not pull the headband downward. A few carefully chosen details usually look more refined than covering the entire surface with embellishments.
Finish by weaving every yarn tail into the interior stitches and trimming excess yarn. Examine the attachment points from several angles to make sure no stuffing is visible. Gently reshape both horns with your fingers and check that the headband remains comfortable. If the underside feels rough, small crocheted patches can be sewn over exposed seams. These finishing details may seem minor, but they significantly improve the overall appearance and durability of a handmade crocheted horn headband pattern.
Customization, Sizing, Care, and Creative Variations
Sizing is one of the easiest aspects of this project to customize. For smaller horns, stop after approximately R12 or R14 and finish with one plain round. For larger horns, continue the established sequence by increasing two stitches every second round. For example, after reaching 18 stitches, the next increase round can be [SC 8, INC] x 2 [20], followed by a plain round. Maintaining gradual increases preserves the tapered silhouette while allowing you to create almost any horn height.
Color changes can also add dimension. To make striped horns, change yarn colors every two or three rounds while carrying or cutting the previous yarn neatly inside the piece. A darker tip gradually transitioning into a lighter base creates a dramatic effect. Alternatively, keep the horns neutral and use a brighter color for the band. Because the crocheted horn headband pattern uses relatively little yarn, it can be an excellent project for using coordinated leftovers from previous crochet projects.
Texture provides another customization opportunity. The basic version uses single crochet because it creates dense, stable fabric, but surface details can be embroidered afterward. Horizontal lines around the horns can suggest ridges, while small chains sewn spirally around each horn can create additional dimension. Avoid using overly loose decorative stitches on areas that will receive frequent handling because they may snag during use or storage.
When making the project for children, prioritize comfort and secure construction. Keep the horns smaller and lighter, use soft yarn, and ensure that every component is firmly sewn rather than loosely attached. The headband should sit comfortably without excessive pressure. Avoid small detachable decorations when creating accessories intended for very young children. A simple version with embroidered details can provide visual interest without requiring additional loose components.
To care for the finished headband, gentle spot cleaning is usually preferable, particularly when a rigid plastic or metal base is used. Dab the crocheted surface with a damp cloth and mild soap, then allow it to air dry completely. Avoid crushing the horns while they are wet because moisture can temporarily soften the fibers. If a horn becomes flattened during storage, reshape the stuffing gently with your fingers before wearing it again.
This project can also become the starting point for many related handmade designs. The horn construction technique can be adapted for costume hats, hooded scarves, decorative plush toys, fantasy-inspired bags, or seasonal accessories. Once you understand how increases create the tapered shape, you can experiment with longer, shorter, wider, or curved versions. Learning this basic shaping principle makes the crocheted horn headband pattern useful beyond a single finished accessory.
FAQ – Frequently Asked Questions About the Crocheted Horn Headband Pattern
What yarn is best for a crocheted horn headband pattern?
Medium-weight cotton or acrylic yarn is a practical choice. Cotton provides good stitch definition and structure, while acrylic is lightweight, affordable, and available in many colors. The most important consideration is choosing yarn that creates dense fabric when worked in single crochet.
What crochet hook size should I use?
For worsted-weight yarn, a hook between approximately 3.5 mm and 4.5 mm works for many crocheters. For the horns, consider using a slightly smaller hook than usual so that the stitches remain tight enough to conceal the stuffing.
How can I make the crochet horns stand upright?
Use dense single crochet stitches, firm but moderate stuffing, and secure sewing around the entire base. A stable headband foundation also helps. The lower section of each horn should be stuffed enough to maintain its shape but not so firmly that it becomes difficult to flatten against the band.
Can I make the horns larger?
Yes. Continue alternating increase rounds with plain rounds. If your current round contains 18 stitches, for example, you can gradually expand to 20, 22, and 24 stitches while adding plain rounds between increases. You can also add additional plain rounds to increase height without dramatically increasing width.
How do I make both horns the same size?
Count every round carefully and use a stitch marker. Write down any modifications made to the first horn so you can repeat them exactly on the second. Use approximately the same amount of stuffing in each piece and compare the horns before attaching them.
Can beginners make this pattern?
Yes. The project mainly requires chains, single crochet stitches, increases, and basic sewing. The magic ring can take a little practice, but it is a useful technique for many amigurumi and three-dimensional crochet projects. Beginners can also replace the magic ring with a short chain joined into a small circle if necessary.
Can I make the headband without a plastic base?
Yes. A completely crocheted elastic-style band works particularly well with smaller horns. Measure the head circumference and make the band slightly shorter so the natural stretch of the crochet fabric provides a comfortable fit.
How can I make curved crochet horns?
You can manipulate the stuffing so one side is slightly fuller than the other, then gently bend the horn into position. For a more permanent curve, advanced crocheters can alter the placement of increases and decreases to shape the fabric itself.
How far apart should the horns be?
There is no mandatory measurement because head sizes and horn dimensions vary. Approximately 2.5 to 3.5 inches between the inner edges is a useful starting point for many adult headbands. Always test the position before sewing permanently.
Can this pattern be made with leftover yarn?
Absolutely. The individual components require relatively small quantities of yarn, making this project useful for leftover medium-weight yarn. Coordinating scraps can also be used to create stripes, contrasting horn tips, decorative edging, or small embellishments.
Conclusion
The crocheted horn headband pattern combines simple crochet techniques with three-dimensional shaping to create a distinctive handmade accessory. Throughout this tutorial, you learned how to prepare a stable headband foundation, understand the essential crochet stitch abbreviations, construct tapered horns using controlled increases, add fiberfill correctly, and attach the finished pieces securely. These techniques are valuable not only for this headband but also for many amigurumi and dimensional crochet projects.
One of the best features of this pattern is its flexibility. You can change the yarn colors, horn height, band width, spacing, curve, and decorative details while keeping the same basic construction. A simple adjustment to the number of rounds can create tiny playful horns or longer dramatic versions, allowing each finished piece to have its own personality.
Take your time during the assembly stage and check the placement of both horns before permanently sewing them in place. Careful finishing, consistent stitch tension, and balanced stuffing will help transform a straightforward crochet project into a polished handmade accessory.If you make this crocheted horn headband pattern, leave your sincere opinion about the project and share any suggestions you may have. Your ideas about different colors, horn shapes, decorations, or construction techniques can inspire new variations and help other crochet enthusiasts discover creative ways to personalize their own handmade headbands.