
Pattern for making a crochet pumpkin is a charming and beginner-friendly way to create handmade autumn decorations using yarn, a crochet hook, and a few basic stitches.
The beauty of this crochet pumpkin pattern is that you do not need complicated materials or advanced crochet techniques to achieve an attractive result.
Before beginning the Pattern for making a crochet pumpkin, it is helpful to understand how the project is constructed. Instead of crocheting a complicated sphere with numerous increases and decreases, you will first create a textured rectangular panel. The short sides of this panel are joined to form a tube, one end is gathered closed, the pumpkin is filled with stuffing, and the opposite end is gathered afterward. A long strand of yarn is then passed around the pumpkin several times to create deeper sections and a realistic rounded shape. Finally, a crocheted stem is attached at the center. This construction method makes it easy to change the dimensions of your pumpkin because increasing the starting chain creates a taller pumpkin, while adding more rows increases its circumference.
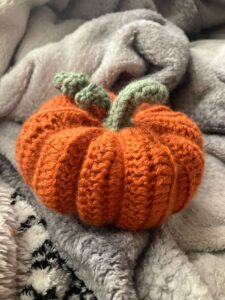
Materials, Crochet Stitch Key, and Pumpkin Measurements
For this Pattern for making a crochet pumpkin, choose a medium-weight yarn if you want a versatile decorative pumpkin that is easy to shape. Approximately 60 to 100 yards of yarn is usually sufficient for a small to medium pumpkin, although the exact amount depends on yarn thickness, tension, and finished size. You will also need a crochet hook appropriate for your yarn, polyester fiberfill, a yarn needle, scissors, and a small amount of brown or green yarn for the stem. Optional materials include a stitch marker and additional green yarn for a leaf or curling vine.
The crochet stitch key keeps the instructions easier to follow. CH = chain, SC = single crochet, BLO = back loop only, SL ST = slip stitch, ST = stitch, STS = stitches, REP = repeat, FO = fasten off, INC = increase by working two stitches into the same stitch, and DEC = decrease by combining two stitches into one. The main pumpkin body does not require complicated increases or decreases because most of its shape comes from gathering and stuffing.
For a medium pumpkin, begin with CH 26. This starting chain determines approximately how tall the crocheted panel will be before assembly. If you prefer a miniature pumpkin, try approximately CH 16–20. For a larger decorative pumpkin, approximately CH 32–40 can work well. Remember that different yarn weights and individual crochet tension will affect the actual dimensions, so measurements are often more reliable than stitch counts when resizing.
Row 1: SC in the second CH from the hook and SC across. CH 1, turn. You should have 25 stitches if you began with 26 chains. Keep your stitches relaxed and consistent. A foundation that is too tight can pull one side of the rectangle inward and make the finished pumpkin harder to shape evenly.
Row 2: SC BLO in each ST across. CH 1, turn. From this point onward, continue working into the back loop only. Rows 3–approximately 40: SC BLO across, CH 1, turn. The exact number of rows is flexible. Continue until the rectangular piece is long enough to wrap around itself comfortably and create the circumference you want for your pumpkin.
The BLO single crochet texture is an important part of this project because it produces visible vertical ridges after assembly. These ridges naturally imitate the sections found on a real pumpkin. Before joining the rectangle, stretch it gently and inspect the proportions. For a pleasantly rounded pumpkin, the rectangle should generally be considerably longer than it is tall. If the panel seems too short when wrapped into a tube, add several more rows before continuing.
Joining, Gathering, and Stuffing the Crochet Pumpkin
Once the rectangular panel has reached the desired length, bring the first and last rows together with the right sides facing each other. Join them using SL ST through corresponding stitches on both edges. Another option is to sew the edges together with a yarn needle using a mattress-style seam. The goal is to create a flexible tube with a seam that does not appear excessively bulky.
After joining, FO, leaving a long yarn tail of approximately 18 to 24 inches. Thread this tail through a yarn needle. Along one open end of the tube, weave the needle in and out through the edge stitches. You do not need to pass through every tiny loop, but the gathering stitches should be evenly distributed around the opening.
Pull the yarn gradually until the opening closes. Avoid pulling aggressively all at once because this can break the yarn or create uneven gathers. When the center is tightly closed, pass the needle through several opposite stitches and secure the opening with a few firm knots. This gathered end will become the bottom of the crochet pumpkin.
Turn the piece so that the seam is positioned neatly and the textured ridges run vertically from the bottom toward the upper opening. Begin adding polyester fiberfill in small portions. Push stuffing toward the bottom and sides first, gradually building the rounded shape. Small pieces of stuffing generally create a smoother surface than inserting one large amount at once.
Continue stuffing until the pumpkin feels full but still compressible. Overstuffing can stretch the crochet stitches too far apart, revealing the filling and making it difficult to create the characteristic pumpkin sections. Understuffing, however, can leave the finished project looking flat. The ideal amount gives the handmade crochet pumpkin a firm shape while still allowing it to be pulled inward with shaping yarn.
Cut another long piece of matching yarn and thread the yarn needle. Repeat the gathering technique around the remaining open edge. Before closing it completely, add small amounts of fiberfill wherever the pumpkin needs additional volume. Pull the opening closed securely and knot the yarn. Do not trim the long tail yet because it can be used during the shaping process.
Creating Pumpkin Ribs, Stem, and Decorative Details
To create more pronounced pumpkin sections, take the long yarn tail from the top and insert the needle through the center of the pumpkin, bringing it out through the center of the bottom. Pull gently until the top and bottom begin moving toward each other. This compression changes the project from a simple stuffed ball into a flatter, more realistic crochet pumpkin shape.
Bring the yarn around the outside of the pumpkin, positioning it between two raised crochet ridges. Insert the needle through the center again from bottom to top and gently tighten the strand. The yarn will pull into the surface and create a deeper groove. Repeat this technique around the pumpkin, spacing each strand as evenly as possible.
For a classic appearance, create approximately six to eight sections. You can follow the existing crochet ridges as visual guides. After every section, inspect the pumpkin from several angles before tightening further. Keeping similar tension on each strand produces balanced shaping. When you are satisfied with the result, secure the yarn firmly near the center opening and weave in the remaining end.
Now create the stem using brown, tan, dark green, or another coordinating yarn. One simple stem begins with a magic ring. Round 1: 6 SC into the magic ring. Join with SL ST if working in joined rounds. For a slightly wider stem, work Round 2: INC around for 12 SC and then continue upward without increasing.
For a narrow stem, you can simply work 6 SC around for approximately 4–6 rounds, depending on the desired height. For a thicker version, work approximately 8–10 SC per round. When the stem reaches the desired length, FO, leaving a long tail for sewing. A slightly irregular stem can actually make the pumpkin look more natural, so perfect symmetry is unnecessary.
Position the stem over the gathered opening at the top of the pumpkin. Use the long yarn tail to sew securely around its base, passing through both the stem and pumpkin fabric. Add a small crocheted leaf or curling vine if desired. A simple vine can be created with a chain followed by multiple stitches worked into each chain, naturally causing the strip to curl. These optional details can give the Pattern for making a crochet pumpkin an attractive finished appearance.
Customizing Your Crochet Pumpkin, FAQ, and Finishing the Project
One of the best qualities of this Pattern for making a crochet pumpkin is its flexibility. Once you understand the basic rectangular construction, changing the finished size is straightforward. Increase the starting chain for a taller pumpkin and crochet additional rows for a wider circumference. Conversely, fewer chains and fewer rows produce a miniature pumpkin that works beautifully in baskets, garlands, tabletop arrangements, or seasonal displays.
Yarn selection dramatically changes the personality of the finished piece. Smooth acrylic or cotton yarn creates clear stitch definition and crisp ribs. Wool blends offer a softer, warmer appearance. Bulky yarn produces a plush pumpkin with fewer stitches, while thinner yarn can create delicate miniature versions. Whatever yarn you choose, select a hook that produces a relatively dense fabric so that the stuffing remains concealed.
Color is another easy way to personalize the crochet pumpkin pattern. Orange creates the familiar autumn look, but white and cream pumpkins complement neutral décor. Sage and olive green provide an earthy appearance, while mustard, burgundy, rust, and terracotta work beautifully in fall-inspired arrangements. Making several pumpkins in coordinating colors and different sizes can create an especially appealing handmade centerpiece.
Pay attention to finishing details because they can significantly improve the final result. Weave in every loose end securely, shape the stuffing with your fingers, and adjust the ribs until the pumpkin sits naturally. If the bottom is too rounded and the pumpkin tips over, press it gently against a flat surface while redistributing the stuffing. This can help create a stable base.
The same basic technique can also be adapted to create different textures. Instead of SC BLO, experienced crocheters may experiment with half double crochet worked through the back loop, alternating ribbed stitches, or other textured patterns. When making changes, create a small swatch first because taller stitches can significantly alter the dimensions and elasticity of the finished rectangle.
Most importantly, treat the stitch counts in this Pattern for making a crochet pumpkin as a practical starting point rather than an unchangeable rule. Yarn thickness, hook size, personal tension, and stuffing density all affect the final dimensions. Measuring your work and observing its proportions as you crochet will often produce better results than focusing exclusively on exact numbers.
FAQ – Frequently Asked Questions About the Pattern for Making a Crochet Pumpkin
Is this crochet pumpkin pattern suitable for beginners?
Yes. The project primarily uses chains, single crochet, back-loop-only single crochet, slip stitches, and basic sewing techniques. A beginner who can maintain reasonably consistent tension should be able to complete it. The shaping process may seem unusual the first time, but it becomes intuitive once the pumpkin is stuffed.
What is the easiest stitch for making a crochet pumpkin?
Single crochet is one of the easiest and most practical choices because it creates a dense fabric. For this particular design, single crochet through the back loop only is especially useful because it creates the ribbed texture that gives the finished pumpkin additional dimension.
Do I need a magic ring for the pumpkin body?
No. The main body is crocheted as a rectangle and then assembled. A magic ring is suggested only for the optional crocheted stem. If you prefer, the stem can also be made as a tiny rectangle, rolled into a tube, and sewn into position.
Why is my crochet pumpkin too tall?
The starting chain controls the approximate height of the pumpkin. If your pumpkin looks taller than desired, use fewer chains for the next version. You can also compress the top and bottom more strongly when creating the sections, which helps produce a shorter and rounder silhouette.
Why does my pumpkin look flat?
A flat pumpkin may need additional stuffing or a wider crocheted rectangle. Add enough filling to create volume before closing the second opening. If the rectangle does not have enough rows, its circumference may also be too small compared with its height.
How much stuffing should I use?
Use enough fiberfill for the pumpkin to feel firm while remaining compressible. You need to be able to pull shaping yarn through the center and create visible grooves. If the pumpkin becomes extremely rigid, it is probably overstuffed.
How do I make deeper pumpkin sections?
Use a strong yarn strand and pass it repeatedly through the center of the stuffed pumpkin. Wrap the strand around the outside and gently tighten it before repeating the process for the next section. Increase the tension gradually rather than pulling extremely hard in one motion.
Can I use leftover yarn?
Yes. Small crochet pumpkins are excellent projects for using leftover yarn. Make sure you have enough of the main color to complete the rectangular body. The stem, leaf, and vine require only small quantities of coordinating yarn.
Can I make a pumpkin using chunky yarn?
Absolutely. Chunky or bulky yarn can create a soft, plush pumpkin quickly. Use a hook appropriate for the yarn while maintaining stitches dense enough to prevent the stuffing from showing. You will probably need fewer chains and rows than you would with medium-weight yarn.
Can cotton yarn be used for this project?
Yes. Cotton provides excellent stitch definition and makes the ribbed texture particularly visible. Because some cotton yarns have less elasticity than acrylic or wool blends, avoid making your stitches excessively tight.
How can I make a miniature crochet pumpkin?
Reduce both the starting chain and the total number of rows. For example, you might begin with approximately CH 12–16 and crochet until the rectangle has proportions suitable for a small pumpkin. Use a smaller amount of stuffing and create the sections using a yarn needle.
How can I make the stem look more realistic?
Use brown, tan, olive, or muted green yarn and avoid making the stem perfectly straight. You can gently curve it while sewing or vary the stitch tension slightly. Adding a tiny leaf or curled vine can also enhance the natural appearance.
Can these pumpkins be used as seasonal decorations?
Yes. Handmade crochet pumpkins can be arranged on shelves, tables, mantels, baskets, or other indoor decorative areas. They work well for autumn, Halloween-inspired, and harvest-themed displays. Keep small handmade items and detachable embellishments away from very young children and pets.
How do I keep the stuffing from showing through the stitches?
Use an appropriate hook size and maintain fairly dense crochet tension. If large spaces appear between stitches, try a slightly smaller hook. Avoid overstuffing because excessive filling pressure can stretch the crochet fabric and make gaps more visible.
How many pumpkin sections should I create?
Six to eight sections generally create a balanced appearance, but there is no strict requirement. Larger pumpkins may look attractive with additional sections, while tiny pumpkins may need only five or six. Use the crochet ridges as guides for even spacing.
Conclusion
The Pattern for making a crochet pumpkin offers a simple way to turn basic crochet stitches into a beautiful three-dimensional seasonal decoration. Starting with a ribbed rectangle makes the construction approachable because there is no need to manage complicated increases and decreases throughout the pumpkin body.In this tutorial, you learned how to create the foundation chain, work single crochet through the back loop, determine the size of the rectangular panel, join the edges, gather the openings, add fiberfill, and transform the stuffed form into a recognizable pumpkin.
You also learned how to create deeper pumpkin ribs by passing yarn through the center and wrapping it around the outside. This shaping technique is one of the most important parts of the project because it gives the pumpkin its characteristic segmented appearance and allows you to control how tall or flattened the final shape becomes.The finishing process included instructions for crocheting and attaching a stem as well as ideas for adding leaves and curling vines. These details are optional, which means you can keep your pumpkin simple or make it more decorative depending on the style you prefer.
Once you have completed one pumpkin, try changing the yarn weight, starting chain, number of rows, colors, and decorative details. A collection of pumpkins in different sizes and coordinating autumn shades is an enjoyable way to practice the same crochet techniques while producing unique finished pieces.After trying this Pattern for making a crochet pumpkin, please leave your sincere opinion about the project and share your suggestions. Tell us which yarn, color combination, stem style, or decorative detail you would choose, and share any creative ideas that could make the next handmade crochet pumpkin even more interesting.