
Shark-shaped fabric pencil case pattern is a fun sewing project that transforms simple pieces of fabric into a practical pencil case with a playful ocean-inspired design.
One of the advantages of this Shark-shaped fabric pencil case pattern is that it can be customized in many different ways.
The key to creating a professional-looking fabric shark pencil case is accurate preparation. A symmetrical body, smooth curves, secure zipper installation, and properly clipped seam allowances can make a significant difference in the final appearance. The project does not require complicated equipment, but a sewing machine, fabric scissors, pins or clips, a zipper foot, an iron, and a marking tool are very helpful. Before beginning, read through the entire construction process and prepare all pieces. Working slowly around the shark’s curves is more important than sewing quickly, especially around the nose and tail where small inaccuracies can noticeably change the shape.
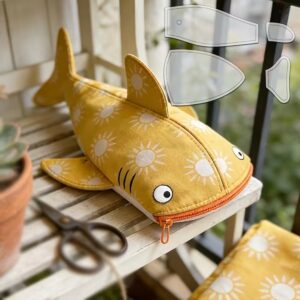
Materials, Measurements, and Preparing the Shark Pattern
For a medium shark pencil case, plan for a finished body approximately 10 to 11 inches long and about 4 to 5 inches tall at its widest point. These measurements can be adjusted depending on what you want to store inside. You will need approximately one fat quarter of exterior fabric, a similar amount of lining fabric, lightweight or medium-weight fusible interfacing, coordinating thread, and a zipper approximately 8 to 10 inches long. Small fabric scraps are enough for the fins and optional teeth.
Begin by drawing the shark body on paper. Create a gently pointed nose at one end, a slightly curved back, a rounded belly, and a narrow section leading toward the tail. Add a classic forked shark tail at the opposite end. Because the Shark-shaped fabric pencil case pattern needs seam allowance, add approximately 3/8 inch around the entire outline. Avoid extremely narrow points because they can be difficult to turn neatly after sewing.
Fold the exterior fabric with right sides together and place the paper template on top. Trace the pattern and cut two mirrored exterior pieces. Repeat the process with the lining fabric so that you have two matching lining pieces. Cut interfacing slightly smaller than the exterior pieces or according to the manufacturer’s instructions. Keeping every layer consistent is important because mismatched pieces can create puckering when the case is assembled.
Fuse the interfacing to the wrong side of both exterior body pieces. Use the temperature recommended for your particular interfacing and press rather than sliding the iron back and forth. Allow the pieces to cool before moving them. This extra structure makes the fabric pencil case pattern more durable and helps the shark silhouette remain recognizable when the pouch is empty.
Next, prepare the fins. Cut two small triangular side-fin pieces from exterior fabric and, if desired, one dorsal fin for the top. Each fin can be made from two fabric layers sewn right sides together. Leave the base open, trim the seam allowance, turn the fin right side out, and press it flat. Topstitching approximately 1/8 inch from the edge can provide a clean finished appearance.
Before sewing anything permanently, place the pieces together to preview the final shark. Position the fins, check the tail proportions, and mark where the zipper will sit. This preparation stage is also the best time to decide whether you want decorative eyes, embroidered details, felt teeth, or contrasting topstitching. Keeping embellishments relatively simple allows the shark-shaped pencil case to remain practical while still giving it plenty of personality.
Sewing the Zipper and Creating the Shark Details
The zipper is one of the most important components of the Shark-shaped fabric pencil case pattern. Depending on your design, it can be placed along the shark’s back or incorporated into the mouth area. A zipper positioned along the upper body is generally easier for beginners because it creates a wide opening and keeps the decorative face uncomplicated. Mark the zipper placement carefully on both exterior pieces before beginning.
Place one exterior body piece right side up and align the zipper with the marked opening, keeping the zipper tape parallel to the fabric edge. Place the corresponding lining piece over it with the right side facing downward. The zipper should be sandwiched between the exterior and lining fabrics. Secure all layers using sewing clips or pins, making sure the zipper remains straight.
Attach a zipper foot to the sewing machine and stitch approximately 1/4 inch from the zipper teeth. Sew slowly, especially near the zipper pull. When necessary, stop with the needle lowered, raise the presser foot, and move the zipper pull behind the foot before continuing. Fold the exterior and lining away from the zipper and press carefully. Add a narrow line of topstitching to prevent fabric from catching in the zipper.
Repeat the same process with the second exterior and lining pieces. After both sides are attached, open and close the zipper several times. It should move smoothly without catching the fabric. If the lining is too close to the zipper teeth, another narrow line of topstitching can help secure it. Checking the zipper now is much easier than repairing it after the entire shark fabric pencil case has been assembled.
Add the shark’s facial details before closing the body. Small circles of felt can become eyes, or the eyes can be embroidered for a softer finish. If the design includes teeth, cut several small white felt triangles and position them along the mouth. Keep decorative pieces securely stitched and avoid loose embellishments when making the pencil case for young children.
The fins can now be basted into position. Place them pointing inward toward the center of the shark so that they will extend outward after the body is turned right side out. Stitch across each fin base using a short basting seam. Check the placement from both sides before continuing. Correctly positioned fins give the Shark-shaped fabric pencil case pattern much of its distinctive three-dimensional character.
Assembling, Sewing, and Turning the Fabric Pencil Case
Once the zipper and decorative elements are complete, open the zipper at least halfway. This is essential because the opening will later be used to turn the finished fabric pencil case right side out. Forgetting this step can make turning the project extremely difficult. Arrange the exterior pieces with right sides together and place the lining pieces right sides together as well.
Match the edges carefully around the entire shark shape. Pin or clip frequently around the nose, fins, belly, and tail. Curved areas benefit from closer pinning because fabric layers can shift while sewing. Make sure the fins remain tucked safely between the exterior layers and are not accidentally folded into the seam in the wrong direction.
Sew around the exterior shark using approximately a 3/8-inch seam allowance. Reduce the machine speed around the nose and tail. When approaching a tight curve, sew a few stitches, stop with the needle down, lift the presser foot slightly, pivot the fabric, and continue. This technique produces smoother curves than attempting to force the fabric continuously through the machine.
Sew around the lining in the same manner, but leave an opening approximately 3 to 4 inches long along a relatively straight section. This opening will allow the entire shark-shaped pencil pouch to be turned. Backstitch securely at both ends of the opening so that the seam does not unravel while the fabric is being manipulated.
Trim the seam allowance around bulky areas and clip the curved sections. Small V-shaped notches can be removed from outward curves, while tiny straight clips work well on inward curves. Be careful not to cut through the stitching. Trim the tail points and nose carefully so that they can be turned more cleanly. Proper seam trimming is one of the most important finishing techniques in this project.
Reach through the opening in the lining and gently pull the shark right side out. Use a blunt turning tool, knitting needle, or similar object to carefully shape the nose and tail without puncturing the fabric. Pull the fins into their proper positions and smooth the seams with your fingers. Once everything is correctly shaped, press the exterior carefully to give the Shark-shaped fabric pencil case pattern a crisp, finished appearance.
Finishing Techniques, Customization, FAQ, and Final Tips
After turning the project, close the opening in the lining. Fold the raw edges inward approximately 3/8 inch and press them flat. Stitch the opening closed with a narrow machine seam or use a ladder stitch for a nearly invisible finish. Push the lining into the shark body and smooth it toward the corners, nose, and tail.
Inspect the zipper again and make sure it opens freely from end to end. If the zipper ends feel bulky, gently manipulate the fabric around them rather than trimming aggressively. A small amount of hand stitching can secure any loose areas. Press the finished pencil case with moderate heat, especially if felt or synthetic materials were used for decorative details.
Customization is one of the most enjoyable parts of this Shark-shaped fabric pencil case pattern. A realistic version can use gray fabric for the upper body and pale gray or white fabric for the belly. A playful version can feature bright blue fabric, stripes, polka dots, or ocean-themed prints. You can also use contrasting thread around the fins and tail to emphasize the shark silhouette.
The pattern can also be resized. A smaller version works as a coin pouch or earphone case, while a larger version can hold markers, crochet hooks, sewing tools, or small art supplies. When changing the dimensions, remember to adjust the zipper length proportionally. Maintaining a balanced relationship between the body, fins, and tail will help preserve the recognizable shark shape.
For additional durability, reinforce the beginning and end of every important seam. Areas around the zipper and fin bases experience more stress than the rest of the case, so backstitching is recommended. If using lightweight quilting cotton, medium-weight interfacing can make the finished fabric shark pencil case feel substantially more structured without making it difficult to turn.
Before considering the project complete, remove loose threads and examine all seams. Check that the lining is fully tucked inside, the zipper does not catch, and the fins are securely attached. A final gentle press can smooth wrinkles and improve the shape. These small finishing steps transform a simple handmade pouch into a neat and practical sewing project.
FAQ – Frequently Asked Questions About the Shark-Shaped Fabric Pencil Case Pattern
Is the Shark-shaped fabric pencil case pattern suitable for beginners?
Yes. A confident beginner can complete this project, particularly if they already know how to sew basic seams. The zipper and curved shark outline are the most challenging parts, but working slowly makes them manageable. Practicing zipper installation on scrap fabric can also help before beginning the final case.
What fabric works best for a shark pencil case?
Quilting cotton, cotton canvas, denim, and other stable woven fabrics are good options. Quilting cotton is especially beginner-friendly because it is easy to cut and sew. When using lighter fabric, adding fusible interfacing provides the structure needed for a durable shark-shaped fabric pencil case.
What size zipper should I use?
For a pencil case measuring approximately 10 to 11 inches long, an 8- to 10-inch zipper generally works well. The exact size depends on the location of the opening. A slightly longer zipper can sometimes be easier to install because the excess can be trimmed after sewing, provided the zipper design allows this safely.
Can I make the shark without interfacing?
Yes, particularly when using heavier canvas or denim. However, interfacing is recommended for lightweight cotton because it gives the pouch better structure. Without interfacing, the case may collapse when empty and the shark silhouette may appear less defined.
How can I make the shark tail look sharper?
Trim excess seam allowance near the tail points before turning the project. After turning, use a blunt tool to gently push the corners outward. Avoid using scissors or another sharp object because it can puncture the fabric or damage the seam.
Why does my fabric pucker around the curves?
Puckering often happens when the seam allowance has not been clipped sufficiently or when the fabric was stretched during sewing. Make small clips around curved sections without cutting the stitches. Pressing the seams carefully after turning can also improve the shape significantly.
Can the pencil case be washed?
That depends on the materials used. A case made from washable cotton, polyester thread, and washable interfacing can usually be gently hand washed. Always consider the care requirements of the zipper, felt decorations, interfacing, and other embellishments before washing.
Can I add more pockets inside?
Yes. A small flat pocket can be sewn onto one lining piece before the zipper and body are assembled. Keep the pocket relatively shallow so that it does not interfere with the shape or make the interior too bulky.
How can I make the project look more professional?
Accurate cutting, consistent seam allowances, careful pressing, smooth zipper installation, and neat topstitching make the biggest difference. Do not rush curved sections. Taking extra time to clip seams, remove loose threads, and shape the tail and nose properly can noticeably improve the finished Shark-shaped fabric pencil case pattern.
Can I use fabric scraps for this project?
Absolutely. The fins, eyes, teeth, and even sections of the body can be made from scraps. Combining coordinating leftover fabrics can turn the project into a creative scrap-busting sewing idea while reducing unnecessary fabric waste.
How long does this project usually take?
The time depends on sewing experience and the amount of decoration. A simple version may be completed in a few hours, while a detailed shark with appliqué, teeth, multiple fins, and decorative stitching may take longer. Preparing the pattern accurately at the beginning usually saves time during assembly.
What can I store inside the finished shark case?
Although designed as a pencil case, it can hold pens, markers, erasers, small rulers, lightweight craft tools, crochet hooks, or other compact supplies. Avoid extremely sharp or heavy objects that could damage the lining or place excessive pressure on the zipper.
Conclusion
Creating a Shark-shaped fabric pencil case pattern is an enjoyable way to combine practical sewing techniques with a playful design. Throughout this tutorial, you learned how to prepare the shark body pattern, select suitable fabrics, add interfacing, construct the fins, install the zipper, assemble the exterior and lining, sew curved seams, turn the project, and finish the details neatly.The most important steps are accurate cutting and patient sewing. Curves around the shark’s nose, belly, and tail should be stitched slowly, while seam allowances need to be clipped carefully before turning. Proper zipper installation and secure fin placement also help create a durable pencil case that can withstand regular use.
Once you understand the basic construction method, this fabric pencil case pattern becomes highly adaptable. You can experiment with different sizes, colors, prints, fin shapes, facial expressions, and decorative details. The same basic technique can even inspire other animal-shaped pouches and creative storage projects.A handmade shark pencil case can be useful for school supplies, art materials, sewing notions, or small craft tools. It can also make a thoughtful handmade gift, especially when the fabric and details are customized for the person receiving it.
Most importantly, allow your handmade project to have its own personality. Small variations are a natural part of sewing, and they can make each shark unique. Careful construction matters, but creativity is what makes a handmade project memorable.After trying this Shark-shaped fabric pencil case pattern, leave your sincere opinion about the project and share your suggestions. What colors would you choose for your shark? Would you add teeth, embroidered eyes, extra fins, or another creative detail? Your ideas can inspire new variations and make this fun sewing project even more interesting.