
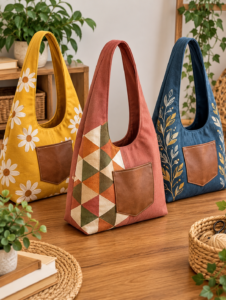
Simple fabric shoulder bag pattern is a practical and creative sewing project for anyone who wants to turn a few pieces of fabric into a useful handmade accessory.
The beauty of this simple fabric shoulder bag pattern comes from its uncomplicated shape. Instead of relying on complex hardware or difficult construction methods, the design focuses on clean fabric panels and a comfortable strap.
Before starting your fabric shoulder bag, prepare the materials and organize the work area so every stage can be completed accurately. For a medium bag, plan for approximately 1/2 yard of exterior fabric, 1/2 yard of lining fabric, and a similar amount of lightweight or medium-weight fusible interfacing. You will also need coordinating thread, fabric scissors or a rotary cutter, pins or sewing clips, a ruler, an iron, and a sewing machine. A practical starting measurement for the main panels is approximately 15 inches wide by 14 inches high, although these measurements can be adjusted. The strap can begin as a strip approximately 4 inches wide and 32 to 40 inches long, depending on how low you want the bag to sit. Taking a few minutes to measure carefully at the beginning makes the remaining sewing process much easier.
Materials, Measurements, and Fabric Preparation
The first step in this simple fabric shoulder bag pattern is choosing an exterior fabric with enough stability for the intended use. Quilting cotton can create a lightweight bag, while canvas, denim, cotton duck, or medium-weight home décor fabric will produce a firmer result. If you choose a lightweight material, interfacing becomes particularly useful because it prevents the finished bag from feeling too soft. Always consider the direction of a printed design before cutting so that flowers, geometric motifs, animals, or other directional elements appear upright on the finished project.
For a convenient medium-size version, cut two exterior rectangles measuring approximately 15 x 14 inches. Cut two lining rectangles in the same dimensions. These measurements include room for the seams and create a versatile everyday bag without making the project unnecessarily large. If you want a smaller shoulder bag, reduce both dimensions proportionally. For a larger tote-style version, increase the width and height while remembering that a larger bag may require heavier interfacing and a stronger strap.
Next, cut two pieces of fusible interfacing slightly smaller than the exterior panels, or follow the instructions supplied with the interfacing you are using. Fuse the interfacing to the wrong side of each exterior piece using an iron at the recommended temperature. Press rather than sliding the iron aggressively across the material. Allow the pieces to cool completely before moving them because the adhesive needs a little time to create a secure bond with the fabric.
The shoulder strap is another important part of the project. Cut one strip approximately 4 inches wide by 36 inches long for a comfortable medium-length shoulder strap. Before cutting, you can use a measuring tape over your shoulder to determine your preferred finished drop. If the available fabric is not long enough, sew two shorter strips together using a diagonal seam, press the seam open, and then continue constructing the strap. This method can make the joined area less bulky than a straight horizontal seam.
To prepare the strap, fold the long fabric strip in half lengthwise with the wrong sides together and press it to establish a center crease. Open the strip again, fold both long raw edges inward until they meet the center crease, and press carefully. Fold the entire strip along the original center crease once more. The raw edges should now be enclosed inside the strap. Sew close to both long edges to secure the folds and create a clean, balanced appearance.
Before assembling the bag, press every cut piece and confirm that matching panels have identical dimensions. Small differences can become much more noticeable once the seams are sewn together. Mark the top center of each exterior panel with a removable fabric marker or a small crease. These reference points can help you position the strap evenly later. Careful preparation is one of the simplest ways to make a handmade shoulder bag pattern look more polished and professionally constructed.
Sewing the Exterior and Creating the Bag Shape
Place the two exterior panels with their right sides together, carefully matching all raw edges. Pin or clip along the sides and bottom while leaving the entire top edge open. Sew the sides and bottom using approximately a 1/2-inch seam allowance. Backstitch at the beginning and end of each seam for additional security. If your exterior fabric frays easily, finish the seam allowances with a zigzag stitch or another preferred edge-finishing method.
After sewing the exterior, press the side and bottom seams carefully. Pressing during construction is just as important as the actual stitching because it helps the bag maintain clean edges. Keep the exterior turned wrong side out for the next step. At this stage, you essentially have a flat fabric pouch, but creating depth at the bottom will transform it into a more practical fabric shoulder bag.
To create boxed corners, pinch one bottom corner so the side seam and bottom seam sit directly on top of each other. The corner should form a triangular point. Measure approximately 1 1/2 inches from the tip and draw a straight line across the triangle. Sew directly along this marked line, backstitching at both ends. Repeat the process on the opposite corner and check that both measurements match before trimming anything.
Trim the excess corner fabric approximately 1/2 inch beyond each new seam. When the exterior is turned right side out, the bottom should now have noticeable depth instead of remaining completely flat. A 1 1/2-inch corner measurement creates moderate capacity without making the bag excessively wide. For a deeper bag, the corner measurement can be increased, but both corners must always be identical to maintain a symmetrical shape.
Turn the exterior right side out and gently push the boxed corners into shape. Avoid using sharp objects that could damage the fabric. Examine the side seams, bottom seam, and corners to ensure there are no skipped stitches or openings. If the fabric is thick, the corners may benefit from a little steam and careful finger pressing. The bag should now begin to resemble the final project shown by a typical simple fabric shoulder bag pattern.
At this stage, you can also add optional decorative details before attaching the lining. A fabric label, simple appliqué, embroidery, or a small exterior patch pocket can personalize the project. Keep embellishments practical and securely stitched so they can withstand regular use. If you prefer a clean minimalist appearance, leave the exterior unchanged and allow the fabric print or texture to become the main visual feature of the finished bag.
Making the Lining and Attaching the Shoulder Strap
Place the two lining rectangles right sides together and align their edges. Pin along both sides and the bottom. Sew these edges using the same seam allowance used for the exterior, but leave an opening approximately 4 to 5 inches wide along the bottom seam. This opening is essential because the entire bag will later be turned through it. Backstitch securely on both sides of the opening so the stitches do not loosen during turning.
Create boxed corners in the lining using exactly the same method and measurements used for the exterior. Align the side and bottom seams, measure approximately 1 1/2 inches from each corner point, mark a straight line, and stitch across it. Trim the excess fabric after checking that both corners match. Matching exterior and lining dimensions helps prevent excess lining fabric from bunching inside the completed shoulder bag.
Now position the prepared strap on the exterior of the bag. Place one end against one side of the upper edge and the opposite end on the other side. A useful starting point is approximately 3 inches from each side seam, but adjust the placement according to the width of your bag. Make sure the strap is not twisted before pinning or clipping it securely in position. The raw ends of the strap should extend slightly beyond the top raw edge.
Baste the strap ends to the exterior using a seam allowance smaller than the final top seam. Basting keeps the strap from shifting when the lining is attached. For additional strength, you can sew across each strap end twice. Because the strap supports the weight carried inside the bag, secure stitching is important. This small reinforcement can significantly improve the durability of your simple fabric shoulder bag pattern.
With the exterior right side out and the lining wrong side out, insert the exterior bag inside the lining. The right sides of the exterior and lining should now face each other. Match the side seams and upper raw edges, making sure the shoulder strap is completely enclosed between the two layers. Pin or clip around the entire top opening, using extra clips near the strap ends where the fabric layers may be thicker.
Sew completely around the upper edge using approximately a 1/2-inch seam allowance. Work slowly across bulky areas and keep the raw edges aligned. Once the seam is complete, check that both strap ends have been securely caught in the stitching. If necessary, reinforce those areas with another line of stitches inside the seam allowance. This top seam connects the exterior, lining, and strap and is one of the most important construction points in the entire project.
Turning, Topstitching, and Finishing the Shoulder Bag
Reach through the opening left in the bottom of the lining and carefully pull the exterior fabric through it. Continue gently until the entire bag has been turned right side out. Avoid pulling aggressively on the strap because this can put unnecessary pressure on the newly sewn seams. Once everything is turned, use your fingers to shape the corners and straighten the top edge of the fabric shoulder bag.
Fold the raw edges of the lining opening inward so they align with the existing seam. Press the folded edges and close the opening with a narrow machine stitch close to the edge. A hand-sewn ladder stitch can also create a nearly invisible finish if preferred. After closing the opening, push the lining completely inside the exterior and smooth it into the boxed corners.
Roll the upper seam gently between your fingers so the lining sits slightly inside the exterior and does not show excessively from the outside. Press around the entire top opening. Be careful with fabrics that are sensitive to high heat. Good pressing at this stage can dramatically improve the appearance of a simple fabric shoulder bag, giving the upper edge a crisp and intentional finish.
Topstitch approximately 1/8 inch from the upper edge around the entire opening. This line of stitching helps keep the lining in place and provides additional reinforcement where the strap connects to the bag. For an even more structured appearance, add a second line of topstitching approximately 1/4 inch below the first. Use a slightly longer stitch length when working through several layers of fabric for a smoother finish.
Inspect the completed bag carefully. Check the strap attachment points, topstitching, lining, boxed corners, and side seams. Trim any visible loose threads and give the project a final press. If the lining seems slightly loose, smooth it toward the bottom corners rather than pulling it tightly at the top. Handmade fabric bags naturally have some flexibility, and a small amount of movement in the lining is completely normal.
Once finished, the simple fabric shoulder bag pattern can become the foundation for many variations. You can add an interior pocket, magnetic snap, zipper, contrasting strap, patchwork exterior, or decorative quilting in future versions. Changing the fabric alone can transform the same basic pattern from a casual everyday bag into a colorful seasonal accessory. Learning the basic construction first makes these later customizations much easier and gives you a dependable pattern that can be sewn repeatedly.
Frequently Asked Questions About the Simple Fabric Shoulder Bag Pattern
Is this simple fabric shoulder bag pattern suitable for beginners?
Yes. The construction mainly uses straight seams, basic pressing, boxed corners, and straightforward lining techniques. A beginner should work slowly, measure carefully, and press each seam before moving to the next stage. Practicing on inexpensive cotton fabric can also make the first version more comfortable to sew.
What is the best fabric for a shoulder bag?
Medium-weight cotton, canvas, denim, twill, and cotton duck are useful choices. Lightweight quilting cotton can also work when reinforced with fusible interfacing. The ideal fabric depends on whether you want a soft casual bag or a firmer, more structured result.
Do I need interfacing for this fabric shoulder bag?
Interfacing is recommended but not always essential. Heavy canvas or denim may already provide enough structure, while lightweight cotton usually benefits considerably from interfacing. Medium-weight fusible interfacing is a practical option for an everyday bag because it adds stability without creating excessive stiffness.
How can I make the shoulder strap longer?
Measure from the preferred starting point on one side of your body, over the shoulder, and down to the desired position on the opposite side. Add a few inches for seam allowances and adjustments. For a crossbody-style variation, you may need a strap around 45 to 55 inches long, depending on your height and preferred fit.
Can I add pockets to this simple fabric shoulder bag pattern?
Yes. An interior slip pocket is easiest to add before the lining pieces are sewn together. Cut a rectangle of fabric, finish its upper edge, fold the remaining raw edges inward, and stitch it to one lining panel. Exterior pockets should similarly be attached before assembling the exterior panels.
How can I make the bag stronger?
Choose durable exterior fabric, use suitable interfacing, reinforce the strap attachment areas, and use quality polyester thread. You can also add an extra layer of interfacing around the upper edge or strap attachment points. Avoid overloading a handmade bag beyond what its fabric and seams are designed to support.
Can the dimensions of the pattern be changed?
Absolutely. The suggested 15 x 14-inch panels are simply a practical starting size. You can make the panels wider, taller, or smaller according to your needs. Remember that major size changes may also require adjustments to the strap length, boxed corners, interfacing weight, and pocket dimensions.
How do I prevent the lining from showing above the exterior?
Careful pressing is the key. After turning the bag, roll the upper seam slightly toward the lining so the exterior fabric reaches just beyond the seam line. Press the edge thoroughly and then topstitch around the opening. This technique encourages the lining to remain discreetly inside the bag.
Can leftover fabric be used for this project?
Yes, provided the pieces are large enough and have suitable strength. Smaller scraps can also be joined to create patchwork panels before cutting the final exterior dimensions. If using multiple pieces, press the joining seams well and consider adding interfacing to stabilize the finished patchwork panel.
How should a handmade fabric shoulder bag be cleaned?
Cleaning depends on the materials used. If all fabrics and interfacing are washable, gentle washing may be appropriate. Prewashing the exterior and lining fabrics before sewing can reduce unexpected shrinkage later. Structured bags generally benefit from gentle handling and air drying to help preserve their shape.
Conclusion
Creating a simple fabric shoulder bag pattern is a rewarding way to practice essential sewing skills while producing something practical for everyday use. Throughout this project, we prepared exterior and lining panels, added interfacing for structure, constructed a comfortable fabric strap, created boxed corners for extra capacity, assembled the lining, joined all the layers, and finished the upper edge with neat topstitching.The most important lesson is that professional-looking handmade sewing does not necessarily require complicated techniques. Accurate measurements, consistent seam allowances, careful pressing, and patient topstitching can make a major difference. Once you understand this basic construction, the same fabric shoulder bag pattern can be adapted with different fabrics, dimensions, pockets, closures, decorative details, and strap lengths.
This project can also be an excellent way to use fabric already available in your sewing collection. A favorite print can create a cheerful everyday bag, while denim or canvas can produce a more durable version. Contrasting lining fabric adds a hidden decorative detail, and coordinated thread can give the topstitching a refined appearance.After completing your first bag, consider experimenting with the dimensions and construction details. You might create a smaller version for quick outings, a wider version for craft supplies, or a longer strap for a crossbody-inspired design. Each variation helps develop useful sewing skills while allowing the basic simple fabric shoulder bag pattern to remain familiar and approachable.
Remember to check the finished seams before regular use, especially around the strap attachment points. Reinforcing these areas and choosing materials appropriate for the intended purpose will help the bag remain attractive and functional. With a little practice, this straightforward pattern can become a reliable foundation for many future handmade bag projects.If you make your own simple fabric shoulder bag, leave your sincere opinion about the project and share any suggestions you have for future versions. It is always interesting to hear which fabrics, dimensions, pockets, colors, and finishing details other sewing enthusiasts would choose. Your ideas may also inspire new variations and creative ways to personalize this simple and useful handmade bag.