
Fabric witch hat pattern is a creative sewing project that transforms simple pieces of fabric into a charming decorative witch hat with a handmade appearance.
One of the advantages of this Fabric witch hat pattern is that the basic structure uses relatively simple shapes. The hat is primarily created from a cone-shaped crown and a circular or slightly oval brim.
Before beginning the fabric witch hat sewing project, it is helpful to decide the approximate finished size. A decorative tabletop hat can have a brim around 10 to 14 inches wide, while smaller versions can be created for wreaths, baskets, centerpieces, or seasonal displays. For a medium decorative hat, prepare approximately 1/2 to 3/4 yard of main fabric, coordinating fabric if desired, medium-weight fusible interfacing, matching thread, scissors or a rotary cutter, pins or sewing clips, a ruler, fabric marker, and a sewing machine. Decorative ribbon, fabric scraps, artificial leaves, buttons, or small fabric patches are optional. Taking a few minutes to organize the materials before cutting makes the entire sewing process smoother and helps produce cleaner, more accurate results.
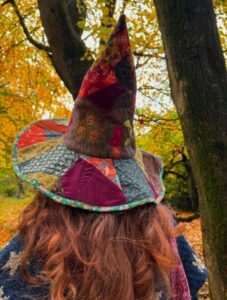
Materials, Measurements, and Preparing the Fabric Witch Hat Pattern
Start the Fabric witch hat pattern by preparing the crown template. On a large sheet of paper, draw a triangular or slightly curved cone shape approximately 13 to 16 inches tall. The lower edge should be gently curved rather than completely straight because this helps the finished crown sit naturally against the brim. Make the bottom edge approximately 12 to 15 inches wide, depending on how narrow or full you want the crown to appear. Add approximately 1/2 inch around the outer edges for seam allowance if it is not already incorporated into your template.
For the brim, create a circle approximately 11 to 14 inches in diameter. A dinner plate, large bowl, compass, or homemade cardboard template can help produce a consistent curve. Inside this circle, mark a smaller opening that corresponds to the circumference of the finished crown. Do not cut the center opening too large at first. It is much easier to enlarge it gradually than to repair an opening that has been cut excessively wide. Accurate measurements at this stage are particularly important for a neat connection between the brim and crown.
Choose fabric that supports the visual style you want to achieve. Black cotton creates a recognizable Halloween appearance, while orange, purple, dark green, gray, or patterned fabric can make the fabric witch hat more distinctive. Small prints, stars, checks, stripes, and subtle seasonal motifs are particularly suitable because they add visual interest without hiding the shape of the project. If you enjoy scrap sewing, contrasting fabrics can also be combined to create a patchwork-inspired crown.
Press all fabric before cutting. Wrinkles can slightly distort measurements and make matching curved pieces more difficult. Place the pattern pieces on the fabric and trace around them with tailor’s chalk or a removable fabric marker. Cut two brim pieces and the required crown pieces according to your construction method. If you are making a lined crown, cut the crown from both the exterior and lining fabrics. Take your time around curves because clean cutting makes later sewing considerably easier.
Next, cut the interfacing slightly smaller than the corresponding fabric pieces or according to the manufacturer’s application instructions. Medium-weight fusible interfacing works well for many decorative hats because it provides stability without making the project excessively stiff. Apply the interfacing to the wrong side of the fabric with an iron, using the appropriate temperature for both the fabric and interfacing. Avoid moving the iron constantly; pressing and lifting usually creates a more secure bond.
Once the pieces have been prepared, arrange everything on your work surface before sewing. You should have the crown pieces, two brim layers, interfacing, and any optional lining pieces ready to use. This is also a convenient moment to audition ribbons and embellishments. Seeing the colors together before construction helps you decide whether the finished Halloween fabric witch hat should look playful, rustic, elegant, colorful, or intentionally whimsical.
Sewing the Crown and Creating the Characteristic Witch Hat Shape
Begin constructing the crown by placing the exterior fabric pieces with their right sides together. Align the long edges carefully and secure them with pins or sewing clips. Sew using approximately a 1/2-inch seam allowance, following the curved or angled edge toward the tip. Backstitch at the beginning and end of the seam. If the crown is made from a single folded piece rather than two separate pieces, simply sew the open long edge to create the cone.
Trim excess fabric near the tip without cutting through the stitching. This small detail is important because too much fabric concentrated at the narrow end can prevent the point from turning cleanly. If necessary, carefully grade bulky seam allowances. Turn the crown right side out and gently push the tip outward using a blunt turning tool. Never use scissors for this step because the sharp point could accidentally puncture the fabric.
Press the crown carefully while preserving its three-dimensional shape. You do not necessarily want the cone to look perfectly straight. One of the most charming features of a Fabric witch hat pattern is the slightly bent or crooked crown. To create this appearance, gently fold the upper portion toward one side. A few discreet hand stitches can hold the bend in place, or a small amount of lightweight stuffing can be inserted before shaping if you want additional volume.
If you want a fuller crown, add polyester fiberfill gradually. Use only enough stuffing to support the fabric because overfilling can make the hat look rigid. Concentrate a small amount near the base and middle while leaving the upper portion relatively flexible. This allows the point to bend naturally. For a flatter decorative hat, such as one intended for a wall or wreath, stuffing can be omitted entirely.
Check the bottom circumference of the completed crown against the center opening of the brim template. The two measurements should be very close. If the brim opening is slightly too small, enlarge it a little at a time. Making several small adjustments is safer than removing a large amount of fabric at once. Clip tiny notches around the inner curve if necessary to help the fabric relax when the crown is attached.
Before moving forward, place the unfinished crown on your work surface and evaluate its proportions. A taller crown creates a dramatic witch-hat silhouette, while a shorter crown feels more compact and cute. This is the best stage to adjust the bend, add subtle folds, or modify the stuffing. Once the crown is attached to the brim, major changes become more difficult, so shaping it now will improve the final appearance of the fabric witch hat sewing pattern.
Constructing the Brim and Assembling the Fabric Witch Hat
To make the brim, place the two circular fabric pieces with right sides together. If interfacing has not already been applied, attach it to the wrong side of one or both layers according to the amount of firmness you want. Pin around the outer edge, keeping the fabric smooth. Sew around the circumference using approximately a 1/2-inch seam allowance and maintain an even curve as you guide the fabric beneath the presser foot.
Trim the seam allowance slightly and clip small notches around the curved edge without cutting through the stitches. These notches allow the seam allowance to spread when the brim is turned right side out, producing a smoother circular edge. Turn the brim carefully and use your fingers or a blunt turning tool to gently shape the perimeter. Press the entire brim on a suitable iron setting until the outer edge looks clean and defined.
Topstitch approximately 1/8 to 1/4 inch from the outer edge of the brim. This step is optional, but it creates a more polished finish and helps prevent the fabric layers from shifting. You can also sew one or two additional concentric rows of stitching around the brim. Besides adding stability, these lines create subtle decorative texture that complements the handcrafted appearance of the Fabric witch hat pattern.
Now position the crown inside the center opening of the brim. Match the crown seam with the back of the hat and distribute the remaining fabric evenly around the opening. Pin generously because joining a straight or slightly curved crown edge to a circular opening requires control. If there is minor excess fabric, distribute it evenly rather than creating one obvious pleat unless pleating is intentionally part of your design.
Sew slowly around the opening, removing pins as you approach them. After completing the seam, inspect both sides to make sure all fabric layers were caught securely. Small gaps can be repaired with another line of machine stitching or invisible hand stitches. If the raw seam is visible on the underside, cover it with bias tape, a narrow fabric strip, or carefully turned seam allowances for a cleaner finish.
Place the assembled hat on a flat surface and shape the brim with your hands. A perfectly symmetrical brim creates a cleaner style, while gently bending one or two areas upward produces a more whimsical appearance. The interfacing should help the brim maintain these subtle curves. At this stage, the basic fabric witch hat is complete, and you can immediately see how the proportions of the crown and brim work together.
Decorating, Finishing, and Customizing Your Fabric Witch Hat
The finishing details allow you to transform a simple sewing project into a distinctive seasonal decoration. Start by wrapping ribbon, fabric strips, lace, or coordinating trim around the base of the crown. Position the band where the crown meets the brim because it can conceal minor irregularities in the seam while also giving the Fabric witch hat pattern a finished appearance. Secure the band with hand stitches or a small amount of appropriate fabric adhesive.
For a rustic Halloween design, consider making the hatband from torn cotton strips rather than perfectly finished ribbon. Slightly frayed edges add texture and work particularly well with black, orange, brown, purple, or neutral fabrics. A small fabric bow can be attached to one side. If your main fabric is heavily patterned, however, keep the band relatively simple so that the finished project does not become visually crowded.
Fabric patches are another easy way to personalize the crown. Cut small squares or irregular shapes from contrasting scraps and sew them onto the exterior with straight stitching or decorative stitches. Intentionally visible stitching can contribute to the handmade style. This technique is also useful for using leftover fabric from previous sewing projects and makes each handmade witch hat slightly different.
Buttons, fabric flowers, felt leaves, small bows, and lightweight Halloween-themed embellishments can also be added. Keep the decorations concentrated around the lower portion of the crown rather than covering the entire hat. This preserves the recognizable silhouette and keeps the design balanced. When attaching small decorations, sew them securely if the project will be stored and reused for several seasons.
You can also modify the basic Fabric witch hat pattern for different purposes. Reduce all measurements proportionally to make miniature ornaments, shelf decorations, or additions to handmade wreaths. Increase the dimensions for a larger centerpiece or decorative display. When resizing the project, remember that the crown opening and inner brim opening must still correspond closely. Maintaining this relationship is more important than following one exact set of dimensions.
Finally, inspect the entire hat for loose threads, uneven seams, or areas that need additional pressing. Trim thread ends carefully and reshape the crown and brim one final time. A finished fabric witch hat should look intentionally handmade rather than unfinished. Small variations and gentle curves contribute character, while clean seams, secure construction, and thoughtful decoration give the project a polished appearance suitable for displaying throughout the Halloween season.
Frequently Asked Questions About the Fabric Witch Hat Pattern
What is the best fabric for a Fabric witch hat pattern?
Medium-weight cotton is one of the easiest options because it cuts cleanly, presses well, and is manageable for beginners. Canvas, linen blends, lightweight denim, and felt may also be suitable depending on the desired appearance. Very lightweight fabric usually benefits from interfacing so the finished hat does not collapse.
How much fabric do I need to make one witch hat?
For a medium decorative hat, approximately 1/2 to 3/4 yard is usually sufficient, although the exact amount depends on the dimensions, fabric width, lining, and direction of the print. Buying a little extra material is useful when working with directional patterns or matching decorative motifs.
Does the witch hat need interfacing?
Interfacing is highly recommended for a structured decorative hat. It helps the brim remain relatively flat and gives the crown enough support to maintain its silhouette. Medium-weight fusible interfacing is a practical option for standard cotton fabrics. If you use naturally firm material such as felt or heavier canvas, less reinforcement may be necessary.
Can beginners make this Fabric witch hat pattern?
Yes. The project involves basic seams, curved sewing, turning fabric, and attaching two three-dimensional sections. Beginners should work slowly when sewing the circular brim and connecting the crown. Using plenty of pins or clips and checking alignment before stitching can make these steps much easier.
How can I make the pointed crown bend to one side?
Use a slightly longer crown and leave the upper section flexible. After sewing and turning the cone, gently fold the tip toward one side. A few hidden hand stitches can secure the bend. If the crown is stuffed, keep the upper section lightly filled so that it remains flexible enough to create the characteristic crooked witch-hat shape.
Can I make the hat without a sewing machine?
Yes, although construction will take longer. Use small, consistent hand stitches and strong polyester thread. A backstitch works particularly well for structural seams because it is stronger than a simple running stitch. Decorative elements can also be attached by hand.
How can I make the brim firmer?
Use medium or firm interfacing between the brim layers. Two layers of interfacing may be appropriate when working with lightweight cotton, but always test a scrap first. Another option is adding a layer of thin batting or stabilizer, depending on whether you prefer a soft padded brim or a crisp structured one.
Can scraps be used for this sewing project?
Absolutely. This fabric witch hat sewing project is especially suitable for scrap fabrics. Different materials can be combined into patches, contrasting crown sections, hatbands, bows, and other decorative elements. Scrap construction is also an effective way to create a more rustic patchwork appearance.
How should a finished fabric witch hat be stored?
Store the hat in a clean, dry location where the crown will not be crushed. A box large enough to accommodate the brim is ideal. Avoid placing heavy decorations on top of it. Before storing, make sure the fabric is completely dry and remove dust gently so the project is ready to display again the following season.
Can this pattern be resized?
Yes. The Fabric witch hat pattern can be enlarged or reduced as long as the crown and brim remain proportional. When changing the overall dimensions, always check the circumference of the crown base against the inner opening of the brim before sewing. Creating paper templates first is the safest way to test new sizes without wasting fabric.
Conclusion
Creating a Fabric witch hat pattern is an enjoyable way to combine basic sewing techniques with seasonal creativity. The project begins with simple pattern preparation, including a cone-shaped crown and circular brim, and develops through interfacing, careful stitching, shaping, assembly, and decorative finishing. Paying attention to accurate measurements and seam allowances makes the construction process easier and gives the final hat a cleaner appearance.The most important techniques covered in this project include preparing stable fabric, creating the pointed crown, reinforcing the brim, joining curved sections, and shaping the finished hat. Once these fundamentals are understood, the same basic pattern can be adapted into many different styles. You can experiment with Halloween fabric, patchwork details, contrasting hatbands, bows, buttons, decorative stitching, or a more minimalist finish.
This Fabric witch hat pattern also provides plenty of room for personalization. No two handmade hats need to look identical, and small differences in the bend of the crown, brim shape, fabric combination, and embellishments can make each version unique. Whether you prefer classic blac
If you make your own fabric witch hat using these steps, leave your sincere opinion about the project and share any suggestions or creative changes you would make. Your ideas can inspire new variations, different color combinations, and even more interesting ways to personalize this handmade Halloween sewing project.