
Crochet bow pattern projects are charming, quick, and surprisingly versatile, making them a wonderful choice for crocheters who enjoy creating small handmade accessories with plenty of personality.
Another advantage of this Crochet bow pattern is that it requires only a small amount of yarn, so it can be an excellent project for using leftovers from your yarn collection.
Before beginning the crochet bow, become familiar with the stitch abbreviations used throughout the pattern. In standard US crochet terminology, ch = chain, sc = single crochet, hdc = half double crochet, sl st = slip stitch, st = stitch, sts = stitches, FO = fasten off, and rep = repeat. The main bow can be worked almost entirely in single crochet, making it easy to count stitches and maintain straight edges. The instructions are presented in crochet pattern keys so that you can follow the project row by row while also understanding why each step is used. Keep your tension relaxed and consistent, count your stitches regularly, and you will have a neat foundation for shaping a beautiful handmade bow.
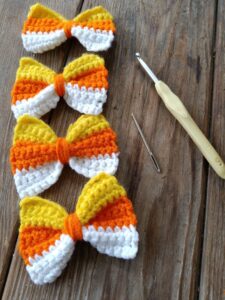
Materials, Crochet Stitch Keys, and Preparing the Bow
For this Crochet bow pattern, gather yarn in your preferred color, a crochet hook suitable for that yarn, scissors, a yarn needle, and a stitch marker if you find markers helpful. Approximately 15 to 30 yards of yarn should be enough for many small or medium bows, although the exact amount varies according to size and yarn thickness. You can make the center band in the same color for a classic appearance or select a contrasting shade to emphasize the middle of the bow.
A useful beginner combination is medium-weight yarn with a hook around 4 mm to 5 mm, adjusting according to the yarn label and your personal tension. A smaller hook relative to the yarn thickness creates denser stitches and can help the bow hold its shape. However, avoid working so tightly that inserting the hook becomes uncomfortable. A slightly firm but flexible fabric is ideal for this easy crochet bow.
The primary stitch is single crochet (sc). To make one, insert the hook into the designated stitch, yarn over, and pull up a loop. You should now have two loops on the hook. Yarn over once more and pull through both loops. Single crochet produces a compact fabric that works particularly well for small decorative projects because it gives the finished piece enough structure without making it excessively bulky.
Use this basic pattern key for the main rectangle: {Foundation: ch 21} {Row 1: sc in 2nd ch from hook, sc in each ch across = 20 sts} {Rows 2–10: ch 1, turn, sc in each st across = 20 sts} {FO, leaving a long tail}. These numbers create a practical starting size rather than an absolute requirement. If you want a wider bow, increase the foundation chain. If you want a taller bow, crochet additional rows.
While making the rectangle, count the 20 sc at the end of every row. Accidentally skipping the first or final stitch can gradually narrow the fabric and produce uneven sides. The turning ch 1 does not count as a stitch in this version of the pattern. Therefore, begin the first single crochet directly in the first stitch after turning and continue across until you have reached the final stitch.
After completing the rectangle, place it flat and examine the proportions before fastening off permanently. The fabric should resemble a small horizontal rectangle when positioned for bow shaping. If it seems too narrow, add a few rows. If you want longer loops, begin again with additional foundation chains. Understanding this relationship between width and height makes the Crochet bow pattern easy to customize without complicated calculations.
Step-by-Step Crochet Bow Pattern and Shaping
Once the main rectangle is complete, weave in the shorter starting yarn tail with a yarn needle while keeping the longer finishing tail available. This longer strand can help secure the center later. Gently flatten the rectangle with your fingers. If your yarn responds well to blocking, light blocking can improve the edges, but the piece should be completely dry before final assembly.
Find the exact horizontal center of the rectangle. Fold the fabric slightly like an accordion by bringing the upper and lower edges toward the middle. Depending on the size of your bow, two or three small folds usually create a pleasing shape. Pinch the folds tightly between your fingers. You should immediately see the two sides beginning to resemble the loops of a crocheted bow.
Use the long yarn tail to wrap around the pinched center several times. Keep each wrap firm enough to hold the folds but avoid pulling so aggressively that the yarn distorts the stitches. After several wraps, thread the yarn through the needle and pass it carefully through the wrapped center on the back of the bow. Repeat once or twice before securing the yarn. The center should now remain gathered even when you release your fingers.
For a more finished appearance, crochet a separate center band. Use this key: {ch 5} {Row 1: sc in 2nd ch from hook and across = 4 sts} {Rows 2–6: ch 1, turn, sc across = 4 sts} {FO, leaving a sewing tail}. Wrap this narrow strip around the center of the bow with the ends meeting at the back. Adjust the number of rows if necessary because different yarns create different dimensions.
Sew the ends of the center band together securely at the back using the yarn tail. Position the seam so that it remains hidden behind the bow. Pass the needle through only a few layers when possible rather than pushing through the entire bow repeatedly. This keeps the front surface neat. Once secure, weave the yarn end through nearby stitches and trim the excess carefully.
The essential crochet bow pattern can therefore be summarized as {ch 21} {20 sc across} {repeat for approximately 10 rows} {FO} {pinch center} {wrap and secure} {crochet center band} {wrap band around middle} {sew at back}. This straightforward sequence is useful to remember because it can be adapted to many bow sizes without changing the fundamental construction technique.
Adjusting the Size, Colors, and Style of Your Crochet Bow
One of the easiest ways to customize this Crochet bow pattern is by changing the foundation chain. For a miniature bow, try approximately {ch 11–15}, depending on your yarn. For a larger decorative bow, experiment with {ch 26–31} or more. Always remember that one chain is effectively used for turning into the first row when following the single-crochet construction described above.
You can also adjust the height by changing the number of rows. Fewer rows produce a narrow, delicate bow, while additional rows create fuller loops. A useful principle is to crochet the rectangle until its proportions look approximately right before shaping it. Because yarn thickness and individual tension vary significantly, visual proportion is often more helpful than trying to force every bow to match one universal measurement.
Color provides another opportunity for creativity. A solid-color crochet bow has a clean and timeless appearance, while a contrasting center band creates a stronger focal point. You can also alternate colors every two rows, use variegated yarn, or combine a neutral main section with a brighter center. When changing colors, secure and weave the yarn ends carefully so they do not become visible after the bow is gathered.
For additional texture, replace some single crochet rows with half double crochet (hdc). To make an hdc, yarn over, insert the hook into the stitch, yarn over, pull up a loop, yarn over again, and pull through all three loops. A simple variation is {ch 21} {Row 1: 20 sc} {Rows 2–9: 20 hdc} {Final Row: 20 sc}. This creates a slightly taller stitch texture while the single-crochet edges help frame the piece.
The bow can also be worked in the back loop only (BLO) for a subtle ribbed effect. Insert the hook beneath only the back loop of each stitch rather than under both loops. A possible variation is {ch 21} {Row 1: 20 sc} {Rows 2–10: ch 1, turn, 20 sc BLO}. The resulting horizontal ridges add texture without requiring advanced crochet techniques.
Whatever variation you choose, make a note of your stitch count, row count, hook size, and yarn type whenever you create a bow you particularly like. These details become your personal crochet bow pattern formula and make it easier to reproduce matching pieces later. This is especially helpful when creating pairs of hair bows, coordinated decorations, sets of gift embellishments, or multiple accessories for a larger handmade project.
Finishing Ideas, FAQ, and Crochet Bow Care
After completing the basic Crochet bow pattern, check the symmetry of both loops. Gently pull and shape the left and right sides until they appear balanced. Adjust the center band so that it sits vertically and covers the wrapped yarn beneath it. If necessary, use the yarn needle to make one or two small securing stitches between the back of the center band and the bow body to prevent the band from rotating.
A finished bow can be attached to many handmade projects. You can sew it onto a crocheted hat, bag, scarf, amigurumi figure, blanket corner, or decorative pouch. For removable decorations, attach the bow according to the requirements of the intended accessory. When making items for young children, prioritize secure construction and avoid loose decorative components that could detach during normal handling.
To keep the crochet bow looking neat, weave every yarn end through several stitches on the back. Change direction at least once while weaving so that the yarn is less likely to work loose. Trim only after you are confident that the end is secure. Avoid visible knots on the front because they can interrupt the clean appearance of the bow.
If your bow curls slightly after crocheting, gentle blocking may help. Follow the care requirements appropriate for the specific yarn fiber you are using. Shape the rectangle or completed bow carefully and allow it to dry completely before attaching it to another project. Avoid excessive heat, particularly with synthetic yarns, because some fibers can be damaged by high temperatures.
For a more structured handmade crochet bow, you can use a tighter gauge or choose cotton yarn, which often creates clear stitch definition. For a softer bow, use a slightly larger hook or a yarn with more drape. The ideal texture depends on the intended purpose. A bag decoration may benefit from firmness, while a bow attached to a soft crochet garment may look better with greater flexibility.
Most importantly, treat this pattern as a foundation for experimentation. Once you understand how the rectangle becomes a bow through center gathering, you can change nearly every element without losing the basic shape. Adjust the dimensions, yarn weight, stitch texture, center width, and color combination. That flexibility is what makes a simple Crochet bow pattern useful for both beginners and experienced makers.
Frequently Asked Questions About the Crochet Bow Pattern
Is this Crochet bow pattern suitable for beginners? Yes. The main version primarily uses chains and single crochet stitches. If you can make a foundation chain, work single crochet, turn rows, and fasten off yarn, you can practice this project. The shaping process also requires no complicated increases or decreases.
How long does it take to crochet a bow? The time varies depending on experience, bow size, and yarn thickness. A small bow made primarily from single crochet can generally be completed relatively quickly, making it a practical project when you want to practice stitches or use small amounts of leftover yarn.
What is the best yarn for a crochet bow? Cotton and acrylic are both practical choices. Cotton yarn often provides crisp stitch definition and structure, while acrylic can create a softer bow. The best choice depends on whether you want a firm decorative bow or a more flexible accessory.
What hook size should I use? Match the hook to your selected yarn as a starting point, then adjust according to the desired fabric. If the bow feels too loose, try a slightly smaller hook. If the fabric feels excessively stiff and difficult to crochet, move to a slightly larger hook.
How can I make a smaller crochet bow? Reduce both the foundation chain and the number of rows. For example, you can experiment with {ch 13} {12 sc across} {work approximately 6–7 rows}, then gather the center. Exact dimensions will depend on yarn and tension.
How do I make a larger bow? Increase the number of foundation chains and crochet additional rows to maintain balanced proportions. For example, start with {ch 31} and work approximately 14 to 16 rows, adjusting after checking the rectangle visually.
Why are the edges of my bow uneven? Uneven edges usually occur when stitches are accidentally added or skipped at the beginning or end of a row. Count your stitches after every row. If the pattern begins with 20 single crochet stitches, each subsequent row should also contain 20 sc unless the instructions intentionally change the count.
Can I use double crochet instead of single crochet? Yes, but double crochet creates a taller and more open fabric. You may need fewer rows to achieve the same height. Single crochet is recommended for the basic version because its compact texture helps the bow maintain its shape.
Can I use leftover yarn for this project? Yes. A crochet bow uses relatively little yarn, making it a useful scrap-yarn project. Small amounts left from larger crochet projects can often be transformed into coordinating bows rather than being discarded.
How do I keep the center of the bow tight? Pinch the middle firmly and wrap yarn around it several times before adding the center band. Secure those wraps at the back with a yarn needle. The separate center band then covers the construction and provides additional stability.
Can the bow be added to amigurumi? Yes. Small bows can add decorative detail to many amigurumi projects. Sew the bow firmly into position using yarn or thread that coordinates with the project, and make sure the attachment is appropriate for the intended use of the finished item.
Can I make several matching bows? Absolutely. Record your yarn, hook size, foundation-chain count, number of rows, and center-band measurements after finishing the first bow. Repeating those specifications will help you create bows with consistent dimensions.
Conclusion
This Crochet bow pattern demonstrates how a few fundamental crochet techniques can be transformed into a charming and versatile handmade accessory. Starting with a simple foundation chain and rows of single crochet, you can create a rectangular fabric that becomes a recognizable bow simply by gathering and securing its center.Throughout the tutorial, you learned the essential crochet keys: {ch = chain}, {sc = single crochet}, {hdc = half double crochet}, {sl st = slip stitch}, {st/sts = stitch/stitches}, and {FO = fasten off}. Understanding these abbreviations makes the written instructions easier to follow and also prepares you for many other crochet patterns.
The main construction was worked with {ch 21}, followed by {20 sc} across each row for approximately ten rows. After finishing the rectangle, the center was pinched, wrapped securely with yarn, and covered with a separately crocheted band. This method creates a clean bow shape without complicated increases, decreases, or advanced shaping.You also learned how to customize the pattern by adjusting the number of chains and rows. Smaller stitch counts create miniature embellishments, while longer foundation chains can produce larger decorative bows. Different yarn weights, hook sizes, color combinations, and textured stitches provide even more opportunities for personalization.
The finished crochet bow can become an embellishment for bags, hats, pouches, amigurumi, handmade gifts, and many other creative projects. Once you have practiced the basic version, consider making several variations and recording your favorite measurements so you can easily reproduce them whenever you need another bow.If you make this Crochet bow pattern, please leave your sincere opinion about the project and share your suggestions. It would be wonderful to know which colors, yarns, sizes, or stitch variations you would choose and what changes you would make to personalize your own handmade crochet bow.