
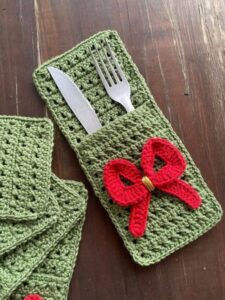
Crochet cutlery holder pattern with a bow is a charming way to bring handmade warmth to your dining table while keeping forks, knives, and spoons neatly arranged.
A crochet cutlery holder offers a manageable project for beginners who already know how to chain and work single crochet.
This Crochet cutlery holder pattern with a bow includes the materials, US crochet abbreviations, row instructions, assembly steps, and finishing details needed to make the design. The suggested dimensions are intended for ordinary dinner utensils, but you should always check the fit using your actual cutlery. You will also learn how to adjust the starting chain, change the pocket depth, and position the bow securely without sewing the pocket closed. Simple color choices can transform the same construction into an everyday table accessory or a festive decoration. The final sections explain care and answer common questions about sizing, yarn, and bow shaping. Follow the instructions at your own pace, and use the first completed holder as a reference when creating additional pieces.
Materials, Measurements, and Crochet Stitch Key
For this crochet cutlery holder pattern with a bow, prepare approximately 35–50 grams of medium-weight cotton yarn for the main piece and a small amount of contrasting cotton for the bow. Yarn requirements vary with thickness and tension. You will also need a 4 mm crochet hook, scissors, a yarn needle, a measuring tape, and two stitch markers. Choose a hook that produces a firm but flexible fabric.
Cotton yarn gives this project clear stitch definition and a neat appearance. Smooth yarn also makes it easier to count stitches and sew the edges accurately. Check the care label before choosing your materials, particularly if you want washable table accessories. Use a similar yarn thickness for the bow and holder so the decorative detail stays proportionate to the pocket.
The suggested finished measurements are approximately 4 inches wide and 8½ inches tall. Before assembly, the main rectangle measures approximately 4 inches wide and 14 inches long. Folding the lower 5½ inches upward creates a pocket about 5½ inches deep and leaves 3 inches of the back exposed. Side seams slightly reduce the usable interior width.
This pattern uses US crochet terminology. The stitch key is: ch = chain, sc = single crochet, sl st = slip stitch, and st/sts = stitch/stitches. The turning ch 1 does not count as a stitch. Work under both top loops of each stitch unless another instruction is provided. Numbers in parentheses show the stitch total at the end of a row.
To make single crochet, insert your hook into the indicated stitch, yarn over, and pull up a loop. Yarn over again and pull through both loops on the hook. For a slip stitch, insert the hook, yarn over, and draw the yarn through both the stitch and the loop on your hook. Keep your movements relaxed to maintain consistent tension.
The suggested gauge is approximately 18 single crochet stitches and 20 rows per 4 inches. Make a small swatch before starting, then measure its center without stretching it. If your gauge differs, adjust your hook or starting stitch count. Exact gauge is less important than achieving a suitable width, a sturdy fabric, and a comfortable fit for your utensils.
Crochet the Main Rectangle and Assemble the Pocket
Begin the main rectangle with ch 19. For Row 1, work 1 sc in the second chain from the hook and 1 sc in every remaining chain: 18 sc. Keep the foundation chain relaxed so the lower edge does not pull inward. Working into the back bumps of the chain is optional and creates a tidy foundation edge.
For Row 2, ch 1, turn, and work 1 sc in each stitch across: 18 sc. Repeat this instruction for Rows 3–70. At the suggested gauge, the rectangle should measure approximately 14 inches long. Measure your own work and stop at that length even if your row count differs. Fasten off and weave in the starting and finishing ends.
Maintain 18 stitches in every row to keep the rectangle straight. If the edges begin to slope inward, check whether you have missed an end stitch. Place markers in the first and last stitch of each row when needed. Remember that the turning chain is not a stitch, and work your first single crochet into the first actual stitch.
Lay the rectangle flat with your chosen display side facing downward. Fold the bottom 5½ inches upward, bringing the display side to the outside of the pocket. The remaining upper section forms the exposed back. Clip the folded edges together and insert your utensils to check the fit. Adjust the fold slightly if a different pocket depth suits your cutlery better.
Thread a yarn needle with approximately 24 inches of matching yarn. Starting at one bottom corner, whipstitch the side edges together, catching corresponding edge loops from both layers. Continue upward to the pocket opening, secure the yarn, and weave in the end. Repeat on the opposite side. Sew firmly without pulling so tightly that the edges pucker.
Leave the pocket opening completely unsewn. The fold already closes the bottom, so only the two sides need seams. Slide the utensils in and out to check for snagging and adequate space. If the pocket is too narrow, remake the rectangle with additional stitches. Excessive stretching can distort the holder and weaken the appearance of the seams.
Crochet the Bow and Attach the Decorative Detail
To make the crochet bow, use your contrasting yarn and ch 17. For Row 1, work 1 sc in the second chain from the hook and each remaining chain: 16 sc. For Rows 2–7, ch 1, turn, and work 1 sc in each stitch across: 16 sc per row. Fasten off, leaving a long tail for gathering and sewing.
At the suggested gauge, the bow rectangle measures approximately 3½ inches wide and 1½ inches tall. Weave in the starting end, then pinch the exact middle into small accordion folds. Wrap the long yarn tail around the gathered center several times. Secure the wraps with a few needle stitches through the center on the back of the bow.
Make a narrow center band to cover the gathered section. Begin with ch 4. Work 1 sc in the second chain from the hook and each remaining chain: 3 sc. Continue with ch 1, turn, and 3 sc per row until the strip measures approximately 2 inches. Test the length around the bow center before fastening off.
Wrap the band snugly around the gathered middle, with its short ends meeting behind the bow. Add or remove rows if necessary to achieve a comfortable fit. Sew the short ends together, then anchor the band to the gathered center with a small stitch. Adjust both sides of the bow so they have similar width and evenly distributed folds.
Place the bow on the pocket front, centered horizontally and approximately ¾ inch below the opening. Slip a piece of cardboard inside the pocket to help separate its front and back layers. Sew through the center band and the pocket front only. Remove the cardboard afterward and inspect the inside to ensure the pocket remains fully open.
Use several small stitches to hold the bow securely. If the sides twist or lift too much, add a discreet tack beneath each one. Weave all attachment ends into the inside of the pocket, keeping them clear of the opening. A sewn bow is easy to repair and provides a dependable finish for an accessory that may need regular washing.
Finishing, Size Adjustments, and Everyday Care
Finish your crochet cutlery holder with a bow by checking its seams and trimming only after the yarn ends have been securely woven in. If washing or blocking is appropriate for the yarn, follow its care label. Reshape the damp holder by hand and let it dry flat. Arrange the bow folds gently rather than flattening them beneath a heavy object.
To make a wider holder, increase the foundation chain. The first row always contains one fewer stitch than the starting chain because you begin in the second chain from the hook. For example, ch 23 produces 22 sc. At the suggested gauge, this gives a width close to 5 inches before seaming, which may suit larger utensils.
Adjust the rectangle length using this relationship: rectangle length equals finished back height plus pocket depth. For example, a holder with a 9-inch finished back and a 6-inch pocket requires a 15-inch rectangle. Measure the fold carefully before sewing. This approach lets you change the proportions while keeping the same simple construction and stitch pattern.
Personalize the Crochet cutlery holder pattern with a bow through color combinations. Cream with burgundy feels warm and classic, while sage with ivory gives a softer appearance. To change colors between rows, complete the final yarn-over of the last single crochet with the new shade. Leave enough yarn at each change to weave the ends in securely.
When making a matching set, record the hook size, yarn, stitch count, rectangle length, and fold depth used for your first holder. Check each new rectangle against those measurements before seaming. Position every bow at the same distance below the opening. These small checks help create a coordinated set even when your tension varies slightly from one session to another.
For everyday care, remove the utensils after use and wash the holders as directed by the yarn label. Dry them thoroughly before storing and inspect the bow attachment occasionally. At the table, arrange the cutlery with handles extending above the opening. These holders are intended for presentation, so avoid using them to transport exposed sharp knives or as protective kitchen equipment.
FAQ: Crochet Cutlery Holder Pattern with a Bow
Is this pattern suitable for beginners?
Yes. The pattern uses chains, single crochet, and simple hand sewing. You do not need to make increases, decreases, or shaped sections. Beginners should focus on counting stitches consistently and checking the rectangle’s measurements before assembling the pocket.
Which yarn works best for this project?
Smooth cotton is a practical choice because it provides visible stitches and a neat finish. Choose yarn with care instructions that suit your intended use. Very fluffy yarn can make the pocket edges and bow folds harder to define.
Why are the edges of my rectangle uneven?
Uneven edges often come from missed end stitches, extra stitches, or changing tension. Count the stitches in every row and mark the first and last stitch if necessary. Keep the turning chain separate from the stitch count.
Can I use a different hook size?
Yes, but a different hook changes the size and density of the fabric. Make a swatch first and measure it. Select a hook that produces a fabric sturdy enough to hold utensils without becoming stiff or leaving large gaps.
How do I make the holder fit larger cutlery?
Increase the starting chain to widen the rectangle and check the utensils against the fabric before sewing. If you need a deeper pocket, increase the rectangle length as well. Remember to account for the small amount of width taken up by the side seams.
How can I keep the bow symmetrical?
Pinch the exact center of the bow rectangle and distribute the folds evenly. Secure the gathered middle before adding the center band. After assembly, adjust both sides and add discreet attachment stitches if the bow shifts.
Can I place a napkin inside the pocket?
A thin folded napkin may fit alongside the utensils, depending on their size. Test the combination before completing the seams. For a thicker napkin, make a wider holder rather than forcing everything into a tight pocket.
How much yarn should I buy for several holders?
Complete one holder and weigh it to estimate your total requirement. Multiply that weight by the number of pieces you want, then allow extra for swatching and tension differences. Calculate contrasting bow yarn separately if you are using another color.
Conclusion
This Crochet cutlery holder pattern with a bow teaches you to create a rectangular single crochet panel, fold and seam a useful pocket, and finish it with a neatly gathered bow.
You also learned how to check gauge, adjust measurements, choose coordinated colors, and care for the completed accessory.
With the first holder as your reference, you can create a matching set for everyday meals or special celebrations. Please leave your honest opinion about the tutorial and share your suggestions, favorite color combinations, or sizing adjustments that worked well for your table.