
Crochet Christmas bauble placemat pattern is a festive project that brings color, texture, and handmade charm to your holiday table.
One of the most enjoyable features of this crochet Christmas placemat is its flexibility. Classic red, green, cream, and golden yellow create a traditional holiday look, while burgundy, ivory, and muted green offer a softer combination.
Before beginning your Crochet Christmas bauble placemat pattern, prepare a comfortable workspace and gather your supplies. A smooth, washable cotton yarn is a practical choice for a table accessory, especially when the finished piece will be used regularly. Consistent tension helps the circle lie flat, while accurate stitch counts prevent unwanted waves or curling. The suggested design has twelve double crochet rounds followed by a single crochet border, although its final diameter depends on your yarn and hook. You will also learn how to increase or reduce the size to suit your plates. Take the time to check each stage, because a carefully finished placemat looks attractive and feels more stable beneath an ordinary place setting.
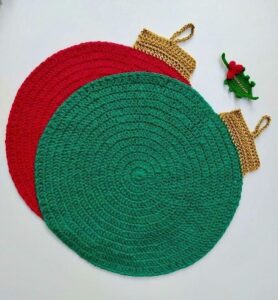
Materials and Crochet Stitch Abbreviations
For this Crochet Christmas bauble placemat pattern, prepare approximately 180–240 yards of medium-weight cotton yarn, allowing additional yarn if you enlarge the design. Choose red for the body, cream for two decorative stripes, green for the border, and golden yellow for the cap. Yardage is an estimate because individual tension, yarn thickness, and finished dimensions vary.
Begin with a 4.5 mm crochet hook, then adjust if necessary to create a firm but comfortable fabric. Gather scissors, a yarn needle, a removable stitch marker, and a measuring tape. Keep one of your dinner plates nearby so you can compare its width with the growing circle and decide when the placemat is large enough.
This pattern uses US crochet terminology. The abbreviation ch means chain, sl st means slip stitch, sc means single crochet, and dc means double crochet. The abbreviation st means stitch, while sts means stitches. An increase, written as inc, means working two stitches into one stitch; here, the body increases use two double crochets.
A magic ring, also called MR, creates an adjustable center opening. Form the ring, crochet the first round into it, and pull the tail to close the center. If you prefer another method, chain four and join the last chain to the first with a slip stitch. Work the first round into that small ring instead.
At the start of each double crochet round, chain two without counting those chains as a stitch. Work the first double crochet into the same stitch where the previous round was joined. Finish by slip stitching into the first actual double crochet. Mark that first stitch when needed to keep the joining point easy to identify.
The finished circular body may measure approximately 12–14 inches across, but this is only a guide. Make a small double crochet swatch to become familiar with your tension, then measure the actual project as it grows. The term gauge describes stitch and row density; different gauges produce different dimensions even when the stitch counts match.
Crochet the Circular Christmas Bauble Body
Round 1: With red yarn, make a magic ring, ch 2, and work 12 dc into the ring. Pull the center closed and join with a sl st to the first dc: 12 sts. Round 2: Ch 2, work 2 dc into every stitch around, and join: 24 sts. Keep the center secure without pulling so firmly that the stitches become distorted.
Round 3: Ch 2 and repeat [dc in the next st, 2 dc in the next st] 12 times. Join: 36 sts. Round 4: Ch 2 and repeat [dc in the next 2 sts, 2 dc in the next st] 12 times. Join: 48 sts. Each round adds twelve stitches, spreading the increases evenly around the circle.
Round 5: Ch 2 and repeat [dc in the next 3 sts, 2 dc in the next st] 12 times. Join: 60 sts. Change to cream for Round 6. Ch 2 and repeat [dc in the next 4 sts, 2 dc in the next st] 12 times. Join: 72 sts. Complete the previous round’s joining slip stitch with the new color for a straightforward transition.
Return to red for Round 7. Ch 2 and repeat [dc in the next 5 sts, 2 dc in the next st] 12 times. Join: 84 sts. Round 8: Ch 2 and repeat [dc in the next 6 sts, 2 dc in the next st] 12 times. Join: 96 sts. Lay the crochet bauble placemat on a flat surface and check its shape.
Round 9: Ch 2 and repeat [dc in the next 7 sts, 2 dc in the next st] 12 times. Join: 108 sts. Change to cream for Round 10. Ch 2 and repeat [dc in the next 8 sts, 2 dc in the next st] 12 times. Join: 120 sts. This second cream ring repeats the decorative detail while keeping the construction simple.
Return to red for Round 11. Ch 2 and repeat [dc in the next 9 sts, 2 dc in the next st] 12 times. Join: 132 sts. Round 12: Ch 2 and repeat [dc in the next 10 sts, 2 dc in the next st] 12 times. Join: 144 sts. Measure the body, then fasten off if its size suits your table setting.
Add the Border and Golden Ornament Cap
Join green yarn in any stitch of the completed body to begin the single crochet border. Ch 1 without counting it as a stitch, then work one sc into every stitch around. Join with a sl st to the first sc: 144 sts. Fasten off. Keep the border relaxed enough to avoid tightening the circumference and pulling the circle inward.
Place the circle right side up and choose the edge that will become the top of the ornament. Mark 12 consecutive border stitches, with their midpoint positioned at the top. These stitches form the attachment area for the golden bauble cap. Rotate the circle before marking if you want the body’s joining seam to sit in a less noticeable position.
For Cap Row 1, join golden yellow yarn in the first marked stitch. Ch 1, then work one sc into each of the 12 marked stitches: 12 sts. Turn. The first row follows a short arc of the circle, which is expected. Work evenly and avoid stretching the border while adding this small extension.
For Cap Row 2, ch 1 and work one sc into each stitch across: 12 sts. Turn. For Cap Row 3, ch 1 and work one sc into each stitch across: 12 sts. Fasten off. These rows create the ornament’s rectangular top. Add one or two more rows of 12 sc if you prefer a taller cap.
An optional crochet ornament loop can make the outline more recognizable. Join golden yarn near the middle of the cap’s upper edge, ch 10, and slip stitch into an adjacent top-edge stitch. Fasten off and secure the tails. Keep this decorative loop beyond the plate area, or omit it for a simpler placemat with fewer projecting details.
For additional decoration, use small, flat embroidery stitches between the cream rings. A few short lines or tiny stitched stars can personalize the Christmas bauble placemat pattern without overwhelming its shape. Keep the middle smooth so the plate rests comfortably. Secure every embroidery tail on the back, and avoid bulky knots, raised decorations, or loose additions beneath tableware.
Finishing, Size Adjustments, and Everyday Care
Weave in the yarn ends with a yarn needle, passing each tail through the backs of several stitches before reversing direction. Secure the magic-ring tail especially carefully, because an unsecured center may loosen during use or washing. Trim only after the tail is firmly woven in. Spread the finishing areas around the back to avoid creating thick spots beneath a plate.
To block the crochet placemat, dampen or wash it according to the yarn’s care label. Remove excess water gently without wringing, then lay the piece on a clean towel. Smooth the circular body and straighten the golden cap. Allow it to dry completely. Blocking helps refine minor unevenness, but it cannot reliably repair major construction errors.
If the circle forms pronounced waves, check for extra stitches or accidental stitches worked into the starting chains. If it cups into a bowl, check for missed increases and tight tension. When the counts are correct but the shape remains distorted, your stitch height may need a different increase rate. Test a hook or tension adjustment before remaking the affected rounds.
To enlarge the crochet Christmas placemat, continue the increase sequence before adding the border. Round 13: Repeat [dc in the next 11 sts, 2 dc in the next st] 12 times, giving 156 sts. Round 14: Repeat [dc in the next 12 sts, 2 dc in the next st] 12 times, giving 168 sts. Begin and join both rounds as previously instructed.
For a smaller version, stop after an earlier completed body round and work one border stitch into each existing stitch. Adjust the cap width if needed to keep the proportions balanced. This project is a decorative table accessory for ordinary place settings. Do not assume it provides adequate protection beneath cookware taken directly from an oven or stove.
When making a matching set, use the same yarn type, hook size, round count, and stripe placement for every piece. Measure the placemats before finishing and shape them consistently during blocking. Follow the yarn label when washing, and test a multicolor swatch for dye transfer. Store the dry pieces flat so they are ready for your next festive meal.
Frequently Asked Questions
Is the Crochet Christmas bauble placemat pattern suitable for beginners?
Yes, it is suitable for beginners who already understand chains, double crochet, single crochet, and slip stitches. The main additional skill is placing increases correctly. Use a stitch marker, count each completed round, and check the circle on a flat surface regularly. A chain ring is an alternative if you are still learning the magic ring.
Which yarn should I use for a Christmas placemat?
Medium-weight washable cotton is a practical starting choice. It offers clear stitch definition and creates a comfortable fabric for table use. Choose a yarn with care instructions that fit your needs, and use compatible yarns for every color. The finished texture should feel smooth and stable rather than very loose or bulky.
Why does my circular placemat curl upward?
Upward curling can occur when the outer edge does not have enough length to accommodate the height of the rounds. Missed increases and tight tension are common causes. Check the stitch totals first. If they are correct, consider whether your yarn, hook, and stitch height require an adjustment to the standard increase sequence.
Why does the edge look ruffled?
A ruffled edge can result from extra stitches, loose tension, or an increase rate that does not match your stitch dimensions. Make sure you are not treating the beginning ch 2 as an additional stitch. Mild unevenness may settle after blocking, but substantial waves usually require correcting or reworking the affected rounds.
Can I make the entire placemat in one color?
Yes. Work all twelve body rounds in one color, then add the border and golden cap. You can also use the same color for the border if you prefer a simpler design. A solid version of the Crochet Christmas bauble placemat pattern reduces color changes and leaves fewer yarn ends to finish.
How do I choose the right finished size?
Measure your plate and compare it with the crocheted body. The circle should be large enough to remain visible around the plate if that is the look you want. Add or remove complete body rounds before working the border. Position the ornament cap toward the outside of the place setting.
Can I adapt this pattern into a coaster?
Yes, you can stop after an early round to create a smaller circular base, then add a proportionately smaller cap. Measure the piece against your intended mug or glass before finishing. Keep the surface flat and the cap outside the cup’s resting area. The exact stopping round depends on your yarn and tension.
How should I wash the finished placemat?
Follow the care instructions for the yarn used, including any different colors or embroidery yarn. Test a small multicolor swatch if you are concerned about dye bleeding. After washing, reshape the circle and cap gently and let the piece dry as directed. Avoid storing it while damp.
Conclusion
This Crochet Christmas bauble placemat pattern explains how to create a circular ornament-shaped table accessory using clearly counted double crochet rounds.
You have learned the essential crochet abbreviations, how to work evenly spaced increases, how to introduce festive stripes, and how to add a single crochet border and golden cap. The finishing instructions also show you how to secure yarn ends, block the fabric, adjust its size, and care for the completed placemat.
Choose your favorite Christmas colors and enjoy creating a handmade detail for your holiday table. Please leave your honest opinion about this pattern and share any suggestions for improving the instructions or adding new variations. Your feedback and creative ideas are welcome, whether you make a single centerpiece mat or a coordinated set of crochet Christmas placemats.