
Crochet gift box pattern for decoration is a charming project that transforms simple yarn into a small present-shaped accent for your home.
The appeal of a crochet gift box comes from the combination of familiar stitches and thoughtful construction. You do not need complicated stitch combinations to create an attractive result, but you do need consistent tension and matching panels.
This Crochet gift box pattern for decoration uses US crochet terminology and includes stitch counts for a small box measuring approximately 7.5 cm across before allowing for seam thickness. Your finished dimensions may vary because yarn thickness, hook size, and personal tension affect the fabric. For that reason, the instructions explain when to measure and how to adjust the panels before sewing. The box is intended primarily as a decorative item, although a supported version can hold a lightweight surprise. Start by selecting two coordinating yarn colors and gathering your basic tools. Then work through the panels, assembly, lid, and bow at a comfortable pace, checking the shape as you complete each stage.
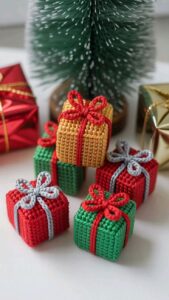
Materials and Stitch Keys for Your Crochet Gift Box
Choose approximately 60–90 grams of worsted-weight cotton yarn for the box and 15–25 grams of contrasting yarn for the ribbon and bow. These quantities are estimates rather than exact requirements. Cotton provides clear stitch definition and usually produces a firm fabric, making it a practical choice for this small decoration. Use the same yarn weight for both colors.
Gather a 3.5 mm crochet hook, tapestry needle, scissors, ruler, and several stitch markers. Adjust the hook size if necessary to achieve closely worked stitches that remain comfortable to crochet. Your fabric should feel firm without becoming difficult to handle. An optional removable plastic canvas insert can provide extra support after you have assembled and measured the box.
The crochet stitch key uses the following abbreviations: ch means chain, sc means single crochet, sl st means slip stitch, st means stitch, and RS means right side. This pattern uses single crochet for the panels and ribbon, followed by sewn joins. The chain made at the beginning of a new row does not count as a stitch.
To work single crochet, insert your hook into the indicated stitch, yarn over, and pull up a loop. Yarn over again and pull through both loops on the hook. When turning, make one chain and rotate the work before beginning the next row. Place the first single crochet into the first stitch of the previous row, leaving the turning chain unworked.
The suggested gauge is approximately 20 single crochet stitches and 24 rows per 10 cm. At this gauge, a panel measuring 15 stitches across and 18 rows high will be approximately 7.5 cm square. Make a swatch large enough to measure accurately, and check it without stretching. Gauge matters here because the pieces must fit together.
If your gauge differs, use the stitch counts as a starting point and adjust the number of rows until each body panel is square. Make the base and four walls identical in size. The lid must be slightly larger than the assembled box, so finalize its dimensions after checking the body. Careful panel measurements make assembly much easier.
Crochet the Square Base and Four Side Panels
Begin the crochet box base with your main color. Foundation: ch 16. Row 1: sc in the second ch from the hook and in each remaining ch—15 sc. Count the stitches before continuing. Keep the foundation chain relaxed enough to match the width of the following rows; an overly tight chain can pull the bottom edge inward.
Work Rows 2–18: ch 1, turn, sc in each st across—15 sc per row. Maintain the same stitch count throughout the panel. If identifying the first and last stitches is difficult, mark them and move the markers as you work. Straight edges depend on placing one stitch into every stitch without adding stitches to the turning chain.
Measure the piece after Row 18. Its width and height should be approximately equal, creating a square crochet panel. If the panel is shorter than it is wide, add rows. If it is taller, remove rows. Write down the final row count so you can repeat it for the remaining pieces. Matching dimensions matter more than using precisely 18 rows.
Fasten off, leaving a sewing tail approximately 40 cm long. Make four more panels using the same foundation, stitch count, and final row count. You should now have five matching squares: one base and four walls. Stack or arrange them together to compare their dimensions, and correct any noticeably different piece before beginning the seams.
For lightly curled edges, dampen the panels and lay them flat to dry according to the yarn’s care instructions. Gently shape them to matching dimensions without stretching the fabric. This light blocking can make the edges easier to join, but it will not correct an incorrect stitch count. Check the construction before relying on blocking to improve the shape.
You can personalize this Crochet gift box pattern for decoration with horizontal stripes. Change colors by completing the final yarn-over of the last single crochet in a row with the new yarn. Repeat the same stripe placement on all four walls for a coordinated appearance. Keep the base solid if you want a simpler project with fewer yarn ends.
Assemble the Box and Crochet a Fitted Lid
Lay the base in the center with one wall beside each of its four edges. Use markers to hold the pieces in position. With a tapestry needle and matching yarn, whipstitch each wall to the base. Where stitch edges meet row-end edges, distribute the sewing stitches evenly. Their counts may differ, so match the physical lengths without stretching either panel.
Fold the four walls upward and sew the vertical corners from the base toward the opening. Keep the seams secure without pulling them so tightly that the fabric puckers. Check that the top edges sit at similar heights. When the crochet box body stands evenly, secure the sewing tails and weave them into the inside of the seams.
Start the lid top with ch 18. Row 1: sc in the second ch from the hook and across—17 sc. Rows 2–20: ch 1, turn, sc across—17 sc per row. At the suggested gauge, this produces a square approximately 8.5 cm across. Adjust the row count until the height matches the width, then compare it with the assembled box.
For the lid’s shallow sides, make four matching strips. Work ch 18. Row 1: sc in the second ch from the hook and across—17 sc. Rows 2–3: ch 1, turn, sc across—17 sc. Each strip should match the length of one lid edge. If you changed the lid top’s stitch count or dimensions, adjust these strips accordingly.
Sew one strip to each edge of the lid top, then join their short ends at the corners. This forms a shallow cap that fits over the box opening. Test the removable lid before securing every yarn tail. If it compresses the walls, increase the top panel and side-strip lengths. If it sits excessively loosely, reduce their dimensions.
For firmer walls, add an optional removable structural insert made from plastic canvas. Measure the completed interior before cutting a base and four side pieces. Cover cut edges with fabric or enclose the insert in a sewn lining. It should fit comfortably without pushing the walls outward. Remove the insert before washing the crochet, following the yarn’s care instructions.
Make the Crochet Ribbon, Bow, and Finishing Details
Using your contrasting yarn, begin the crochet ribbon with ch 5. Row 1: sc in the second ch from the hook and across—4 sc. Row 2: ch 1, turn, sc across—4 sc. Repeat Row 2 until the strip reaches the required length. Measure against your finished box because ribbon length changes with the box size and your gauge.
To keep the lid removable, attach its ribbons separately from the body decorations. Make two strips long enough to cross the lid top and extend down its opposite shallow sides. Position them at right angles, crossing at the center, then sew them securely. Keep the strips smooth against the lid without tightening them enough to distort its shape.
Make additional short ribbon sections for the box walls if you want the appearance of a fully wrapped present. Align each section with the corresponding ribbon on the lid. Sew these sections only to the body, keeping the lid free to lift away. Check the alignment with the lid in position before completing the final securing stitches.
For the crochet bow, make another four-stitch-wide ribbon approximately 18–22 cm long. Fold both ends toward the middle so they overlap slightly at the back. Sew the overlapping ends together, then wrap yarn around the center to pinch the strip into two loops. Secure the wrapping firmly and hide its ends behind the bow.
Sew the bow to the ribbon intersection on the lid. Arrange the loops evenly and add discreet securing stitches underneath if they need support. Finish your gift box decoration with an embroidered star, small yarn dots, or a crocheted tag if desired. A few carefully placed details can complement the design while keeping the square shape and ribbon clearly visible.
Inspect the seams, weave in remaining ends, and test the lid one last time. Display the box on a shelf, mantel, or celebration table. Avoid placing heavy items inside an unsupported version, as the fabric can stretch. For cleaning, follow the yarn label, remove any insert, and reshape the pieces while drying to preserve the crochet gift box silhouette.
Frequently Asked Questions
Is this crochet gift box pattern suitable for beginners?
Yes, this project is suitable for beginners who can make chains and single crochet stitches. The panels use repeated rows rather than complicated shaping. Sewing requires patience, but temporary stitch markers help keep the pieces aligned. Start with a solid-color box so you can focus on consistent stitches and matching measurements.
Why are my panels different sizes even though their stitch counts match?
Changes in tension can produce different dimensions despite identical stitch counts. Check that you are using the same hook and yarn throughout, and measure each finished panel. Light blocking may help with small differences, but a substantially larger or smaller panel should be corrected before assembly.
Can I use acrylic yarn for this decoration?
Yes, acrylic yarn can work well, especially when you want a lightweight decoration in bright colors. Some acrylic yarns create softer fabric, so make a swatch first. A smaller hook or removable insert may help the box maintain its shape. Choose the hook according to the fabric you produce.
How do I make a larger crochet gift box?
Increase the number of stitches across the body panels and work enough rows to make each one square. Make all five body panels identical. Assemble the body before determining the lid dimensions, allowing additional room for the seams. Larger boxes usually benefit from interior support because broader panels can bend more easily.
What should I do if the lid is too tight?
Measure the outside of the assembled box, including its corner seams and any ribbon sections. The lid needs enough interior space to fit over those features comfortably. Remake the lid top slightly larger and adjust the side strips to match. Avoid stretching a tight lid over the body, which can distort both pieces.
Can I put an actual gift inside the box?
A small, lightweight item can fit inside a supported box. For something that needs protection, use a suitable inner container rather than depending on the crochet fabric alone. The unsupported version is best used as decoration. Avoid placing unpackaged food directly against the yarn.
How can I make the bow hold its shape better?
Work the ribbon with firm, consistent stitches and keep the loops modest in size. Longer strips create larger loops that may droop. Secure the center wrapping carefully and sew the bow firmly to the lid. Small stitches beneath the loops can help hold their position without changing the appearance.
Can I change the colors for different occasions?
Absolutely. Red and cream suit Christmas decorations, pastels work beautifully for spring celebrations, and neutral shades can complement everyday interiors. You can also make several boxes in coordinating colors. Keep the ribbon noticeably different from the body so the wrapped-present details remain easy to see.
Conclusion
This Crochet gift box pattern for decoration shows how to crochet five matching square panels, assemble a tidy box, create a fitted removable lid, and add a handmade ribbon and bow.
Consistent stitch counts, careful measurements, and balanced seams are the main steps that help the finished decoration maintain its shape. Optional interior support makes the design firmer, while color changes allow you to adapt it for different celebrations.
Please leave your honest opinion about this tutorial and share your suggestions for future patterns. Were the panel measurements and assembly instructions easy to follow? Tell us which colors you would choose and whether you would enjoy making a smaller ornament version or a larger decorative box.