
Crochet snowflake pattern is a beautiful way to create delicate winter decorations with a small amount of yarn and a few familiar stitches.
The appeal of a crochet snowflake comes from its combination of simplicity and delicate detail. Each round has a specific purpose: the first establishes the center, the second creates six arches, and the third shapes the pointed arms.
This Crochet snowflake pattern uses American crochet terminology and includes a stitch key for every abbreviation in the instructions. You do not need advanced techniques, but you should feel comfortable making chains, single crochet, half double crochet, double crochet, and slip stitches. The small points use a picot, which is simply a short chain joined back onto itself. Before beginning, gather your supplies and read through the three rounds so you understand where each stitch belongs. Work slowly enough to count the center stitches and chain arches accurately. Once the crochet is complete, a little careful shaping will bring out the design and help your handmade snowflake look ready for display.
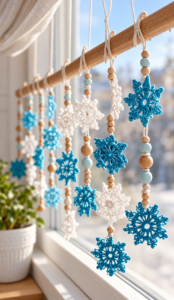
Materials and Crochet Stitch Key
Choose smooth cotton yarn for a snowflake with clearly visible stitches and a clean outline. Sport-weight cotton is a practical starting point because it is easier to handle than very fine crochet thread. You will need approximately 10–20 yards for one small ornament, although the amount depends on your yarn thickness, hook size, and tension.
Gather a suitable crochet hook, scissors, a yarn needle, rustproof pins, and a blocking mat. A 2.5–3 mm hook may work well with sport-weight cotton, but adjust according to your yarn and comfort. The finished snowflake may measure approximately 3–4 inches across after blocking; this is an estimate, not a fixed measurement.
The crochet stitch key uses US terms: ch means chain, sl st means slip stitch, sc means single crochet, hdc means half double crochet, and dc means double crochet. The abbreviation st means stitch. A ch-5 space is the opening underneath a chain of five stitches.
For single crochet, insert the hook, yarn over, and pull up a loop; yarn over again and pull through both loops. For half double crochet, yarn over before inserting the hook, pull up a loop, then yarn over and pull through all three loops. Keep these stitches relaxed enough to work comfortably.
For double crochet, yarn over, insert the hook, yarn over, and pull up a loop. Yarn over and pull through two loops, then repeat to finish. To make a picot, chain three and slip stitch into the first of those three chains. That small loop forms the tip of each snowflake arm.
This Crochet snowflake pattern is worked in joined rounds. Close each round with the specified slip stitch instead of continuing in a spiral. The beginning chain one does not count as a stitch. Instructions inside parentheses belong in the same space, and the joining slip stitches are not included in the main stitch counts.
Step-by-Step Crochet Snowflake Pattern
Round 1: Make the center. Chain four and slip stitch into the first chain to form a ring. Chain one, then work 12 sc into the ring. Insert your hook through the center opening rather than into individual chains. Slip stitch into the first sc to join, then count twelve stitch tops before continuing.
Round 2: Begin the chain arches. Chain one and work one sc into the same stitch where you joined Round 1. Chain five, skip the next sc, and work one sc into the following sc. This creates the first ch-5 space, with a single crochet anchor at each end of the arch.
Round 2: Complete all six arches. Repeat “ch five, skip one sc, sc in the next sc” four more times. You now have five arches and six sc anchors. Chain five, skip the final unused stitch of Round 1, and slip stitch into the first sc of Round 2. Count six ch-5 spaces.
Round 3: Shape the first arm. Slip stitch into the first ch-5 space. Work (sc, hdc, dc, picot, dc, hdc, sc) into that space. For the picot, chain three and slip stitch into the first of those chains. All six main stitches go beneath the arch, with the picot positioned between the two double crochets.
Round 3: Finish the remaining arms. Repeat (sc, hdc, dc, picot, dc, hdc, sc) in each of the remaining five ch-5 spaces. Leave the sc anchors between the arches unworked. Slip stitch into the first sc of Round 3 to join. You should have six arms, six picots, and 36 main stitches.
Fasten off and secure the ends. Cut the yarn, leaving a tail approximately 6 inches long, and pull it through the final loop. Thread the yarn needle and weave the tail through several stitches on the back, changing direction to help secure it. Weave in the starting tail, then gently spread the six arms.
Blocking and Finishing Your Crochet Snowflake
Blocking a crochet snowflake helps define its points and open spaces. Lightly dampen the finished piece according to your yarn’s care instructions, then press out excess moisture between clean towels. Avoid twisting or wringing the ornament. The purpose is to make the fibers flexible enough to arrange into a balanced shape.
Place the snowflake on a blocking mat and gently flatten the center. Spread the six arms evenly around it, positioning a rustproof pin through each picot. Adjust neighboring arms so the spaces between them look similar. Keep the stretching gentle; pulling too firmly can distort the chains or make one point noticeably longer.
Measure from the center to each tip if you want a particularly consistent result. Move the pins slightly until all six points sit at approximately the same distance. Additional pins can support an arch that needs shaping. Let the snowflake dry completely before removing the pins so the finished outline has time to settle.
For a firmer crochet snowflake ornament, consider a fabric stiffener suitable for your yarn. Follow the product directions and test it on a small sample first, especially with colored cotton. Apply it evenly without filling the decorative openings, then pin the snowflake into shape and allow it to dry fully before handling.
Add a hanger by threading a separate piece of cotton thread or narrow ribbon through one picot. Tie the ends together to form a loop, keeping it lightweight so it does not pull the point out of shape. For gift wrapping, pass ribbon through an open space and secure the ornament gently against the package.
Store your finished handmade snowflakes flat in a clean, dry container. Place them where heavier decorations cannot crush or bend the pointed arms. If you make several ornaments, separate them with tissue paper to protect their shape. Follow the yarn and stiffener care instructions when cleaning, since some finishes soften or wash away when wet.
Troubleshooting and Customizing the Pattern
If your snowflake has the wrong number of arms, check Round 2 first. There must be exactly six ch-5 spaces before you begin shaping the outer round. Skipping too many center stitches or adding an extra anchor can change that number. Undo the affected section and correct it before continuing with the arms.
If the center cups noticeably, confirm that Round 1 contains 12 single crochet stitches. Check that the joining slip stitch and the chain arches are not unusually tight. Slight unevenness may improve during blocking, but pronounced cupping deserves a closer inspection. Remake the affected round with a more relaxed tension if the counts are correct.
If the arms ripple, count the stitches inside each arch. Every arm should contain two sc, two hdc, two dc, and one picot, arranged in the written order. Extra stitches or accidental stitches in the anchors can add unwanted fullness. Consistent chain tension also helps the arches provide similar amounts of space.
To change the size of this Crochet snowflake pattern, use a different yarn weight with an appropriate hook while keeping the stitch instructions unchanged. Fine cotton thread produces a smaller, more delicate decoration. Thicker cotton creates a larger piece. Make one sample first, since yarn behavior and personal tension influence both the diameter and definition.
For a color variation, work the entire snowflake in white, ivory, pale blue, or another shade you enjoy. You can also change colors at the beginning of Round 3 by joining the new yarn in the first ch-5 space. Secure all ends carefully so the color change remains neat around the openwork.
When creating a matching set, record the yarn, hook size, and blocked diameter of your first successful snowflake. Use the same materials and compare each new piece with that sample while pinning. Counting the arches and checking every arm before fastening off will save time and help your ornaments look consistent together.
Frequently Asked Questions
Is this Crochet snowflake pattern suitable for beginners?
Yes, it is suitable for beginners who already understand the basic stitches used in the pattern. The project is small, and each round has a clear purpose. If the picot feels unfamiliar, practice chaining three and joining into the first chain on a separate swatch before making the snowflake.
Which yarn works best for a crochet snowflake?
Smooth cotton is a useful choice because it shows the stitches clearly and allows the openwork to remain visible. Sport-weight cotton is comfortable for a first attempt, while crochet thread creates a finer ornament. Very fuzzy yarn can obscure the small spaces and soften the pointed outline.
Can I use a magic ring instead of the chain-four ring?
Yes. Make a magic ring, chain one, and work the same twelve single crochets into it for Round 1. Join as instructed and continue with the remaining rounds. Close the ring gently and weave in the starting tail securely so the center remains stable.
Do I have to stiffen my crochet snowflake?
No. Stiffening is optional. A damp-blocked cotton snowflake can work well on a gift or as a flat decorative accent. A hanging ornament may benefit from a firmer finish if you want the points to hold their shape more clearly. Choose a suitable product and follow its instructions.
Why are my snowflake points different lengths?
Uneven tension, missing stitches, or inconsistent picots can make the arms look different. Check that all six arms contain the same stitch sequence and that every picot has three chains. If the construction is correct, gentle blocking can help arrange the points at similar distances from the center.
Can I make a garland using this pattern?
Yes. Crochet several snowflakes, finish and block them individually, then attach them at even intervals along a suitable cord. Keep the attachments secure and avoid pulling the points too tightly. Matching yarn and consistent blocking measurements will help the finished garland look coordinated.
How do I clean a finished snowflake?
Follow the care instructions for your yarn and any stiffener you applied. An unstiffened cotton piece may be gently washed and blocked again if the yarn label permits it. For a stiffened ornament, check the finishing product’s directions before wet cleaning, as water may alter its firmness.
Conclusion
This Crochet snowflake pattern teaches you how to make a twelve-stitch center, build six chain arches, and shape six pointed arms using basic crochet stitches and a small picot.
You have also learned how to check the stitch counts, secure the yarn ends, block the finished ornament, and add an optional hanger or stiffened finish. By changing your yarn, hook, or colors, you can use the same construction to create a variety of winter decorations.
Take your time with the first piece and use it as a reference when making more. Careful counting and gentle shaping can make a noticeable difference to the final result. Please leave your honest opinion about this tutorial and share your suggestions, favorite color combinations, or ideas for future crochet patterns. Your feedback can help make upcoming projects clearer, more useful, and more enjoyable.