
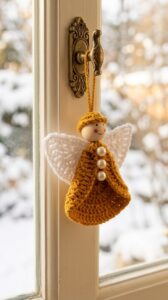
Crochet angel pattern for Christmas is a charming way to create a handmade ornament with a rounded head, a flowing dress, and delicate wings.
The beauty of a crochet Christmas angel comes from its simple silhouette and the care you put into the finishing details.
This Crochet angel pattern for Christmas uses American crochet terminology and is suitable for crocheters who are comfortable with basic stitches, increases, and decreases. The head is worked in continuous rounds, while the dress uses joined rounds and the wings use short rows. These different methods are explained where they appear, so you can follow the construction without guessing. Read the instructions before starting and count your stitches whenever the pattern changes the shape. A stitch marker is particularly helpful when making the head. Once the separate pieces are complete, careful sewing and light shaping will turn them into an attractive ornament that you can display, give as a gift, or make again in other colors.
Materials and Crochet Stitch Key
Gather smooth sport-weight cotton yarn, a suitable hook, a small amount of polyester stuffing, scissors, a yarn needle, and a stitch marker. Choose yarn for the head, dress, wings, and optional halo. Approximately 40–60 yards in total should be sufficient for a small angel, although the amount varies with your materials and tension.
A 2.5–3 mm crochet hook is a useful starting point for many sport-weight cotton yarns. Choose a size that creates firm stitches in the head without making crochet uncomfortable. The finished ornament may be approximately 4–6 inches tall. Treat this as an estimate and make adjustments through yarn and hook choice rather than changing individual stitch counts.
The crochet stitch key uses US terms: ch means chain, sl st means slip stitch, sc means single crochet, hdc means half double crochet, and dc means double crochet. Inc means work two sc in the same stitch. Dec means reduce two stitches to one single crochet, and MR means magic ring.
For an invisible decrease, insert the hook under the front loop of the next stitch, then under the front loop of the following stitch. Yarn over and pull through both front loops, then yarn over and pull through the two remaining loops. Use this technique on the head to create a smoother surface as it narrows.
For double crochet, yarn over, insert the hook into the indicated stitch, yarn over, and pull up a loop. Yarn over and pull through two loops, then repeat to complete the stitch. The dress hem uses a shell, which in this pattern means five double crochets worked into the same stitch.
Instructions in parentheses are repeated the stated number of times. A number at the end of a round gives the total stitch count. Beginning chains do not count as stitches unless specified. Work the head in a continuous spiral, joining the dress rounds as directed and turning after each wing row.
Crochet the Angel Head and Flared Christmas Dress
Head, Rounds 1–3: With your chosen head color, make an MR and work 6 sc into it for Round 1. Tighten the ring and mark the first stitch. Round 2: inc in every stitch (12). Round 3: repeat (sc, inc) six times (18). Move the marker at the beginning of each round.
Head, Rounds 4–7: Round 4: repeat (2 sc, inc) six times (24). Rounds 5–7: work one sc in every stitch (24 each round). These rounds give the head its rounded shape. Keep your tension consistent, and check that there are no extra stitches near the marker before beginning the decreases.
Head, Rounds 8–10: Round 8: repeat (2 sc, dec) six times (18). Round 9: repeat (sc, dec) six times (12). Add small amounts of stuffing until the head feels rounded without stretching the fabric. Round 10: dec six times (6). Fasten off, thread the tail through the remaining front loops, and pull closed.
Dress, Rounds 1–3: With dress yarn, chain twelve and slip stitch into the first chain without twisting the chain. Round 1: ch one, sc in each chain, and join to the first sc (12). Round 2: ch one, repeat (sc, inc) six times, and join (18). Round 3: ch one, repeat (2 sc, inc) six times, and join (24).
Dress, Rounds 4–7: Round 4: ch one, repeat (3 sc, inc) six times, and join (30). Round 5: ch one, repeat (4 sc, inc) six times, and join (36). Rounds 6–7: ch one, sc in every stitch, and join (36 each round). Keep the narrow starting opening at the top and the wider edge at the bottom.
Dress, Round 8: Ch one and work sc in the first stitch. Repeat (skip 2 stitches, 5 dc in the next stitch, skip 2 stitches, sc in the next stitch) five times. For the final shell, skip two stitches, work five dc in the next, skip the final two stitches, and join to the first sc. Finish with six shells and six sc anchors.
Make the Wings, Halo, and Assemble the Angel
Wing, Rows 1–2: Make two identical wings in your chosen wing color. Row 1: work 6 sc into an MR, tighten the ring, ch one, and turn. Keep the stitches arranged as a semicircle rather than joining them. Row 2: inc in each stitch (12), ch one, and turn. The turning chain does not count as a stitch.
Wing, Rows 3–4: Row 3: repeat (sc, inc) six times (18), ch one, and turn. Row 4: repeat (2 sc, inc) six times (24). Fasten off with a long sewing tail. Each wing should resemble a small fan, with a curved outer edge and a straighter lower edge. Repeat all four rows for the second wing.
For an optional crochet halo, chain enough stitches to form a small ring that looks proportionate above the head. Start with approximately sixteen chains, check the size, and adjust if necessary. Slip stitch into the first chain to close the ring, then slip stitch loosely into every chain. Fasten off with a tail for attaching it.
To assemble the crochet Christmas angel, place the closed bottom of the head over the dress’s narrow opening. Pin or hold it in position, then sew around the twelve-stitch neckline, catching secure stitches on the underside of the head. Make several evenly spaced passes so the head sits centrally and does not wobble when lifted.
Arrange the two wings behind the upper dress with their curved edges facing outward. Let the inner corners meet or overlap slightly at the center back. Sew the inner portion of each wing securely to the dress, leaving the outer edges free. Check the angel from the front before securing the tails so the wings appear balanced.
Attach the halo to the crown with small stitches in two or three places. Add a separate hanging loop by passing strong yarn through several secure stitches at the top of the head, then knotting and weaving in the ends. Keep the face blank or embroider a simple expression before attaching the halo, according to your preference.
Finishing, Troubleshooting, and Creative Variations
Shape the crochet angel wings before final assembly if their edges curl. Lightly dampen them according to the yarn’s care instructions, spread them on a blocking surface, and pin gently with rustproof pins. Allow them to dry completely. Avoid pulling aggressively, as excessive stretching can make the two wings different sizes.
If the head shows visible gaps, try a slightly smaller hook for that component or reduce the amount of stuffing. The fabric should hold the filling without being stretched. Insert stuffing in small portions and distribute it evenly. A neatly rounded head usually looks better than one packed so tightly that the stitches spread apart.
If the dress twists or leans, inspect the joining point and count the stitches in each round. Accidentally working into the joining slip stitch can add stitches and disrupt the shape. Always join to the first actual single crochet, and place the first stitch of the next round in that same stitch.
If the dress hem does not produce six matching shells, recount Round 7 before changing the edging. It needs exactly thirty-six stitches. Each shell repeat uses six base stitches, including its single crochet anchor. Remember that the last repeat joins to the first anchor instead of adding another single crochet at the end.
Personalize this Crochet angel pattern for Christmas with an ivory dress, pale blue wings, or a small metallic-thread halo. A subtle color change at the hem can emphasize the scallops. Use a lightweight yarn for decorative details so they do not pull the ornament out of shape, and secure every yarn end carefully.
For a coordinated collection, record your yarn, hook size, and finished height after making the first angel. Use the same materials for subsequent ornaments and compare the wing placement during assembly. Store the angels where their wings and dresses will not be crushed. Keep them dry and follow the yarn’s care instructions if cleaning becomes necessary.
Frequently Asked Questions
Is this Crochet angel pattern for Christmas suitable for beginners?
It is suitable for beginners who already know single crochet, double crochet, increases, and decreases. The instructions separate the head, dress, and wings into manageable components. If continuous rounds are unfamiliar, practice using a stitch marker on a small circular sample before starting the head.
What yarn should I use for a crochet Christmas angel?
Smooth cotton is a practical choice because it gives clear stitch definition and helps the dress and wings retain their outline. Sport-weight yarn makes a manageable ornament. Finer cotton creates a smaller angel, while thicker yarn produces a larger decoration when paired with an appropriate hook.
Can I make the angel without a magic ring?
Yes. For the head, chain two and work six sc into the second chain from the hook, then continue as written. Use the same alternative for the wings, arranging those six stitches into a semicircle before turning. Secure the starting tail carefully to keep the opening neat.
Does the dress need stuffing?
No. This design uses an unstuffed, open-bottom dress. Only the head is lightly filled. Leaving the skirt empty keeps the ornament lightweight and allows its flared shape and scalloped edge to remain visible. Shape it gently by hand after assembly if the fabric has been compressed.
How do I keep the wings even?
Make both wings with the same yarn, hook, and stitch counts. Compare them before sewing, and block them to similar dimensions if needed. During assembly, check their height and angle from the front. Small placement adjustments can make a noticeable difference even when the wings themselves match.
Can I add a face to the angel?
Yes. A simple embroidered face is an easy way to add character. Use a small amount of embroidery thread or fine yarn and keep the stitches proportionate to the head. You can also leave the face blank for a simple decorative appearance that highlights the dress, wings, and halo.
Can I make a larger angel with this pattern?
Yes. Use thicker yarn and a suitable larger hook while keeping the stitch counts unchanged. The angel’s proportions should remain similar, although the fabric may behave differently. Make a sample before creating a set, and ensure the head’s stitches remain firm enough to contain the stuffing.
Why does my angel lean when hanging?
The hanging loop may be off-center, or the wings may be attached unevenly. Check that the loop emerges from the top center of the head and that both wings sit at similar heights. Also inspect the neckline seam to ensure the head is securely attached and centered above the dress.
Conclusion
This Crochet angel pattern for Christmas teaches you how to crochet a rounded stuffed head, an open flared dress with six scalloped shells, two fan-shaped wings, and an optional halo.
You have also learned how to join the components, add a hanging loop, check your stitch counts, and correct common shaping problems. Together, these techniques create a small handmade decoration that you can personalize through color, yarn choice, and embroidered details.
Take your time with the assembly, since a centered head and evenly positioned wings bring the finished angel together. Once you are comfortable with the pattern, you can make a coordinated set for your tree or prepare individual ornaments as thoughtful gifts. Please leave your honest opinion about this tutorial and share your suggestions, favorite color combinations, or ideas for future Christmas crochet projects. Your feedback can help make upcoming patterns clearer and more enjoyable to follow.