
Christmas Tree Cutlery Holder Crochet is a charming way to bring handmade detail to your holiday table while keeping each place setting organized.
Making a crochet Christmas tree cutlery holder is an enjoyable opportunity to create something decorative that you can use year after year. Instead of relying on complicated stitches, this pattern uses single crochet and gradual decreases to produce a firm, recognizable tree shape.
This Christmas Tree Cutlery Holder Crochet pattern uses American crochet terminology and provides clear stitch counts throughout the shaping process. Both panels begin at the wide bottom edge and narrow toward the top, but the front panel stops earlier to leave an opening for the cutlery. The back continues to a point, creating the visible upper portion of the tree. Although precise gauge is less critical than it would be for clothing, your tension still affects the width and depth of the pocket. Count your stitches regularly, keep your seams relaxed, and check the fit before completing the assembly. With these habits, you can turn a small amount of yarn into a thoughtful accessory for Christmas meals, family gatherings, or handmade gifts.
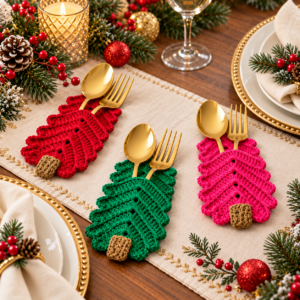
Materials and Crochet Stitch Abbreviations
For your Christmas Tree Cutlery Holder Crochet, prepare approximately 35–50 grams of green DK or light worsted cotton yarn, a small amount of brown yarn, and optional contrasting yarn for embroidery. You will also need a crochet hook suitable for your yarn, scissors, a tapestry needle, and stitch markers. A 3.5 mm hook is a reasonable starting point, but adjust it if your fabric feels too loose or excessively stiff.
Cotton yarn works well because its smooth texture makes individual stitches easy to identify and creates a neatly defined tree outline. Choose a yarn with care instructions that suit a reusable table accessory. Use the same yarn weight for the front and back panels so their edges align during assembly. If you substitute another fiber, make a sample first to check its stretch, texture, and finished dimensions.
The crochet stitch abbreviations used here are ch, meaning chain; sc, meaning single crochet; sc2tog, meaning single crochet two stitches together; st, meaning stitch; and sts, meaning stitches. RS means right side, or the surface you want facing outward. Numbers in parentheses show the stitch total at the end of a row. These counts help you confirm that the tree is narrowing correctly.
To work single crochet, insert your hook into the indicated stitch, yarn over, and pull up a loop. Yarn over again and draw through both loops on the hook. For sc2tog, insert the hook into the next stitch and pull up a loop, then do the same in the following stitch. Yarn over and draw through all three loops, reducing two stitches to one.
Throughout this pattern, ch 1 and turn between rows. The turning chain does not count as a stitch. Always work into the first actual stitch and include the last stitch of the row. A marker in the final stitch can help prevent accidental omissions. Since the pattern already includes one planned decrease per shaping row, skipping another stitch will change the outline and the final stitch count.
A reference gauge is approximately 20 sc and 24 rows per 10 cm. At this tension, the tree body measures about 17.5 cm across its base and 14.5 cm tall before the trunk is attached. The front pocket measures approximately 8.5–9 cm deep. These dimensions are estimates, so compare your sample with your cutlery handles before committing to a complete set.
Crochet the Christmas Tree Back Panel
Begin the back panel with green yarn and ch 36. For Row 1, work 1 sc in the second chain from the hook, then 1 sc in each remaining chain (35 sts). Ch 1 and turn. This foundation forms the wide lower edge of the tree. Keep the chain relaxed so the base lies flat instead of drawing inward.
For Row 2, work sc2tog over the first 2 sts, then sc in each remaining stitch (34 sts). Ch 1 and turn. For Row 3, repeat the same instruction: sc2tog over the first 2 sts, then sc across (33 sts). Ch 1 and turn. Turning the work makes the decreases alternate between the two physical sides of the panel.
Continue Rows 4–10 by working sc2tog at the beginning of each row, followed by sc in every remaining stitch. Ch 1 and turn between rows. The stitch totals are 32, 31, 30, 29, 28, 27, and 26. Count each completed row. The edges will have a slightly stepped appearance, which is normal for this method of shaping a single crochet triangle.
Work Rows 11–20 using the same sequence: sc2tog over the first 2 sts, then sc across. The totals are 25, 24, 23, 22, 21, 20, 19, 18, 17, and 16 sts. Keep your tension steady and lay the panel flat occasionally. An abrupt indentation usually means that an additional stitch was missed or an extra decrease was accidentally worked.
For Rows 21–30, continue decreasing once at the beginning of every row and working single crochet across the remaining stitches. Finish these rows with 15, 14, 13, 12, 11, 10, 9, 8, 7, and 6 sts respectively. Remember to ch 1 and turn between rows. Avoid tightening your grip as the rows become shorter, because this can make the tip curl.
Complete Rows 31–34 in the same manner, ending with 5, 4, 3, and 2 sts. For Row 35, sc2tog over the remaining 2 sts (1 st). Fasten off and weave in the yarn end. Your Christmas Tree Cutlery Holder Crochet back panel is complete. Smooth it gently and check that the base is straight and both sides narrow gradually toward the point.
Make the Front Pocket and Join the Panels
The front pocket panel follows the same instructions as the lower section of the back. With green yarn, ch 36. For Row 1, sc in the second chain from the hook and across (35 sts). Ch 1 and turn. For Rows 2–21, sc2tog over the first 2 sts, then sc across, turning between rows. Finish Row 21 with 15 sts and fasten off.
The final 15-stitch row becomes the pocket opening. At the reference gauge, it measures approximately 7.5 cm across. Hold your utensil handles together and compare them with this opening before sewing. They should fit without strongly stretching the crochet fabric. If you need a wider and deeper holder, enlarge both panels and test the revised dimensions before making additional pieces.
Place the back panel with its chosen right side facing down, then position the front panel over it with its right side facing up. Their inward-facing surfaces should touch. Match the foundation edges and corresponding lower side edges. The back point extends above the shorter front panel. Use clips or markers to hold the layers together while you prepare the assembly seam.
Thread a tapestry needle with green yarn. Beginning at one end of the pocket opening, use small whipstitches to join the matching side edges down to the base. Sew across the bottom, then up the opposite side to the other end of the opening. Keep the stitches evenly spaced and firm without puckering. Leave the entire top edge of the front panel open.
For the crochet tree trunk, use brown yarn and ch 7. For Row 1, sc in the second chain from the hook and across (6 sts); ch 1 and turn. For Rows 2–6, sc across (6 sts), turning between rows. Fasten off with a sewing tail. Center the trunk beneath the tree and sew its upper edge securely to the joined bottom seam.
Insert clean, dry cutlery handles through the opening to test your Christmas Tree Cutlery Holder Crochet. The upper parts of the utensils should remain visible above the pocket, while the lower handles sit inside. Check that nothing catches on loose yarn ends. If the opening is restricted by overly tight upper seam stitches, adjust those stitches carefully before weaving in the remaining ends.
Add Decorations and Finish Your Crochet Holder
Simple Christmas embroidery can make your holder feel personal without overwhelming the crochet texture. Use short red, cream, or gold stitches to suggest small ornaments, or add a curved stitched line for a garland. Decorate the front panel before assembly whenever possible. This allows easy access to the reverse side and helps you avoid accidentally sewing the two panels together.
A small embroidered star near the top of the back panel creates a festive finishing touch. Work several short intersecting stitches with yellow or gold yarn, keeping the decoration light so the point retains its shape. Secure the ends neatly on the reverse side. Avoid long loose strands inside the pocket, where cutlery handles could catch during use.
For a coordinated Christmas table setting, use the same base pattern for every holder while varying small details. You might alternate deep green and sage yarn or give each tree a different embroidered ornament color. Finish one complete sample first and record your yarn, hook, and adjustments. This makes it easier to produce a set with consistent sizing and comfortable pocket openings.
Gentle blocking can improve the appearance of the finished crochet. Follow the yarn’s care instructions and, if appropriate, lightly dampen the holder before laying it flat on a towel. Smooth the base, straighten the sides, and shape the tip without stretching the opening. Let the piece dry fully. Blocking helps settle the stitches, but it cannot correct missing stitches or mismatched panel dimensions.
Care for your crochet cutlery holder according to the yarn label, particularly when different colors or fibers are combined. Gentle washing and flat drying may be suitable, depending on the materials. Remove utensils before washing and reshape the holder while damp if needed. Allow it to dry completely before storage so it is ready for your next holiday gathering.
If your tree looks uneven, check the stitch counts before changing the finishing method. A crooked edge often comes from missing the last stitch, while a tight base may result from a foundation chain or seam pulled too firmly. Practice consistent tension and make small corrections early. These habits will help your Christmas Tree Cutlery Holder Crochet pattern produce a neat and practical result.
FAQ: Christmas Tree Cutlery Holder Crochet
Is this crochet pattern suitable for beginners?
Yes. This project is suitable for beginners who can make chains and single crochet stitches. The main shaping technique is sc2tog, which reduces the stitch count by one. The assembly uses a basic whipstitch seam. Practicing a short sample with several decreases can help you understand the shaping before beginning the full panels.
Why is there only one decrease in each row?
One decrease per row creates a gradual taper. Because you turn the work after every row, the decreases alternate between the two sides of the tree. Adding a decrease at both ends would narrow the panel more quickly and change its proportions. Follow the listed counts to keep the front and back panels compatible.
How can I make a larger cutlery holder?
Increase the starting chain for both panels. For example, ch 40 produces 39 sc in the first row. Decrease one stitch per row until the back reaches 1 stitch. Stop the front panel when its depth supports the handles and its opening is wide enough. Test the panels with your cutlery before joining them.
Can I use acrylic yarn instead of cotton?
Yes, acrylic yarn can be used if it creates a sufficiently firm fabric. Its stretch and texture may differ from cotton, so the finished measurements can change even when the stitch counts stay the same. Crochet a sample, check the fit, and follow the yarn’s washing instructions.
Why does my pocket feel too tight?
Your yarn may be thinner than the suggested yarn, your tension may be tighter, or your utensil handles may be particularly bulky. Tight upper seam stitches can also restrict the opening. Measure the front panel before assembly and test the handles. If necessary, enlarge the pattern rather than relying on excessive stretching.
Does the holder need a fabric lining?
A lining is optional. Firm single crochet generally provides enough structure for ordinary cutlery handles. If you add fabric, attach it to the inward-facing surface of the front panel before assembly. Keep the fabric smooth and ensure that it does not significantly reduce the pocket’s usable width.
Can I leave the tree undecorated?
Absolutely. The triangular green body and brown trunk create a recognizable Christmas tree without additional details. A plain version highlights the crochet stitches and is quicker to make. If you prefer a subtle accent, add a small embroidered star or a few short ornament stitches.
How should I store the holders between holidays?
Clean them as needed, let them dry completely, and store them flat in a dry place. Avoid placing heavy items over the pointed tips or raised embroidery. Keeping the finished set together with your holiday linens makes it easier to prepare matching place settings the following year.
Conclusion
This Christmas Tree Cutlery Holder Crochet tutorial explained how to select yarn, read the stitch abbreviations, crochet a tapered back panel, create a shorter front pocket, and join the pieces while keeping the opening accessible.
You also learned how to add a trunk, personalize the tree with embroidery, check the cutlery fit, and finish the holder with appropriate care. Consistent stitch counts and carefully worked seams are the key to a tidy result.
Start with one holder, test it with your utensils, and use that sample to guide the rest of your holiday set. Please leave your honest opinion about this pattern and share your suggestions for colors, decorations, or improvements. Your feedback and experience can inspire other crocheters and help make this handmade Christmas project even more enjoyable.