
Crochet Santa Claus coaster pattern brings a cheerful handmade touch to your Christmas table with a round cotton face, a red hat, and a soft white beard.This festive project combines practical crochet techniques with small decorative details that give Santa his familiar appearance.The main circle provides a flat resting place for a cup, while the hat and beard add character around its edges.You can make one coaster for your favorite mug or create a matching set for a holiday gathering.
A successful crochet Santa coaster should look attractive while remaining stable beneath a cup.
For that reason, this pattern keeps the central surface smooth and places most decorative elements near the outside of the circle.
This Crochet Santa Claus coaster pattern is designed for confident beginners who understand basic stitches and want to practice shaping.You will use chains, single crochet, double crochet, slip stitches, increases, and simple decreases.Each abbreviation is explained before the instructions, and the shaping steps include counts that you can check you work.There is no need for complicated colorwork because the main pieces are made separately and thenjoined with a yarn needle.
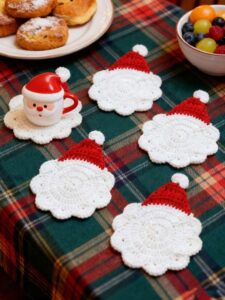
Materials and Stitch Key for Your Crochet Santa Coaster
Choose suitable yarn. Gather smooth, medium-weight cotton yarn in beige, red, and white, plus a small amount of black yarn or embroidery thread. Cotton is absorbent and generally works well for washable coasters. Avoid fluffy yarn for the base because its texture can make cups less stable and hide your stitches.
Prepare your tools. You will need a 3.5 mm crochet hook, scissors, a blunt yarn needle, and a removable stitch marker. If your yarn label suggests a different hook, use that recommendation as a starting point. Choose a size that produces a firm fabric without making the stitches difficult to work.
Understand the stitch abbreviations. In this Crochet Santa Claus coaster pattern, ch means chain, sl st means slip stitch, sc means single crochet, and dc means double crochet. St means stitch, while sts means stitches. An inc, or increase, means working two stitches into the same stitch.
Learn the decrease. Sc2tog means single crochet two stitches together. Insert your hook into the next stitch, yarn over, and pull up a loop. Repeat in the following stitch, then yarn over and pull through all three loops. This turns two stitches into one and shapes the sides of Santa’s hat.
Read the pattern conventions. Instructions inside brackets are repeated the stated number of times. The starting ch 2 in each circular round does not count as a stitch. Join each round with a slip stitch into the first actual double crochet. Turning chains on the hat and beard also do not count as stitches.
Check the intended size. Aim for a main circle approximately 4–4½ inches across, although your measurements may differ. The hat and beard extend beyond that circle. Before adding decorations, place your usual mug on the base and confirm that its bottom fits comfortably inside the smooth central area.
Crochet the Round Base Step by Step
Round 1: establish the center. With beige cotton yarn, make a magic ring, ch 2, and work 12 dc into the ring. Pull the starting tail gently to close the opening, then sl st into the first dc. You should have 12 stitches. Leave the tail available for secure weaving later.
Round 2: double the stitch count. Ch 2 and work 2 dc into every stitch around. Join with a sl st into the first dc for 24 stitches. Spread the circle on your work surface. It should begin to lie flat, with the increases evenly distributed around its circumference.
Round 3: space the increases. Ch 2, then repeat [1 dc in the next st, 2 dc in the next st] 12 times. Join to the first dc. You now have 36 stitches. Count before continuing; catching an extra or missing stitch here is easier than correcting the finished coaster.
Round 4: widen the base. Ch 2 and repeat [1 dc in each of the next 2 sts, 2 dc in the next st] 12 times. Join with a sl st for 48 stitches. Keep your yarn tension comfortable and consistent. Tightening the joining stitch excessively can distort one section of the circle.
Round 5: complete the face. Ch 2 and repeat [1 dc in each of the next 3 sts, 2 dc in the next st] 12 times. Join for 60 stitches. Fasten off and weave the yarn tails through several stitches on the underside, changing direction once to help prevent them from working loose.
Inspect the finished circle. Lay the base flat and measure it before assembling your crochet Santa coaster. If it cups or ripples strongly, check your counts and tension first. For a larger base, add a round of [dc in the next 4 sts, 2 dc in the next st] 12 times, giving 72 stitches.
Make Santa’s Red Hat and White Beard
Start the triangular hat. Using red yarn, ch 14. For Row 1, sc in the second chain from the hook and in each remaining chain, giving 13 sc. Ch 1 and turn. Leave a starting tail long enough for sewing, since the bottom edge of this triangle will attach to the coaster.
Shape the hat gradually. For Row 2, sc2tog, sc in the next 9 sts, and sc2tog: 11 sts. Ch 1 and turn. For Row 3, sc2tog, sc in the next 7 sts, and sc2tog: 9 sts. For Row 4, use the same method with 5 central sc: 7 sts.
Finish the hat point. Continue with ch 1 and turn between rows. Row 5: sc2tog, sc in the next 3 sts, sc2tog: 5 sts. Row 6: sc2tog, sc in the next st, sc2tog: 3 sts. Row 7: sc2tog, sc in the final st: 2 sts. Row 8: sc2tog: 1 st. Fasten off.
Crochet the white brim. With white yarn, ch 14. Sc in the second chain from the hook and across for 13 sc. Ch 1, turn, and sc across again for 13 sc. Fasten off with a sewing tail. This narrow strip covers the bottom of the red triangle and gives the hat its familiar white trim.
Make the beard foundation. With white yarn, ch 25. For Row 1, sc in the second chain from the hook and across for 24 sc. Ch 1 and turn. For Row 2, repeat [skip 2 sts, 5 dc in the next st, skip 2 sts, sl st in the next st] 4 times.
Check the beard and add a hat tip. The beard should have four rounded shells, with each repeat using six foundation stitches. Fasten off, leaving a long sewing tail. For a flat hat-tip decoration, make a white magic ring, work 6 sc into it, join, and close the center. Avoid a bulky pompom that could interfere with storage.
Assemble, Finish, and Care for the Christmas Coaster
Arrange the pieces before sewing. Place the beige circle flat, with the red triangle above its upper edge and the beard below its lower edge. Position the white brim across the triangle’s bottom. Check that the hat and beard frame the face while leaving enough uninterrupted space for the bottom of your mug.
Attach the hat securely. Sew the lower edge of the red triangle to approximately 13 stitches along the top of the beige circle. Use small stitches and avoid pulling the seam tight. Sew the white brim over the joining area, then attach the small white circle to the hat point with several secure stitches.
Sew on the beard. Gently curve the straight foundation edge of the beard around the lower edge of Santa’s face. Attach that foundation edge with small stitches, letting the shells extend outward. Keep the scallops outside the cup’s resting area. If the strip does not span the entire lower semicircle, center it neatly beneath the face.
Embroider simple features. Add two small black eyes close to the upper edge of the face, beneath the hat brim. Use short, flat stitches rather than raised knots or beads. A tiny red or muted pink stitch can suggest a nose. Keep every feature subtle so the coaster remains comfortable beneath a cup.
Block and test the coaster. Lightly dampen the finished piece and shape it flat on a clean towel, following your yarn’s care instructions. Let it dry completely. Place an empty mug on it first, then check stability with a cool drink. If the base rocks, flatten the seams or reposition any decoration causing the problem.
Care for your handmade set. Wash gently according to the yarn label, reshape, and dry flat. Test red yarn for color bleeding before washing it with white items. This Crochet Santa Claus coaster pattern makes a cup coaster, rather than a potholder or trivet; keep it away from oven-hot cookware, flames, and other sources of intense heat.
FAQ: Crochet Santa Claus Coaster Pattern
Is this Crochet Santa Claus coaster pattern suitable for beginners?
Yes, particularly for beginners who have already practiced single crochet and double crochet. The round base teaches evenly spaced increases, while the hat introduces simple decreases. Making the pieces separately also allows you to redo one section without unraveling the whole project.
What yarn works best for a crochet Santa coaster?
Smooth cotton is a practical choice because it absorbs small amounts of moisture and produces a clearly defined fabric. Choose yarn with care instructions suited to regular washing. Use the same yarn weight for the face, hat, brim, and beard to keep their proportions consistent.
Why does my coaster curl upward?
A cupped circle can result from missed increases, tight tension, or a stitch height that needs a different increase rate. Count each round first. If your counts are correct, try adjusting your hook size or tension. Light blocking helps minor unevenness, but severe cupping usually requires reworking.
Why does my round base have wavy edges?
Rippling may happen when you accidentally add too many stitches or when your stitch proportions make the written increase rate unsuitable. Confirm the totals of 12, 24, 36, 48, and 60 stitches. If the counts are correct, make a small tension adjustment and test the circle again.
Can I make the coaster larger?
Yes. Add the sixth round described in the base instructions to reach 72 stitches. Measure afterward, since one additional round can increase the diameter noticeably. You can keep the original decorations for a smaller Santa face detail or enlarge them proportionally if you prefer a fuller appearance.
Do I need to stiffen the finished coaster?
Usually, no. Firm cotton stitches and careful blocking should provide enough structure. Heavy stiffening can reduce flexibility and change how the coaster absorbs moisture. Concentrate on a flat base, secure seams, and thorough drying before deciding whether any additional treatment is necessary.
Can I replace the magic ring with a chain ring?
Yes. Ch 4 and join with a sl st to form a ring, then work the first round’s 12 dc into its center. This alternative leaves a more visible opening. Weave the starting tail securely around that opening if you want to draw it slightly smaller.
How can I make several coasters look consistent?
Use the same yarn, hook, stitch counts, and blocking measurements for every coaster. Making all the circles first, followed by all the hats and beards, can help maintain steady tension. Compare the pieces before sewing and position the embroidered features at matching points.
Conclusion
This Crochet Santa Claus coaster pattern teaches you how to build a flat circular base, shape a red triangular hat, crochet a white brim and scalloped beard, and assemble the pieces with neat seams.
Clear stitch counts make the construction easier to follow, while simple embroidery gives Santa personality without adding unnecessary bulk. With suitable cotton yarn, careful positioning, and gentle blocking, you can create a festive coaster ready for everyday holiday use.
Make a single Santa for your favorite cup or repeat the pattern for a coordinated Christmas table. Pay attention to the smooth resting area and check each finished coaster with the mug you intend to use. Please leave your honest opinion about the pattern and share any suggestions, color ideas, or practical improvements you would like to see in future crochet projects.