
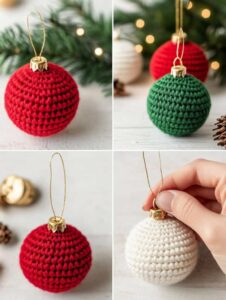
Crochet Christmas bauble pattern brings a handmade touch to your holiday decorating with a small, colorful ornament you can create one stitch at a time.The design in this tutorial features a softly stuffed sphere, a contrasting decorative band, and a crocheted hanging loop.
Making a crochet Christmas ornament is also a pleasant way to use small amounts of leftover yarn.
Because the design relies mainly on single crochet stitches, you can concentrate on consistent tension and careful counting.The rounded shape develops through evenly spaced increases, several straight rounds, and matching decreases toward the top.
This Crochet Christmas bauble pattern uses US crochet terminology and continuous spiral rounds throughout the main body.You will find a complete stitch key below, along with round totals that help you check your progress.The finished diameter will vary with your yarn, hook size, and tension, so the measurements are approximate.Instead of rushing, pause occasionally to inspect the fabric and confirm that the stuffing will remain concealed.Small adjustments to color and embroidery allow you to personalize the ornament without changing its basic construction.By the end of the tutorial, you will understand how to crochet, stuff, close, decorate, and hang your own Christmas bauble.
Materials, Measurements, and Crochet Stitch Key
Choose a smooth DK-weight yarn in your main color and a small amount in a contrasting shade. Prepare approximately 15–25 grams of yarn altogether, a 3 mm crochet hook, polyester fiberfill, a blunt yarn needle, scissors, and a locking stitch marker. These quantities are estimates for one small ornament. Smooth yarn is especially helpful because it makes individual stitches easier to identify.
For the color scheme used here, select deep red for the main body and cream for the central stripe. Green and cream, blue and white, or gold-colored yarn paired with burgundy are equally attractive alternatives. Cotton creates crisp stitch definition, while acrylic produces a softer surface. Choose a yarn you can crochet comfortably into a dense fabric without forcing the hook through every stitch.
The essential crochet abbreviations are MR = magic ring, ch = chain, sc = single crochet, st = stitch, and sts = stitches. To work a single crochet, insert the hook into the indicated stitch, yarn over, and pull up a loop. Yarn over once more and pull through both loops. Unless otherwise stated, work under both loops of each stitch.
For shaping, inc = increase means working two single crochet stitches into one stitch. Dec = decrease means combining two stitches into one. Use an invisible decrease by inserting the hook under the front loop of each of the next two stitches, then yarning over and pulling through those two front loops. Yarn over again and pull through the two loops remaining on the hook.
Instructions in parentheses are repeated the stated number of times. For example, (sc in next 2 sts, inc) × 6 [24] means repeat that sequence six times and finish with 24 stitches. The bracketed number always indicates the completed round total. This Crochet Christmas bauble pattern is worked in a spiral: do not join rounds, turn the work, or add starting chains.
With DK yarn and a firm tension, expect a bauble approximately 6–8 cm in diameter, although your result may differ. Exact gauge is less important than a fabric that conceals the filling. Place a marker in the first stitch of each round and move it as you progress. Keep a written round tally, particularly when several consecutive rounds have the same stitch count.
Start the Bauble and Crochet the Rounded Body
Begin with your main color. For Round 1, make a magic ring and work 6 sc into the ring [6]. Pull the starting tail to close the center, then mark the first stitch. If you prefer a chain beginning, ch 2 and work six single crochet stitches into the second chain from the hook. The magic ring generally gives a more adjustable central closure.
For Round 2, work inc in each st around [12]. For Round 3, work (sc in next st, inc) × 6 [18]. Count the stitches at the end of both rounds. The piece should begin widening evenly, although it will not resemble a finished ball yet. Keeping the early rounds accurate makes the remaining shaping much easier to follow.
Continue with Round 4: (sc in next 2 sts, inc) × 6 [24]. Then crochet Round 5: (sc in next 3 sts, inc) × 6 [30]. Each round adds six stitches. Keep the increases relaxed enough to work comfortably, while maintaining small spaces between stitches. If your count is incorrect, find the missed or extra stitch before beginning another round.
For Round 6, work (sc in next 4 sts, inc) × 6 [36]. For Round 7, work (sc in next 5 sts, inc) × 6 [42]. The growing fabric will develop a shallow curved shape. Slight angles at the increase points are normal. Avoid pulling or stretching the piece to make it round; the later rounds and evenly distributed stuffing will help shape it.
Complete the increasing section with Round 8: (sc in next 6 sts, inc) × 6 [48]. Then work Rounds 9–10: sc in each st around [48 per round]. These straight rounds begin building the sides of the ornament. Before the opening becomes smaller, secure the magic-ring tail by weaving it through several stitches inside the work, keeping the center closed without puckering it.
For the decorative band, change to cream during the final pull-through of the last stitch of Round 10. Crochet Rounds 11–12: sc in each st around [48 per round] in cream. Change back to red during the last pull-through of Round 12, then work Round 13: sc in each st around [48]. Leave color-change tails long enough to weave securely inside the bauble.
Shape the Upper Half, Add Stuffing, and Close
Begin narrowing the crochet Christmas bauble with Round 14: (sc in next 6 sts, dec) × 6 [42]. Follow with Round 15: (sc in next 5 sts, dec) × 6 [36]. Invisible decreases help the upper half look tidy. Take care to use two separate stitches for each decrease, and check that the round total drops by exactly six stitches.
Continue with Round 16: (sc in next 4 sts, dec) × 6 [30] and Round 17: (sc in next 3 sts, dec) × 6 [24]. The opening is now smaller, but it should still be large enough for stuffing. Secure the loose color-change ends on the inside before adding filling. Avoid bulky knots, which can create noticeable bumps beneath the fabric.
Add polyester fiberfill in small pieces, placing it around the interior rather than pushing one large clump into the center. Gently spread the filling toward the lower curve and sides. The bauble should feel supported but still have a little softness. Too much stuffing stretches the stitches and can make the filling visible, while too little leaves an uneven or flattened ornament.
Crochet Round 18: (sc in next 2 sts, dec) × 6 [18]. Then work Round 19: (sc in next st, dec) × 6 [12]. Pause to add the final small pieces of stuffing through the remaining opening. Examine the ornament from several angles and distribute the filling gently. Aim for an even shape without packing the top more firmly than the bottom.
Finish with Round 20: dec × 6 [6]. Cut the yarn, leaving a tail approximately 20 cm long, and pull it through the final loop. Thread the tail onto your yarn needle and pass it through the front loop of each of the six remaining stitches. Pull gently until the opening closes, then secure the tail through nearby stitches and bury the end inside.
Check the completed sphere before attaching the hanging loop. Roll it gently between your palms to soften minor unevenness and inspect the closure for gaps. Because the stripe was worked in continuous rounds, a small step will appear at the color transition. This is expected in spiral crochet. Position that transition toward the back when adding embroidery or choosing the ornament’s display side.
Add the Hanging Loop and Personalize the Finish
Make a separate crochet hanging loop using the main color or the contrasting yarn. Leave a starting tail approximately 15 cm long, make a slip knot, and ch 24. Fasten off with another 15 cm tail. Fold the chain into a loop and check its length against your intended display. Adjust the chain count if you prefer the bauble to hang higher or lower.
Sew both ends of the chain beside one another at the top of the bauble. Use each tail to make several securing passes through nearby stitches, spreading the attachment across a small area. Fasten securely and bury the ends inside the ornament. Lift the bauble gently by its loop to confirm that it hangs evenly and that neither attachment slips or stretches excessively.
For a simple decorative finish, embroider several small crosses on the red sections using cream yarn. Each cross consists of two short diagonal stitches that meet in the middle. Leave space between the motifs so the crochet texture remains visible. Keep the embroidery relaxed: pulling it tightly can create dents. Secure the embroidery tails through several stitches before trimming and hiding them.
You can also leave the ornament plain and allow the contrasting band to provide the decoration. A handmade Christmas bauble does not need elaborate embellishment to look attractive. If you make a coordinated set, use the same yarn weight and hook for every ornament. Changing only the colors helps preserve a consistent size while giving each bauble its own personality.
If the finished ornament appears elongated, check your round tally before making another. Extra straight rounds make the body taller, while missing straight rounds can produce a flatter shape. If stuffing shows through, reduce the filling slightly or try a smaller hook next time. These adjustments are more effective than pulling the closing tail tightly, which can distort the upper curve.
Care for your ornaments according to the yarn and filling instructions. Gentle spot cleaning is usually practical for seasonal decorations; allow the bauble to dry completely afterward. Store it where heavier objects cannot compress it, and check the hanging loop before each use. Recording your yarn, hook size, and color choices makes this Crochet Christmas bauble pattern easier to repeat in future seasons.
FAQ: Crochet Christmas Bauble Pattern
Is this crochet Christmas bauble pattern suitable for beginners?
Yes, provided you are comfortable making single crochet stitches and willing to practice increases and decreases. The pattern uses straightforward repeats rather than complex stitch combinations. A stitch marker is particularly useful because the rounds are not joined, making their starting points difficult to identify without one.
How much yarn does one crochet bauble require?
Approximately 15–25 grams of DK-weight yarn is a useful starting estimate for this design. Actual consumption depends on the yarn’s thickness, your tension, and the finished size. You need only a small amount of contrasting yarn for the stripe and embroidered details.
Can I make the bauble in one color?
Absolutely. Use the same yarn throughout Rounds 1–20 and follow every stitch count exactly as written. The stripe changes the appearance rather than the construction. A single-color ornament is also a convenient first version because you can focus entirely on counting, shaping, and finishing.
Can I use a different yarn weight?
Yes, but the finished size will change. Thicker yarn usually produces a larger ornament, while thinner yarn makes a smaller one. Choose a hook that creates dense stitches with your selected yarn. You will also need to adjust your expectations for yarn consumption and stuffing quantity.
Why does my bauble have visible corners?
The evenly spaced increases can produce slight angles, especially with firm yarn and tight tension. Stuffing the ornament evenly and shaping it gently often softens those areas. More experienced crocheters can stagger increase positions in another version, keeping six increases per increasing round and preserving every stated total.
What causes gaps around the decreases?
Gaps may result from loose tension, stretched stitches, or excessive stuffing. Invisible decreases generally create a smoother surface than standard decreases in this type of project. Keep your tension consistent and avoid filling the ornament so firmly that the crochet fabric is under strain.
Can I use a rigid ball inside instead of stuffing?
A rigid insert requires a cover fitted to its exact dimensions, so these instructions may need adjustment. Fiberfill is easier to shape within the given pattern. For your first bauble, use the stuffed construction described here to become familiar with how the increases and decreases form the sphere.
How do I keep the ornament round during storage?
Place it in a container with enough room to preserve its shape and avoid stacking heavy decorations on top. Make sure it is completely dry before packing it away. If it becomes slightly flattened, gently reshape the filling with your hands before displaying it again.
Conclusion
This Crochet Christmas bauble pattern has guided you through choosing materials, reading crochet abbreviations, increasing from six to 48 stitches, adding a contrasting stripe, and decreasing around soft stuffing.
You have also learned how to close the sphere neatly, attach a crocheted hanging loop, and personalize the surface with simple embroidery. Careful counting, consistent tension, and gradual stuffing are the main techniques behind a balanced finished ornament.
Once you feel comfortable with the construction, try different color combinations to create a matching collection or individual handmade gifts. Keep notes about the materials and details you enjoy most so you can recreate them easily. Please leave your honest opinion about this tutorial and share your suggestions, favorite Christmas colors, or ideas for future crochet projects.