
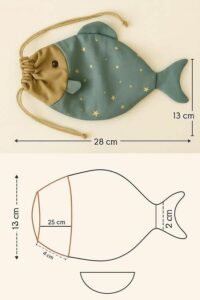
Fish-shaped drawstring fabric bag pattern turns a practical little pouch into a charming sewing project with a rounded body, curved fins, and a decorative tail.The reference photo shows a muted green fish with small gold stars, a mustard-colored head, and matching drawstrings at the mouth.
A fish-shaped fabric bag is an enjoyable project because the fabric does much of the decorative work.
A tiny star print, gentle floral design, or textured solid can make the body look lively while keeping the silhouette easy to recognize.The contrasting head creates a clear focal point, especially when the drawstrings gather the opening into a fish-like mouth.
This Fish-shaped drawstring fabric bag pattern includes a separate tail, decorative fins, and two drawstrings that close the mouth from opposite directions.The body and head form the usable pouch, while the tail remains an external decorative feature.A lightweight lining conceals the internal seam allowances and gives the inside a clean finish.Before cutting your chosen fabric, make a paper template and check the proportions against the reference image.Because some annotations in the photographed diagram are unclear, use the consistent drafting measurements explained in this tutorial.
Materials and Drafting the Fish-Shaped Template
Gather woven cotton fabric for the body, contrasting cotton for the head, and lightweight cotton for the lining. Pieces approximately 35 × 30 cm for each fabric are a convenient starting point, with scraps for fins and the tail. You also need matching thread, two lengths of soft cord, a sewing machine, scissors, pins or clips, paper, a ruler, a fabric marker, and a safety pin.
Use a 1 cm seam allowance unless another measurement is specified. Draft the main shapes at their finished seam lines first, then add allowances afterward. Aim for an overall fish approximately 28 cm long, including a 7 cm decorative tail, and 13 cm high across the widest part of the main pouch. The dorsal fin extends above the body, so the overall height including that fin will be greater.
Draw a horizontal centerline for a 21 cm-long pouch body. At the mouth, mark a vertical opening 9 cm high, centered on that line. Approximately 8 cm from the mouth, mark the widest point at 13 cm high. At the rear end, mark a centered tail attachment 3 cm high. Connect these points with smooth upper and lower curves, keeping the mouth and rear attachment edges straight.
Create the contrasting head by drawing a gently curved dividing line approximately 5 cm behind the mouth. Its upper and lower ends meet the body outline, and its middle bows slightly toward the tail, echoing the photograph. Cut your paper template along this division. Add 1 cm allowances to both sides of the dividing seam and around the outer edges, then label the pieces head and body.
Draft the decorative tail separately. Give it a 3 cm-high attachment edge and a finished length of approximately 7 cm. Widen it toward the end into two rounded lobes with a shallow inward curve between them. Add 1 cm seam allowances around the shape. For the fins, draw one rounded dorsal fin approximately 6 cm wide and 3 cm high, plus a smaller side fin approximately 3 cm wide and 2 cm high.
Cut two mirrored outer body pieces, two mirrored head pieces, and two full lining pieces using the undivided pouch template. Cut two tail pieces, two dorsal-fin pieces, and two side-fin pieces. Mark the head-to-body matching points and the dorsal-fin placement on the upper body curve. This Fish-shaped drawstring fabric bag pattern works best when corresponding pieces match accurately, so check them before beginning the sewing.
Sew the Contrasting Head, Tail, and Decorative Fins
Place one head piece and its matching body piece right sides together along their curved joining edges. Match the upper and lower ends first, then distribute pins along the curve. Sew with a 1 cm allowance, keeping the edges aligned without stretching them. Repeat for the other side of the fish. These two assembled panels now form the complete outside of the pouch.
Clip the curved seam allowances where necessary, taking care not to cut the stitching. Press the allowances toward the darker body fabric. If desired, add a line of topstitching approximately 2–3 mm from the seam on the body side. This holds the allowances neatly and highlights the head shape. Keep the stitch length moderate and follow the curve slowly for a smooth result.
Prepare the tail by placing its two pieces right sides together. Sew around the curved outer edges, leaving the straight attachment edge open. Trim the seam allowance to approximately 5 mm and clip the inward curve between the lobes. Turn the tail right side out, shape the curves gently with a blunt turning tool, and press it flat. Leave the tail unstuffed to match the flat appearance in the reference.
Sew the two dorsal-fin pieces right sides together around their rounded edge, leaving the straight base open. Trim, turn, and press. Repeat with the smaller side fin. A lightweight interfacing can support very thin fabric, but heavy padding is unnecessary for this project. Flat fins blend naturally with the soft drawstring fabric pouch and are easier to sew into the construction.
Position the side fin on one outer panel near the lower end of the head-to-body seam, as shown in the photograph. Fold its open base inward approximately 1 cm and stitch that folded edge securely to the body. Let the rounded end remain free. Add the eye to the head above it; a small circle of black felt sewn firmly around its edge provides a simple fabric alternative to the photographed button.
Baste the dorsal fin to the upper edge of one outer panel, with its rounded portion pointing inward across the panel and its raw base aligned with the body edge. Position it just behind the head seam. Baste the tail to the rear attachment edge in the same way, directing its decorative end inward. Both pieces will point outward after the outer shell is sewn and turned.
Assemble the Lined Fish Bag and Drawstring Casings
Place the two completed outer panels right sides together, enclosing the basted dorsal fin and tail between them. Sew around the upper curve, rear attachment, and lower curve with a 1 cm allowance. Leave the entire mouth edge open. Make sure the loose side fin stays away from the seam. Reinforce the short rear seam with a second line of stitching inside the allowance.
Trim bulky allowances and clip the curved edges where needed. Turn the outer shell right side out, bringing the dorsal fin and tail into their final positions. Press the body gently. Next, place the lining pieces right sides together and sew around their upper, rear, and lower edges, leaving the mouth open and a 6 cm turning gap along the lower curve.
Make two separate drawstring casings, one for each side of the mouth. Measure the mouth edge of each outer panel between its side-seam stitching lines; it should be approximately 9 cm. Cut two strips 11 cm long and 5 cm wide. Fold each short end inward 5 mm twice and stitch it, leaving a finished strip approximately 9 cm long with neatly enclosed ends.
Fold each casing lengthwise with wrong sides together and press. Align its two long raw edges with the raw mouth edge on one side of the outer bag. The folded edge should point downward over the outside of the head. Center the casing so its finished ends meet the side seams without overlapping them. Baste within the 1 cm seam allowance, then attach the second casing to the opposite mouth edge.
Keep the outer bag right side out and the lining wrong side out. Insert the outer bag into the lining so their right sides face one another, with the casings sandwiched between them. Match the side seams and mouth edges. Sew around the complete mouth opening with a 1 cm allowance. Check that the casing ends remain open and that no loose fin or tail is caught in this seam.
Turn the bag right side out through the lining gap. Fold the gap allowances inward and close the opening with a narrow machine seam or a neat hand stitch. Push the lining into the fish body, smooth the mouth seam, and press. Lift the casings into their finished position. If topstitching below them, sew only around the head edge and keep the needle clear of the cord channels.
Thread the Drawstrings and Finish the Fish-Shaped Bag
Cut two cords approximately 65 cm long each. The exact length can be adjusted after threading. Choose a smooth cord thin enough to move freely through the casings without crowding them. Before inserting it, check both channels with a safety pin to confirm that their ends are open and that the mouth seam has not accidentally closed either passage.
Attach a safety pin to the first cord. Starting at one side of the mouth, thread it through the first casing, then through the second casing in the opposite direction. Both ends should emerge at the starting side. Tie them together with a secure knot. This cord travels around the complete mouth through the two separate channels.
Thread the second cord from the opposite side, following the same route around both casings. Its two ends should emerge opposite the first pair. Knot those ends together. Pull the two knotted pairs away from one another to gather the mouth. This double-drawstring closure creates the puckered head seen in the reference and helps the bag stay closed.
Open and close the bag several times to test the movement. If the cords drag, check for stitches crossing a channel, thick knots near the openings, or excessive cord thickness. Trim the cords only after confirming a comfortable length. Finish fraying ends according to the cord material; small sewn fabric end covers are an attractive option that can coordinate with the contrasting head.
Inspect the eye, side fin, dorsal fin, and tail attachments. Remove visible basting threads and press any remaining wrinkles with an appropriate setting for your fabric. The completed fish-shaped fabric bag should lie fairly flat when empty and expand slightly when filled. Avoid overloading it, because the narrow tail junction and curved seams are decorative features rather than heavy-duty carrying components.
Personalize future versions with embroidered scales, different prints, or a second side fin on the reverse. Preserve the same seam allowances and opening construction when changing the appearance. For cleaning, follow the fabric and cord care requirements, reshape the fins while damp, and let the bag dry fully. Keeping your paper template makes this Fish-shaped drawstring fabric bag pattern easy to repeat.
FAQ: Fish-Shaped Drawstring Fabric Bag Pattern
Is this project suitable for beginners?
It suits a confident beginner who can sew a consistent seam allowance and is ready to practice curved edges. The lining and separate casings add a few stages, but each uses familiar straight or curved seams. Making a trial version from inexpensive cotton helps you check the template before cutting your favorite fabric.
Are these the exact measurements of the bag in the photograph?
The photograph shows an approximate overall length of 28 cm and a marked height of 13 cm. Some other diagram labels are unclear, so this tutorial uses an independently drafted construction with similar proportions. Fabric thickness, pressing, and sewing accuracy can cause small differences in the finished measurements.
Which fabric works best for a fish-shaped drawstring bag?
Medium-light woven cotton is a practical choice because it presses well and handles curved seams neatly. Quilting cotton is suitable for the outer body and head. Use a lighter cotton for the lining if your outer fabric is relatively firm, helping the mouth gather without excessive bulk.
Can I make the bag without a lining?
Yes, but the construction needs a different finish around the mouth and internal seams. The lining method described here conceals raw edges and gives the pouch a tidy interior. For a first attempt, following the lined instructions is easier than combining parts of lined and unlined techniques.
Why does the mouth look bulky when gathered?
Heavy fabric, thick interfacing, wide seam allowances, or oversized cord can prevent smooth gathering. Use lightweight materials around the head and casings, and trim bulky allowances carefully. The two channels should also remain separate at the side seams so the cord moves freely between them.
Does the tail hold items?
No. In this version, the tail is a separate decorative piece secured into the rear seam. The usable storage area is the rounded body and contrasting head. Keeping the tail separate makes its curved shape easier to finish and prevents small belongings from becoming trapped inside a narrow extension.
Can I enlarge the pattern?
Yes. Enlarge the finished seam-line templates proportionally, then add the original 1 cm seam allowance afterward. Measure the new mouth edges before cutting the casings, and choose longer cords to suit the larger opening. Do not simply enlarge the seam allowances along with the pattern.
How can I make the eye without using a button?
Sew on a small felt circle or embroider a dark circular eye before assembling the outer shell. Both options reproduce the visual detail without requiring a hard button. Secure the stitching firmly and check decorative attachments periodically, especially if the bag receives frequent handling.
Conclusion
This Fish-shaped drawstring fabric bag pattern explains how to draft a fish silhouette, join a contrasting head to the body, sew flat fins and a decorative tail, and assemble a neatly lined pouch.
You have also learned how to create two separate mouth casings and thread opposing drawstrings for the gathered closure shown in the reference photograph. Accurate cutting, careful curve clipping, and lightweight materials around the opening help produce a clean finish.
Once your first bag is complete, experiment with prints and colors while keeping the construction consistent. A star-covered green body and mustard head capture the character of the reference, while other combinations can make the design entirely your own. Please leave your honest opinion about the tutorial and share your suggestions, favorite fabric combinations, or ideas for future sewing projects.