
A Fabric Horse Pattern is a wonderful way to transform simple pieces of fabric into a charming handmade horse that can be used as a decorative ornament, a thoughtful gift, or a treasured addition to a handmade toy collection.
One of the best things about a Fabric Horse Pattern is its versatility. You can create a traditional brown horse, a playful spotted pony, a soft white horse, or a colorful decorative figure using fabrics you already have at home.
This Fabric Horse Pattern tutorial explains how to plan, cut, sew, stuff, and finish a fabric horse step by step. The instructions are designed for beginners who want a manageable sewing project, as well as experienced crafters looking for inspiration for their next handmade creation. Although the exact dimensions can vary depending on your preferred horse shape, the basic construction principles remain the same. With a paper template, a few sewing supplies, and some patience, you can create a recognizable horse silhouette with a soft body, four legs, ears, and a decorative mane. Follow each stage carefully, and you will have a practical foundation for making your own fabric horse.
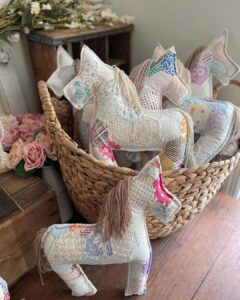
Materials, Tools, and Preparing Your Fabric Horse Pattern
Before beginning your Fabric Horse Pattern, gather all the necessary materials and prepare a comfortable workspace. Having everything ready makes the sewing process easier and helps prevent interruptions once you start assembling the pieces. You will need woven cotton fabric or another suitable textile, matching thread, fabric scissors, sewing pins or clips, a fabric marker, a hand-sewing needle, and a sewing machine if you prefer machine stitching. You will also need stuffing material, such as polyester fiberfill, to give your finished horse a soft three-dimensional shape.
Choose a fabric that is easy to handle and strong enough to support the seams. Medium-weight cotton is an excellent option because it is generally easy to cut, sew, and turn. Felt can be useful for small decorative details, including ears, facial markings, or patches. If you want a rustic appearance, consider a linen or cotton-linen blend. For a more playful result, select printed fabric with small flowers, checks, stars, or other patterns. The fabric you choose will influence the final character of your handmade horse, so consider the intended use before making your selection.
The next step is creating the paper template. Draw a simple horse silhouette with a rounded body, a raised neck, a head, and four legs. Keep the shape relatively broad, especially around the body and neck, because narrow sections can be difficult to turn and stuff. Include a clearly defined muzzle and two small ears, but avoid overly complicated outlines if this is your first attempt. You can sketch the design by hand or trace a basic horse silhouette that you have prepared for your project. Make sure the template is your own or that you have permission to use it if you intend to sell finished items made from a commercial design.
Once the outline is ready, decide whether your horse will be constructed from two matching body panels or from several smaller pieces. For a beginner-friendly Fabric Horse Pattern, two main body panels are usually the simplest option. Place the template on the fabric and trace around it twice, allowing approximately 1/4 inch to 3/8 inch for the seam allowance. The seam allowance is the extra fabric between the stitching line and the cut edge. It helps keep the seam secure and gives you enough material to join the panels together without reducing the intended finished shape too much.
Before cutting, inspect the direction of the fabric print and make sure both body pieces will look attractive when placed together. If the material has stripes, checks, or directional illustrations, align the pattern carefully. Cut slowly with sharp fabric scissors, following the marked outline as smoothly as possible. Transfer any important markings, such as the positions of the ears or decorative patches, onto the wrong side of the fabric. Preparing these details now makes the later stages of your Fabric Horse Pattern more organized and helps you achieve a cleaner finished result.
Step-by-Step Sewing Instructions for a Fabric Horse Pattern
Begin by preparing any separate decorative pieces you want to include. Small fabric ears can be made by cutting four matching pieces, placing them in pairs with their right sides facing, and sewing around the edges while leaving a short opening. Trim excess fabric near the curved seams, turn the pieces right side out, and gently press them into shape. If you prefer felt ears, you can use a single folded piece for each ear, depending on the thickness and appearance you want. Position the prepared ears near the top of the head so they will be secured when the body panels are sewn together.
Next, prepare the mane. Cut narrow strips of fabric, felt, yarn, or another suitable material that will remain secure during handling. The mane can run from the forehead down the back of the neck, creating a recognizable horse profile. For a soft fabric mane, cut several strips of material and arrange them in a row, aligning one edge so it can be attached to the body seam. You can vary the length to create a short, neat mane or a longer, flowing appearance. If using yarn, secure it firmly and avoid loose strands that could detach, especially if the finished horse will be handled by children.
Place the two main body panels with their right sides facing inward. If your design includes ears or a mane attached along the outline, position these details between the panels with their raw edges aligned with the body edge and their decorative portions facing inward. Pin or clip the layers carefully, paying special attention to the head, neck, legs, and other curved areas. Check that the decorative elements are placed where you want them before sewing. Taking a moment to inspect the arrangement can prevent you from having to unpick a seam later.
Sew around the body outline using a consistent seam allowance. A short, secure stitch is suitable for most medium-weight cotton fabrics, but adjust your sewing machine settings according to the material. Leave an opening of approximately 2 to 3 inches along a relatively straight section of the body, such as the underside, so you can turn the project right side out and add stuffing. Reinforce the stitching at both ends of the opening with a few backstitches. When sewing around the legs and neck, slow down and guide the fabric carefully rather than pulling it through the machine. Smooth, controlled stitching helps preserve the silhouette of your Fabric Horse Pattern.
After sewing, trim away excess seam allowance where necessary, particularly around tight curves and corners. Make small clips into the seam allowance around the curved neck, muzzle, and leg areas, taking care not to cut through the stitching. These clips allow the fabric to spread more naturally when the project is turned. Turn the horse right side out through the opening, using a blunt turning tool or the rounded end of a suitable object to gently shape the narrow areas. Avoid sharp tools that could pierce the fabric or damage the seams. Once the horse is turned, inspect the outline and smooth the fabric with your fingers.
Now fill the body with small amounts of polyester fiberfill. Begin with the muzzle, head, and neck, then gradually work toward the main body and legs. Use a blunt stuffing tool if necessary to distribute the filling evenly into narrow sections. Add the stuffing gradually instead of forcing a large amount into one area. Overstuffing can distort the shape, strain the seams, and make the horse appear uneven. Aim for a firm but flexible finish that allows the silhouette to remain recognizable. When the stuffing is evenly distributed, fold the raw edges of the opening inward and close it with small ladder stitches or another neat hand-sewing stitch.
Adding the Mane, Face, and Decorative Details
Once the basic shape is assembled, the decorative stage brings your Fabric Horse Pattern to life. Begin by checking the head, neck, and body to see whether the stuffing is evenly distributed. Gently reshape any areas that appear lumpy or flattened. If the horse has a long neck, make sure the filling supports it without making it excessively stiff. Smooth the fabric around the seams and confirm that the opening is securely closed. A tidy foundation makes every additional detail look more polished and professional.
The mane is one of the most distinctive features of a fabric horse. If you prepared a fabric mane during assembly, check that the strips are securely caught in the seam. For a mane added after sewing, position the material along the back of the neck and attach it with small, evenly spaced stitches. Felt can provide a clean, flat mane, while yarn or soft fabric strips create a more textured appearance. Choose a color that contrasts with the body if you want the mane to stand out, or select a similar shade for a more understated design. Keep the mane firmly attached and trim uneven ends to achieve the desired shape.
The tail can be made from a small bundle of yarn, a narrow fabric strip, or a folded piece of felt. Position it at the back of the horse and sew it firmly to the body. If using yarn, secure the bundle at its attachment point before trimming the ends. For a fabric tail, you can stitch a narrow tube, turn it right side out, and attach it to the rear of the horse. Keep the tail proportionate to the body so it complements the silhouette rather than overwhelming it. A carefully finished tail adds movement and character to the project.
Next, create the horse’s face. You can embroider the eyes, nostrils, and mouth using embroidery floss or matching sewing thread. Small satin stitches or simple straight stitches can produce a neat expression without requiring complicated embroidery skills. Position the eyes symmetrically and keep the muzzle details subtle. For a more decorative style, add felt patches around the eyes or on the forehead. If the horse is intended for a young child, embroidered facial features are generally preferable to glued-on plastic pieces or other small detachable components. Secure all details firmly and inspect the finished face for loose threads.
You can also personalize the body with fabric patches, appliqué shapes, or embroidered markings. White patches on a brown horse, darker spots on a cream pony, or a contrasting star on the forehead can create a distinctive appearance. To add an appliqué patch, cut the desired shape from a non-fraying material or turn the raw edges under before stitching it to the body. Use small, even stitches around the perimeter so the patch lies flat. Avoid adding too many decorations at once; a few well-placed details often produce a more balanced result than an overcrowded design.
Finally, inspect the entire Fabric Horse Pattern from every angle. Check the seams, mane, tail, facial embroidery, ears, and decorative patches. Remove loose threads and correct any areas where the stitching appears uneven. If the fabric is suitable for pressing, use an iron at the appropriate temperature to smooth any accessible flat areas, avoiding pressure on delicate decorations or raised details. Give the horse a gentle reshaping with your hands, then allow it to rest so the stuffing can settle. This final inspection is an important part of the process because even small adjustments can improve the overall appearance and durability of your handmade creation.
Finishing, Customization, Care, and Frequently Asked Questions
A finished Fabric Horse Pattern can be customized in many ways to suit different decorating styles and crafting goals. For a farmhouse-inspired design, choose neutral cotton, a natural linen texture, and a simple yarn mane. For a cheerful children’s room decoration, experiment with colorful prints and contrasting felt details. A small horse can be used as a shelf ornament, part of a seasonal display, or a handmade gift. A larger version can become a decorative cushion-style figure, provided the pattern and construction are adapted to support its size. Think about the intended purpose before selecting the fabric, stuffing, and finishing details.
If you want to create a standing horse rather than a flat decorative figure, the design will require additional construction planning. Separate gussets, shaped legs, or reinforced sections may be necessary to provide a stable three-dimensional form. The simple two-panel method described in this Fabric Horse Pattern is best suited to a soft silhouette that can be displayed leaning against a support or laid flat. Do not expect a basic flat pattern to stand upright without structural modifications. Testing a small paper mock-up before cutting expensive fabric can help you understand how the shape will behave.
Care is another important consideration. Decorative fabric horses should be kept clean according to the requirements of their materials. For routine maintenance, remove dust with a soft brush or a gentle vacuum attachment used at low suction. If the fabric is washable, test a small hidden area first and follow the care recommendations for the textile and stuffing. Hand cleaning with a slightly damp cloth may be appropriate for some projects, but avoid soaking a stuffed item unless all components are designed to tolerate washing. Allow the horse to dry completely before returning it to display.
For a more professional finish, pay attention to consistency across multiple handmade horses. Use the same seam allowance, template dimensions, and stuffing method for each piece. Keep a written record of fabric types, thread colors, and any adjustments made to the original outline. This is especially useful if you intend to create a matching set of horses or repeat the project as a handmade gift. Small differences are part of the charm of handmade crafts, but a consistent construction method helps you maintain the intended shape and quality.
If you are making the project for sale, remember that your final product should be safe for its intended audience and honestly described. Specify the materials used and explain whether the horse is intended for decoration or play. Avoid claiming that a handmade item meets a safety standard unless you have verified that it does. For children’s products, consider age-appropriate construction, secure seams, firmly attached features, and applicable toy-safety requirements. A decorative fabric horse is not automatically suitable for infants or young children simply because it is soft.
The most important lesson is that a successful Fabric Horse Pattern depends on careful preparation, controlled sewing, gradual stuffing, and secure finishing. You do not need expensive materials or advanced equipment to begin. A clear template, suitable fabric, and attention to the details will help you create a charming handmade horse while improving your sewing confidence with every step.
Frequently Asked Questions About the Fabric Horse Pattern
1. Is the Fabric Horse Pattern suitable for beginners?
Yes. A simple two-panel Fabric Horse Pattern is a good project for beginners who already understand basic cutting and sewing techniques. The most challenging parts are usually turning narrow sections, sewing around curves, and distributing stuffing evenly. Starting with a medium-sized design and medium-weight cotton can make these tasks easier. Beginners should take their time and practice on scrap fabric if they are unfamiliar with curved seams.
2. What is the best fabric for making a fabric horse?
Medium-weight cotton is an excellent starting point because it is easy to cut, pin, and sew. Felt is useful for ears, facial details, and patches, while linen can provide a rustic finish. Choose a fabric that is durable enough for the intended use and does not fray excessively. If the horse will be handled frequently, pay particular attention to seam strength and the durability of the decorative components.
3. Can I make a fabric horse without a sewing machine?
Yes. You can complete a Fabric Horse Pattern by hand using a backstitch or another secure hand-sewing technique. Hand sewing may take longer, but it provides good control around small curves and narrow sections. Use closely spaced, consistent stitches and reinforce stress points such as the legs, neck, and tail attachment. A ladder stitch is particularly useful for closing the stuffing opening neatly.
4. How do I make a paper template for the horse?
Draw a side-view horse silhouette on paper, including the head, neck, body, and legs. Keep the outline relatively simple and avoid extremely narrow spaces that would be difficult to sew and stuff. Cut out the paper shape and check its proportions before transferring it to fabric. Remember to add seam allowance around the outline when cutting the fabric pieces. You may wish to make a small test version before creating a larger horse.
5. How much stuffing do I need?
The quantity depends on the size of the horse, the thickness of the fabric, and how firmly you want the finished figure filled. Begin with small handfuls of polyester fiberfill and distribute them gradually throughout the body. A firm but flexible result is usually preferable to an excessively tight shape. Stop adding stuffing when the horse holds its silhouette without stretching the seams.
6. How can I create a realistic-looking mane and tail?
Use yarn, fabric strips, felt, or another suitable material to add texture along the neck and rear of the horse. Choose colors that complement the body fabric and vary the length to achieve the style you want. Attach the mane and tail securely, and trim uneven ends after sewing. For a realistic effect, keep the strands aligned and avoid making the mane disproportionately thick compared with the head and body.
7. How do I prevent the horse from looking lumpy?
Lumps often develop when stuffing is added in large quantities or pushed unevenly into the body. Add small amounts at a time and distribute them carefully, paying particular attention to the muzzle, neck, and legs. Before closing the opening, gently massage the stuffed sections to smooth the filling. Using a suitable stuffing tool with a blunt end can help reach narrow areas without damaging the fabric.
8. Can I use leftover fabric for this sewing project?
Absolutely. A Fabric Horse Pattern is a useful way to use fabric scraps from previous sewing projects. Small prints, solid cotton, linen remnants, and felt offcuts can all be incorporated into the design. Make sure the pieces are large enough for the required pattern sections and that the fabrics have compatible weights. You can also combine complementary scraps to create a patchwork horse with a unique appearance.
9. How do I make the fabric horse safe for children?
Safety depends on the child’s age, the intended use, the materials, and the quality of construction. Embroidered facial features are generally preferable to small plastic eyes or detachable decorations. Secure all seams, check for loose threads, and ensure that the mane, tail, and other details cannot easily detach. A handmade item should not be described as a safe infant toy without an appropriate assessment of its construction and compliance with relevant safety requirements. Supervision and age-appropriate design are especially important for young children.
10. Can I wash a finished fabric horse?
That depends on the fabric, stuffing, embroidery, and decorative materials. Check the care requirements of each component before cleaning the finished item. Spot cleaning with a slightly damp cloth may be sufficient for light marks, while some fully washable materials may tolerate gentle hand washing. Avoid excessive moisture if the stuffing or decorative elements could retain water or become damaged. Always allow the horse to dry thoroughly before storing or displaying it.
11. Can I change the size of the Fabric Horse Pattern?
Yes. You can enlarge or reduce the paper template to create different sizes. However, very small versions may be difficult to turn and stuff, while very large versions may require additional construction support. If you change the template dimensions, preserve the general proportions of the head, neck, body, and legs. Make a test version when attempting a substantial size adjustment.
12. What should I do if the seams begin to open?
Stop using or handling the item until the damaged area has been repaired. Carefully remove any loose stuffing, if necessary, and restitch the opening with a secure seam that catches both fabric edges. Reinforce the surrounding stitches without pulling the fabric so tightly that it puckers. If the item is intended for a child, inspect the entire horse for additional weak seams or loose components before allowing further use.
Conclusion
Creating a Fabric Horse Pattern is a rewarding sewing project that combines simple materials with plenty of opportunities for personal expression. In this guide, you learned how to select suitable fabric, prepare a paper template, cut matching body panels, attach the ears and mane, sew the outline, add stuffing, and finish the horse with facial embroidery and decorative details. You also explored ways to customize the design, care for the finished piece, and improve its durability through careful construction.
The secret to a beautiful handmade horse is not complicated equipment or expensive fabric. It is taking your time, preparing the pieces carefully, keeping the seams secure, and adding the finishing details with patience. Whether you choose a traditional horse design or create a colorful, imaginative version, each project gives you the opportunity to develop your sewing skills and make something uniquely yours.
Now it is your turn to bring your Fabric Horse Pattern to life! Which fabric colors, mane styles, or decorative details would you choose for your handmade horse? Please leave your honest opinion in the comments and share any suggestions, questions, or creative ideas that could help other sewing enthusiasts. Your feedback is valuable and can inspire new variations of this charming fabric craft.