
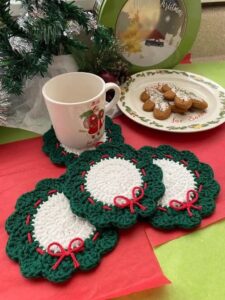
The Crochet coaster pattern in the shape of a Christmas wreath is a delightful way to combine the warmth of handmade crochet with the festive charm of the holiday season.
One of the most appealing features of a Christmas wreath crochet coaster is its combination of beauty and practicality.
This Crochet coaster pattern in the shape of a Christmas wreath tutorial explains how to prepare your materials, create the circular base, shape the wreath, and add the finishing details that make the design special. The instructions use standard US crochet terminology and include stitch abbreviations, round-by-round directions, and practical tips for achieving a neat result. The basic version uses a green crocheted ring with a contrasting decorative border, followed by optional red berries and a small bow. You can adjust the size by changing your yarn and hook, or simplify the embellishments if you prefer a clean, minimalist look. By following each step carefully, you can create a festive handmade coaster that is both attractive and useful.
Materials, Yarn Choices, and Crochet Stitches for Your Christmas Wreath Coaster
Before beginning your Crochet coaster pattern in the shape of a Christmas wreath, gather all the supplies you need. You will need cotton yarn in green, a crochet hook suitable for your yarn, scissors, a yarn needle, and a stitch marker if you find it helpful. Optional materials include small amounts of red and white yarn for berries, a contrasting color for the decorative edging, and a little red yarn for a crocheted bow. Cotton yarn is a practical choice because it creates defined stitches and produces a firm fabric suitable for a coaster.
The yarn selection has a significant influence on the final appearance of your project. Medium-weight cotton yarn is an excellent starting point because it is easy to handle and provides enough structure for the circular wreath shape. Dark green creates a traditional evergreen appearance, while lighter green produces a fresh, contemporary look. You can also combine two shades of green to add visual depth. If you want a more elegant holiday decoration, try cream with gold-colored accents, or use burgundy and forest green for a rich seasonal palette.
Choose a crochet hook that works comfortably with your yarn. A hook around 3.5 mm to 4.5 mm may be suitable for many medium-weight cotton yarns, but the recommendation on the yarn label is a useful starting point. For a coaster, slightly firm stitches are usually preferable because they help the finished piece retain its shape. Avoid crocheting so tightly that your hands become uncomfortable or the stitches are difficult to work. If your fabric feels stiff or curls noticeably, test a different hook size before continuing.
To follow this Christmas wreath crochet pattern, you should understand a few common stitches. Ch means chain, sl st means slip stitch, sc means single crochet, hdc means half double crochet, and dc means double crochet. A magic ring is an adjustable loop that allows you to begin crocheting in the round without leaving a large hole in the center. If you find the magic ring difficult, you can chain 4 and join the ends with a slip stitch to form a small ring instead.
You will also use increases to expand the circular shape. An increase means working two stitches into the same stitch. Increases distribute the fabric around the ring and help the coaster remain flat as it grows. The number of increases depends on the stitch height and the yarn you use. If too few increases are made, the fabric may curl into a bowl; if too many are added, the outer edge may become wavy. Counting your stitches at the end of each round is a simple way to identify problems early.
Before starting the main project, prepare a small practice swatch if you are unfamiliar with working in the round. Practice making a magic ring, working several single crochet stitches into it, and joining the round neatly. This will help you become comfortable with the circular construction used in the wreath. Once you have selected your yarn, prepared the hook, and reviewed the stitch abbreviations, you are ready to begin creating your handmade Christmas wreath coaster.
Step-by-Step Crochet Coaster Pattern in the Shape of a Christmas Wreath
Step 1: Create the center ring. Using green yarn, make a magic ring and chain 1. Work 12 single crochet stitches into the ring, then pull the adjustable loop closed. Join the final stitch to the first single crochet with a slip stitch. You should now have a small, compact circle that forms the foundation of the wreath. If you prefer not to use a magic ring, chain 4, join the chain into a ring, and work the 12 single crochet stitches into the center opening.
Round 2: Increase the circle. Chain 1, then work 2 single crochet stitches into each stitch around the ring. Join with a slip stitch to the first single crochet. You should have 24 stitches at the end of the round. This increase round expands the center and creates a stable base for the wreath. Keep your tension even and make sure the stitches are distributed consistently. If the circle begins to cup, check that you have worked two stitches into every stitch from the previous round.
Round 3: Build the wreath base. Chain 1 and work 1 single crochet into the first stitch, followed by 2 single crochet stitches into the next stitch. Repeat this sequence around the entire circle and join with a slip stitch. You should have 36 stitches. The circle will now be wider and should begin to resemble a small coaster base. If your yarn is thicker or thinner than the suggested weight, the exact size may vary. Focus on keeping the fabric flat rather than trying to match a precise measurement.
Round 4: Create the decorative green edge. Chain 1 and work 1 single crochet into each stitch around the circle, joining with a slip stitch at the end. This round adds a little more width and provides a clean foundation for the outer wreath details. If you want a slightly larger coaster, repeat this round once more, checking that the circle remains flat. Avoid adding extra increases automatically, as the appropriate number depends on your stitch tension and the size of the existing fabric.
Round 5: Form the wreath’s leafy texture. To create a simple decorative border, work a sequence of slip stitches and chain stitches around the outer edge. For example, repeat sl st in the next stitch, ch 2, skip the next stitch, sl st in the following stitch around the circle. This produces small loops that can suggest a soft, leafy wreath border. If the loops are too large, use ch 1 instead of ch 2. Keep the sequence consistent so the edge has a balanced appearance. Join the final repeat neatly and fasten off if you are satisfied with the size.
Step 6: Add festive embellishments. Use small pieces of red yarn to create berries, or embroider several red accents onto the green base with a yarn needle. You can make simple berries by working a few compact stitches into a small loop, then fastening off and leaving a tail for sewing. Distribute the accents around the wreath rather than placing them all in one area. For a classic finish, make a small red bow separately and attach it near the top of the wreath. Weave in all loose ends securely on the back of the coaster.
After completing the rounds, lay the coaster on a flat surface and check its shape. The wreath should lie evenly without curling or forming excessive waves. If the edge looks uneven, gently reshape the fabric with your fingers. You can lightly block the coaster according to the yarn care instructions, allowing it to dry completely before using it. The final size will depend on your yarn, hook, and tension, but a coaster around 4 to 5 inches across is a practical target for many mugs and cups.
Finishing Techniques, Christmas Decorations, and Creative Variations
The finishing details can transform a basic Crochet coaster pattern in the shape of a Christmas wreath into a distinctive holiday accessory. Once the main circle is complete, examine the outer edge and make sure the joining stitches are secure. Use a yarn needle to weave the loose ends into the back of the fabric, following several stitches before trimming the excess yarn. Avoid leaving long tails where they could catch on a mug or become visible during use. A clean finish helps the coaster look polished from both sides.
A crocheted Christmas wreath coaster can be decorated in several ways. Red berries are a traditional choice, but you can also add tiny white accents to resemble winter snow or use gold-colored thread for a subtle festive effect. If you prefer a natural appearance, use two shades of green and skip the bow. For a playful design, alternate red and white decorative stitches around the border. Keep embellishments relatively flat if you intend to place mugs directly on the coaster, because bulky decorations may make cups unstable.
You can also personalize the wreath-shaped crochet coaster by changing its colors. Dark green and bright red create a traditional Christmas combination, while sage green and cream offer a softer appearance. White yarn with silver accents can suggest a snowy winter wreath, and deep green with burgundy gives the design a rich, classic feel. If you are making several coasters as a set, keep the base and dimensions consistent while varying the placement of the decorative accents. This approach creates a coordinated collection without making every piece identical.
Blocking is another useful finishing technique. If the coaster looks slightly uneven, follow the care instructions for your yarn and gently shape the piece on a flat surface. Pinning may help maintain a round outline when the fiber and technique allow it. Avoid excessive heat, particularly with synthetic yarns, and never use a method that could damage the material. After blocking, allow the coaster to dry completely before placing it on a table or stacking it with other handmade decorations.
This Christmas crochet coaster pattern can become part of a larger seasonal craft project. Make several wreath coasters for a holiday table setting, pair them with matching mug cozies, or place a finished coaster inside a handmade gift basket. You can also use the circular motif as inspiration for ornaments, decorative appliqués, or small wall hangings. If you adapt the pattern for an ornament, you may add a hanging loop and use lighter yarn to reduce the weight. For a coaster, however, prioritize a flat surface and avoid excessive decorative bulk.
When making this project as a gift or preparing multiple pieces, consistency is especially important. Count your stitches at the end of each round, use the same hook size throughout the set, and measure the finished circles before adding embellishments. If you plan to make several coasters, keep notes about your yarn, hook, and stitch sequence so you can reproduce the same dimensions. Store the finished pieces in a dry place and follow the yarn’s care instructions when cleaning them. With careful finishing, your handmade Christmas wreath coasters can become a charming part of your seasonal decorations year after year.
Frequently Asked Questions About the Crochet Coaster Pattern in the Shape of a Christmas Wreath
1. Is this Christmas wreath crochet coaster pattern suitable for beginners?
Yes. The pattern uses basic stitches, including chain, single crochet, and slip stitch. Beginners who know how to work in the round can follow the instructions step by step. The decorative border and berries are optional, so you can start with a simple green circle and add embellishments as your confidence grows.
2. What yarn is best for a crochet Christmas coaster?
Cotton yarn is generally a good choice because it provides stitch definition and creates a firm fabric. It is also commonly used for household crochet items. Medium-weight cotton yarn is suitable for many coaster designs, although thinner cotton can create a more delicate result. Choose yarn that can be cleaned according to the needs of the finished item.
3. What size should a Christmas wreath coaster be?
A finished diameter of approximately 4 to 5 inches is a useful starting point for a mug coaster. The ideal size depends on the cup or mug you plan to use and the thickness of your yarn. If you want a larger coaster, add another round while maintaining a flat shape.
4. Why is my crochet coaster curling?
Curling usually means the circle does not have enough increases, the stitches are too tight, or the hook is too small for the yarn. Check the stitch count at the end of each round and compare the fabric with the instructions. You may need to adjust the increase frequency or use a larger hook. Gentle blocking can improve minor unevenness but will not always correct a construction problem.
5. Why does my coaster have wavy edges?
Wavy edges can occur when too many stitches or increases are added. Make sure you are working the specified number of stitches into each round and avoid adding extra increases unless the pattern requires them. If the edge becomes increasingly wavy, undo the affected round and work it again with the correct stitch count.
6. Can I make the wreath coaster without a magic ring?
Yes. Chain 4 and join the chain with a slip stitch to create a small ring. Work the first round of single crochet stitches into the center opening. This method is easy to learn and provides an alternative for crocheters who find the adjustable magic ring difficult.
7. How do I make the coaster look more like a Christmas wreath?
Use green yarn for the base and add small red berries, a bow, or a textured outer border. You can also use two shades of green to create visual depth. Arrange the decorative details evenly around the circle, or place a single bow at the top for a traditional wreath appearance. Keep the decorations relatively flat if the coaster will support a mug.
8. Can I use acrylic yarn instead of cotton?
You can, but cotton is generally preferable for a practical coaster. Acrylic yarn may be softer and can respond differently to heat and moisture. If you choose acrylic, check its care instructions and avoid placing hot cookware on the finished piece. A crocheted coaster should not be considered a substitute for a heat-resistant trivet or pot holder.
9. How do I wash crochet Christmas wreath coasters?
Follow the yarn manufacturer’s care instructions. Many cotton coasters can be gently hand-washed or machine-washed if the yarn label allows it. Secure all loose ends before cleaning, and reshape the coaster while it is damp if necessary. Let it dry fully before storing it. If you have attached delicate embellishments, hand washing may be more suitable.
10. Can I sell handmade crochet wreath coasters?
You can consider selling finished handmade items, provided you comply with applicable laws and any relevant pattern terms or intellectual property rights. Describe the materials and dimensions accurately, and make sure the finished product is well constructed. If you use a pattern created by another person, review its terms before selling items based on it or reproducing the instructions.
11. How many coasters should I make for a Christmas table?
A set of four is a practical starting point for a small household or an intimate gathering. A set of six or eight may be more useful for larger tables. The number depends on how many people you expect to serve and whether you want matching pieces for guests. Making one extra coaster can also be helpful in case another is needed.
12. Can I adapt the pattern to make a Christmas wreath ornament?
Yes. You can use the same circular construction as the basis for an ornament, adjusting the size and yarn as needed. Add a secure hanging loop and use lightweight decorative details. Unlike a functional coaster, an ornament does not need to provide a broad, flat surface, so you can experiment with more texture and dimensional embellishments.
Conclusion: Create Your Own Crochet Christmas Wreath Coaster
The Crochet coaster pattern in the shape of a Christmas wreath is a festive and rewarding project that combines simple crochet techniques with the traditional beauty of holiday decorations. By preparing your yarn and hook, working the circular base, shaping the outer border, and adding optional berries or a bow, you can create a charming handmade coaster for your home or as a thoughtful gift. The project is adaptable, making it suitable for crocheters who want to practice basic stitches as well as experienced makers who enjoy experimenting with colors and textures.
Throughout this guide, you have learned how to choose suitable materials, follow the written crochet instructions, maintain an even circular shape, and finish the wreath with decorative details. You have also explored ways to customize the design, care for the finished piece, and create a coordinated set for the Christmas season. Remember to count your stitches, check that the coaster lies flat, and keep embellishments secure and relatively low-profile when the piece will be used under a mug.
Now you can choose your favorite holiday colors and begin making your own Christmas wreath crochet coasters. Whether you prefer a traditional green wreath with red berries or a modern design in neutral shades, each finished piece can reflect your personal style and creativity. Please leave your honest opinion and suggestions in the comments. Tell us which colors you would choose, whether you would add a bow or berries, and what other Christmas crochet projects you would like to try. Your feedback and ideas can inspire other readers to enjoy this festive handmade craft.