
The Crochet Cowboy Hat Pattern is a fun and creative project for anyone who loves handmade accessories, Western-inspired fashion, and the relaxing art of crochet.
One of the best features of a Crochet Cowboy Hat Pattern is its versatility. You can make a playful miniature hat for decoration, a lightweight fashion accessory, or a larger hat designed to resemble a classic Western silhouette.
In this tutorial, you will learn how to create a crochet cowboy hat step by step, from selecting materials to shaping the crown and forming the characteristic curved brim. The pattern uses familiar crochet stitches and written instructions with standard abbreviations, making it easier to follow each stage of construction. You will begin with a flat circular crown, build the sides of the hat, and then work the brim with carefully planned increases. Because yarn, tension, and head measurements vary, the finished dimensions may differ slightly from one project to another. Taking measurements as you work will help you achieve a more balanced shape and a comfortable fit.
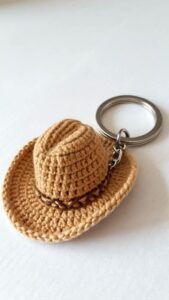
Materials, Crochet Abbreviations, and Starting the Cowboy Hat Crown
To begin your Crochet Cowboy Hat Pattern, gather medium-weight cotton yarn, a crochet hook suitable for the yarn, stitch markers, scissors, a yarn needle, and a measuring tape. You may also want a small amount of contrasting yarn for the decorative hatband. For a hat that holds its shape, choose a yarn with enough body and follow the yarn manufacturer’s recommendations for washing and care. The hook size suggested on the yarn label is a useful starting point, but you may need a smaller hook if your stitches are too loose or the fabric lacks the structure you want.
This pattern uses US crochet terminology. The main abbreviations are ch for chain, sl st for slip stitch, sc for single crochet, hdc for half double crochet, dc for double crochet, inc for increase, and st for stitch. An increase means working two stitches into the same stitch. The instructions are written in joined rounds unless otherwise stated. Place a stitch marker in the first stitch of each round when helpful, and count your stitches regularly to keep the crown symmetrical.
For this sample pattern, use a starting chain-free circle worked in single crochet. Make a magic ring, also called an adjustable loop, and work 6 sc into the ring. Pull the tail to close the center, then join with a sl st to the first sc. If you prefer not to use a magic ring, you can chain 2 and work the first 6 sc into the second chain from the hook. Both methods create the center of the crown, although the adjustable ring usually produces a tighter opening.
Round 1: Work 6 sc into the magic ring and join. Round 2: Ch 1, work 2 sc in every stitch around, and join, giving you 12 stitches. Round 3: Ch 1, work 1 sc in the first stitch and 2 sc in the next stitch; repeat around and join, giving you 18 stitches. Keep your tension even and avoid pulling the stitches so tightly that the circle becomes difficult to work into.
Round 4: Ch 1, work 1 sc in each of the next 2 stitches, then 2 sc in the following stitch; repeat around and join, giving you 24 stitches. Round 5: Ch 1, work 1 sc in each of the next 3 stitches, then 2 sc in the following stitch; repeat around and join, giving you 30 stitches. Round 6: Ch 1, work 1 sc in each of the next 4 stitches, then 2 sc in the following stitch; repeat around and join, giving you 36 stitches. These increases expand the circular crown gradually.
Continue increasing in the same general rhythm, adding one more single crochet between increases in each new round. For example, Round 7 uses 5 sc followed by an increase, repeated around, for 42 stitches. Round 8 uses 6 sc followed by an increase, repeated around, for 48 stitches. Continue until the circle reaches the approximate diameter needed for the crown. The exact number of rounds depends on your yarn, hook, stitch tension, and desired hat size, so measure the circle rather than relying only on the round count.
For a wearable adult hat, a crown circle around 6.5 to 7 inches across can be a useful starting point, but the correct diameter depends on the intended crown depth and head measurement. A small decorative hat will require fewer rounds. If the circle begins to ripple, you may be increasing too frequently; if it cups before you intend it to, you may need more increases. Adjust the spacing gradually and check the fabric after each round. This measurement-based approach makes the Crochet Cowboy Hat Pattern easier to customize.
Building the Crown Sides and Creating the Cowboy Hat Shape
Once the crown circle reaches the desired diameter, it is time to build the sides of the hat. Unlike the flat crown, the sides should extend downward to form a shallow bowl. To begin this stage, work one round of sc without increases, placing one stitch in each stitch around. This helps establish a turning edge between the crown and the sides. Keep the stitch count unchanged throughout this round, and check that the fabric transitions smoothly from the flat circle into the developing crown.
Continue working even rounds of sc, joining each round as before. For a simple adult fashion hat, try working approximately 2 to 3 inches of crown depth, measuring from the center of the top to the lower edge along the curved surface. This is a starting suggestion rather than a fixed measurement. If you are creating a miniature hat, reduce the depth; if you are making a taller Western-inspired crown, add more rounds. The finished height should look balanced in relation to the width of the crown.
As you work, check the fit by comparing the developing hat with the intended head measurement or a suitable hat form. Crochet stretches differently depending on yarn and stitch tension, so a paper measurement alone may not accurately predict the final fit. For a wearable hat, measure around the head at the position where the hat will sit. The finished inner circumference should be chosen to suit that measurement and the amount of stretch in the fabric. Avoid making the crown excessively tight, as this can make the hat uncomfortable.
To create a more recognizable cowboy silhouette, shape the sides with gentle changes in stitch placement rather than abrupt decreases. If you want the crown to narrow slightly toward the top, work a small number of evenly spaced decreases in a planned round, then continue with even rounds. If you prefer a rounded crown, simply continue without decreases. The basic pattern is intentionally adaptable because traditional cowboy hats vary in crown height, taper, and overall shape.
For added structure, consider using a smaller hook if your stitches are too loose, but do not reduce the hook size so much that the fabric becomes stiff or difficult to work. A firm single-crochet fabric often provides better definition than a very open stitch pattern. If the hat is intended primarily as a costume accessory, a softer fabric may be acceptable. For a wearable hat, prioritize comfort, a secure fit, and a brim that does not collapse unpredictably.
Before starting the brim, lay the hat on a flat surface and inspect the crown. The top should be reasonably even, and the sides should not twist or lean noticeably. If the crown has become too tall, remove a few rounds before continuing. If it is too short, add more even rounds. Correcting the height at this stage is easier than trying to compensate after the brim has been completed. A well-proportioned crown creates the foundation for the signature Western shape.
Crocheting the Brim, Adding a Hatband, and Finishing the Design
The brim is the most recognizable feature of a Crochet Cowboy Hat Pattern. To begin, work into the lower edge of the crown. If you have joined rounds throughout the project, start the brim at the established joining point and place a marker there. Work one round of sc evenly around the edge, checking that the stitch count is consistent. This first round creates a clean foundation for the brim increases.
For the next round, begin widening the brim gradually. Work sc in a selected number of stitches, then place an increase, repeating the sequence around. For example, you might begin with 5 sc followed by an increase, repeating around, and adjust the spacing in subsequent rounds according to how the fabric lies. The exact stitch count will depend on the circumference of your crown. If the brim remains too narrow or starts to cup, add increases; if it develops ripples, reduce the frequency of increases. Even distribution is more important than following a fixed increase count without checking the fabric.
Continue expanding the brim over several rounds until it reaches your preferred width. A modest fashion brim may measure approximately 2 to 3 inches from the crown edge, while a more dramatic costume brim can be wider. Work slowly and place markers at regular intervals to help distribute the increases evenly. If you want a slightly angled brim, you can make small adjustments to the increase placement, but keep the overall shape balanced so that one side does not become noticeably larger than the other.
To create a firmer edge, finish with a round of sc or sl st, depending on the appearance and flexibility you want. A round of sc usually provides a visible, stable border, while slip stitches can create a tighter finish but may pull the edge inward if worked too tightly. Keep the final round consistent, and check that the brim remains flat enough to shape comfortably. If the edge curls, review the stitch count and tension before adding more rounds.
The decorative hatband is an easy way to customize your finished hat. Join a contrasting yarn around the base of the crown, just above the brim, and work a round of sl st or sc around the circumference. You can also crochet a separate narrow strip and sew it neatly into place. Choose colors that complement the main yarn, such as brown with cream, black with tan, or a bright accent color for a playful design. If you want a buckle effect, make a small crocheted rectangle in a contrasting color and attach it securely to the band.
To complete the Crochet Cowboy Hat Pattern, weave in all yarn ends using a yarn needle, taking care to secure them on the inside of the hat. Check the brim for uneven sections and gently shape it by hand. If the yarn permits, lightly steam the hat from an appropriate distance without pressing the iron directly against the crochet. Always check the yarn care instructions first, as some fibers can melt, flatten, or become damaged by heat. Allow the hat to cool and dry completely before wearing or storing it.
Frequently Asked Questions About the Crochet Cowboy Hat Pattern
1. Is the Crochet Cowboy Hat Pattern suitable for beginners?
Yes, this pattern can be suitable for beginners who already know how to make a chain, single crochet, slip stitch, and basic increases. The project introduces working in joined rounds and shaping a brim, so it is helpful to practice counting stitches before starting. Beginners can simplify the design by using one yarn color and leaving out decorative details until the basic hat shape is complete.
2. What yarn is best for a crochet cowboy hat?
Cotton yarn is a useful option because it provides clear stitch definition and can create a relatively firm fabric. Other yarns may also work, depending on the desired appearance and flexibility. Choose a yarn with suitable care instructions and enough structure to support the crown and brim. Very soft yarn may produce a floppy hat, while an excessively stiff fabric may feel uncomfortable.
3. How do I make the hat fit my head?
Measure the circumference of your head where the hat will sit, then compare it with the finished circumference of the crochet crown. Consider the stretch of your yarn and the density of your stitches. Because crochet tension varies, check the dimensions while working rather than relying entirely on a suggested hook size or round count. Adjust the crown diameter and side depth before starting the brim.
4. Why is my crochet crown curling upward?
A crown that cups before you want it to may need more frequent increases. The stitches are drawing the circle inward because the fabric is not expanding enough to remain flat. Try adding increases more often in the next round or undoing the previous round and adjusting the spacing. Small changes are usually easier to manage than making many extra increases at once.
5. Why does my crochet crown have wavy edges?
Wavy edges often indicate that too many stitches have been added. If the crown ripples, reduce the number of increases or space them farther apart. Also check that you are not accidentally working extra stitches at the joining point. Counting each round and using stitch markers can help you maintain a consistent circle.
6. How wide should the cowboy hat brim be?
The ideal brim width depends on the intended style. A narrow brim can create a compact costume hat, while a wider brim produces a more dramatic Western-inspired silhouette. A starting width of 2 to 3 inches may work for a simple fashion design, but you can increase or decrease this measurement to suit your preference. Keep the brim balanced around the crown.
7. How can I make the brim hold its shape?
Use a suitable yarn, maintain firm but comfortable tension, and finish with a consistent edge round. The stitch structure and the number of brim rounds affect how the fabric behaves. Some projects may benefit from a compatible crochet-safe stiffening method, but check that the product is suitable for the yarn and intended use. Do not rely on stiffening treatments as a substitute for a well-constructed brim.
8. Can I make a crochet cowboy hat for a child?
Yes. Adjust the crown circumference and depth to the intended wearer’s measurements rather than simply reducing the number of rounds by an arbitrary amount. Use comfortable yarn and avoid loose decorative parts that could detach. For very young children, ensure the finished accessory is appropriate for their age and use, and supervise wear when necessary.
9. Can I make a miniature crochet cowboy hat?
Absolutely. A miniature version can be used as a decoration, a small accessory, or part of a craft display. Use finer yarn and a smaller hook if you want a more delicate result, and reduce the crown and brim dimensions proportionally. Since the scale is smaller, count stitches carefully to keep the shape balanced.
10. How do I add a decorative buckle?
You can crochet a small rectangle with contrasting yarn and attach it to the hatband using a yarn needle. A second color can create the appearance of a buckle frame. Secure all yarn ends and sew the piece firmly in place. If the hat is intended for a child, avoid small detachable components that could present a choking hazard.
11. How should I wash and store my crochet cowboy hat?
Follow the yarn manufacturer’s care instructions. Some yarns can be hand-washed, while others require different treatment. Avoid twisting the hat aggressively, as this can distort the crown and brim. Reshape the hat gently after cleaning and allow it to dry fully. Store it in a way that supports the crown and does not crush the brim.
12. Can I change the stitch pattern?
Yes. Single crochet creates a relatively dense fabric that is useful for shaping the crown and brim. You can experiment with other stitches, but open or highly textured patterns may change the structure and flexibility of the hat. If you substitute stitches, make a small sample first and check how the fabric behaves before applying the new stitch pattern to the entire project.
Conclusion
The Crochet Cowboy Hat Pattern combines classic Western inspiration with the creativity of handmade crochet. By starting with a carefully measured circular crown, building the sides with even rounds, shaping the brim through gradual increases, and finishing with a contrasting hatband, you can create a distinctive accessory that reflects your personal style. The written instructions and crochet abbreviations provide a clear foundation, while the suggested measurements can be adjusted to suit different sizes and designs.
Remember that stitch tension, yarn choice, and careful measuring all contribute to a successful result. Count your stitches, check the crown as it develops, distribute brim increases evenly, and finish the edges neatly. With practice, you can experiment with different colors, crown shapes, brim widths, and decorative details to create several unique versions of the same pattern.
Have you tried making a Crochet Cowboy Hat Pattern, or are you planning to crochet one for the first time? Please leave your honest opinion, share your favorite yarn colors, and offer suggestions for future crochet projects. Your feedback may inspire other readers to try this design and discover their own creative variations.