
The Fabric Shoulder Bag Pattern is a wonderful starting point for creating a practical, stylish, and reusable bag that reflects your personal taste.
One of the most appealing features of a Fabric Shoulder Bag Pattern is its flexibility. You can use cotton prints, canvas, denim, linen blends, or other suitable woven fabrics to achieve different appearances and levels of structure.
In this guide, you will learn how to plan, cut, assemble, and finish a fabric shoulder bag step by step. The instructions explain how to prepare a reliable pattern, choose suitable materials, construct the main body, attach the lining, and create comfortable shoulder straps. You will also discover practical ways to improve the bag’s appearance and durability while avoiding common sewing mistakes. Although the exact dimensions and decorative details can be adjusted to match a particular design, the following method provides a complete foundation for making a beautiful handmade shoulder bag that is both attractive and useful.
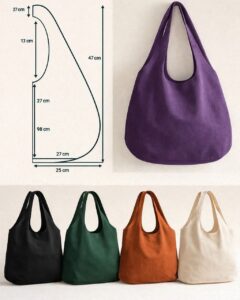
Materials, Measurements, and Preparing Your Fabric Shoulder Bag Pattern
Before beginning your Fabric Shoulder Bag Pattern, gather all the materials needed for the project. You will need your chosen outer fabric, lining fabric, matching thread, fabric scissors or a rotary cutter, pins or sewing clips, a ruler, measuring tape, fabric marking tools, and a sewing machine. An iron and ironing board are also helpful for pressing seams and keeping the fabric smooth during construction. If you prefer a more structured bag, consider adding a suitable woven interfacing that is compatible with your chosen fabric and intended use.
For a straightforward everyday shoulder bag, begin with a finished body approximately 14 inches wide and 15 inches high. This size offers a useful balance between storage capacity and comfortable carrying. You can make the bag smaller for a lightweight accessory or larger if you need additional room for books, craft supplies, or shopping items. These measurements are suggestions rather than fixed requirements, so adjust them according to your preferred design. Remember to account for seam allowances when preparing the pattern pieces.
Draw a rectangle on paper for the main body, then mark the cutting dimensions clearly. For a bag with a finished width of 14 inches and a finished height of 15 inches, you could cut two outer panels measuring 15 inches wide by 16 inches high, allowing approximately 1/2 inch for the side and bottom seams and the upper finishing area. Adjust the exact dimensions to accommodate your chosen top edge and construction method. If you want a flat-bottomed bag, this simple rectangle is sufficient. For a more spacious shape, you can add boxed corners during assembly.
Next, prepare the lining pieces using the same basic body measurements. A lining helps cover the inside seams and gives the bag a more finished appearance. Choose a lightweight woven cotton that complements the exterior fabric without adding excessive bulk. If your outer fabric is relatively heavy, select a lining that is easy to sew and allows the bag to turn comfortably. Cut the lining accurately, keeping the grain direction consistent and making sure both panels match in size.
The shoulder straps are another important part of the Fabric Shoulder Bag Pattern. For a standard shoulder bag, you can begin with two fabric strips measuring approximately 4 inches wide by 24 inches long. Once folded, stitched, and turned or pressed, each strap will become narrower and stronger. The finished length should suit the intended wearer and the way the bag will hang. If you prefer to carry the bag over a thick coat or want a longer drop, increase the strap length before cutting. Always test the proposed length with a measuring tape before sewing.
Before cutting your final fabric, review every pattern piece and check that the measurements are consistent. Make sure the outer panels, lining panels, and straps are correctly labeled. If you are using patterned fabric, consider how flowers, stripes, checks, or other motifs will appear on the finished bag. Aligning a repeated print across the front and back can create a polished result, while intentionally contrasting panels can make the design more playful. Careful preparation reduces fabric waste and makes the sewing process smoother.
Step-by-Step Instructions for Sewing the Fabric Shoulder Bag
Begin by preparing the outer fabric. If the care instructions permit, wash and dry the fabric before cutting to reduce the risk of unexpected shrinkage after the bag is completed. Press the material thoroughly, then place it on a flat cutting surface. Position the pattern pieces carefully, trace the outlines, and cut the two outer panels. Repeat the process with the lining fabric, checking that the pieces have matching dimensions and clean edges.
If you want to add an interior pocket, prepare it before assembling the lining. Cut a rectangular piece of fabric to your preferred size, allowing extra fabric around the edges for hemming. Fold and press the top edge, stitch it neatly, and fold the remaining edges toward the wrong side. Position the pocket on the right side of one lining panel, making sure it sits at a comfortable height for reaching inside the finished bag. Stitch around the sides and bottom, reinforcing the upper corners to help the pocket withstand everyday use.
Place the two outer panels together with their right sides facing each other. Align the side edges and bottom edge, then secure them with pins or clips. Sew along both sides and the bottom using a consistent seam allowance, such as 1/2 inch. Backstitch at the beginning and end of each seam to help prevent unraveling. Keep the upper edge open, as this will become the opening of the bag. If the fabric is thick, sew slowly and guide the layers evenly beneath the presser foot.
To create a wider bottom, consider boxing the corners. With the outer bag still inside out, flatten one bottom corner so that the side seam aligns with the bottom seam. Measure approximately 2 inches from the corner point along the seam line, draw a straight line across the fabric, and stitch along that line. Repeat on the opposite corner. Trim excess fabric only after checking the stitching and leaving an appropriate seam allowance. Larger boxed corners create more depth, while smaller ones produce a shallower base. If you prefer a flat bag, skip this step.
Now assemble the lining using the same basic method. Place the lining panels right sides together and sew along the sides and bottom, leaving a small opening of approximately 4 to 5 inches in the bottom seam. This opening will allow you to turn the bag right side out after the outer body and lining are joined. If you added a pocket, make sure it faces inward when the lining is placed inside the completed bag. Press the seams gently to reduce bulk and help the lining sit neatly.
Prepare the shoulder straps by folding each strip lengthwise with the right sides facing inward. Sew along the long edge, leaving the short ends open if you plan to turn the strap right side out. Trim bulky seam allowances where appropriate, then turn each strap using a suitable turning tool. Press the straps flat, positioning the seam along one edge or the center of the underside. Topstitch along both long edges for a neat finish and added stability. Alternatively, fold the long edges inward, fold the strip in half, and stitch along the edges to create a flat strap without turning a tube.
Attaching the Straps, Finishing the Bag, and Customizing Your Design
Before attaching the straps, mark their positions on the upper edge of the outer bag. For a body approximately 14 inches wide, you might place each strap end about 3 to 4 inches inward from the corresponding side seam. The exact position depends on the strap width and the style you want. Make sure the straps are evenly spaced and are not twisted. Pin or clip each end in place, with the strap ends extending downward toward the bottom of the bag so they will sit correctly after the lining is attached.
Place the outer bag inside the lining, with the right sides of both pieces facing each other. The outer bag should be right side out, while the lining should remain inside out. Slide the outer bag into the lining so that the upper edges meet. Align the side seams, match the raw edges, and position the straps between the two layers. Secure the entire upper edge with clips or pins, paying special attention to the strap attachment points. Sew around the opening with a consistent seam allowance, taking care not to catch the lining unevenly or accidentally fold a strap.
Once the top seam is complete, pull the outer bag through the opening left in the lining. Work slowly to avoid stressing the seams, particularly if you are using heavier fabric or interfacing. After turning the bag, push the lining into the outer body and arrange the corners neatly. Use your fingers or a blunt turning tool to shape the edges without puncturing the material. Close the opening in the lining with a neat machine stitch or secure hand stitching, then tuck the lining fully inside the bag.
Press the upper edge carefully, following the care instructions for the fabrics and any interfacing used. Topstitch around the opening to help the lining remain in place and give the Fabric Shoulder Bag Pattern a professional-looking finish. A second line of stitching may be added near the top if the fabric and design allow it. Check that the straps sit evenly and that the upper edge does not twist. If you want a stronger attachment, add a reinforced rectangular stitch or another suitable reinforcement at each strap base.
You can now personalize the bag with decorative details. Add a coordinating fabric panel, a simple appliqué shape, a small patchwork section, or contrasting topstitching. A button or fabric tie can be used as a closure if it is appropriate for the intended contents and construction. You might also create a second pocket inside for organizing keys, a phone, or other small objects. Keep embellishments securely attached and avoid details that make the shoulder area uncomfortable. For a more structured finish, use interfacing selected for your fabric and the desired level of firmness.
Finally, inspect the entire bag before using it. Check the side seams, bottom corners, lining, pocket edges, and strap attachments. Gently handle the straps to confirm that they are securely sewn, but do not assume that a simple fabric bag is suitable for carrying very heavy loads. Remove loose threads, correct any skipped stitches, and make sure the lining does not bunch excessively inside the bag. A careful final inspection helps your handmade shoulder bag look neat and makes it more practical for regular use.
Frequently Asked Questions About the Fabric Shoulder Bag Pattern
1. What is a Fabric Shoulder Bag Pattern?
A Fabric Shoulder Bag Pattern is a template or set of measurements and instructions used to sew a bag with straps designed to rest on the shoulder. It typically includes the main body panels, lining, and strap pieces, along with guidance for assembling the bag. Some patterns also include pockets, boxed corners, closures, or decorative details. The design can be adapted to different fabrics, sizes, and sewing skill levels.
2. Is this fabric shoulder bag pattern suitable for beginners?
Yes. A simple rectangular shoulder bag is an approachable project for beginners who are learning to sew straight seams and assemble lined accessories. The main techniques include cutting fabric accurately, sewing the body panels, preparing straps, attaching a lining, and finishing the top edge. Beginners may wish to skip optional pockets and boxed corners on their first attempt, then add these features in a later version.
3. What is the best fabric for making a shoulder bag?
Cotton, canvas, denim, and suitable linen blends are common choices. Lightweight cotton is easy to sew and offers many decorative options, while canvas and denim can provide a firmer structure. The best choice depends on the intended use, the weight of the contents, and your sewing machine’s capabilities. Very lightweight fabrics may need suitable interfacing, while thick materials may require a stronger needle and slower stitching.
4. How much fabric do I need for a fabric shoulder bag?
The amount depends on the finished dimensions, strap length, lining, pockets, and fabric width. For a medium-sized bag, you may be able to use less than a yard of outer fabric and a similar amount of lining, but this is only a general estimate. Larger designs, directional prints, and matching patterns may require additional material. Calculate the total cutting area before purchasing fabric and allow for shrinkage, seam allowances, and mistakes.
5. How do I make the shoulder straps stronger?
Use a suitable fabric, sew consistent seams, and reinforce the strap attachment points. Topstitching along the strap edges can help maintain their shape, while reinforced stitching at the ends helps distribute stress. Interfacing or an additional fabric layer may improve stability when compatible with the design. For bags intended to carry substantial weight, choose materials and construction methods appropriate for that load rather than relying on appearance alone.
6. Should I add a lining to my fabric shoulder bag?
A lining is optional, but it usually improves the interior appearance and helps cover the raw seams. It can also provide a convenient place to add pockets. A lined bag may feel more substantial and hold its shape better, depending on the fabrics and interfacing used. If you prefer a simpler project, an unlined bag can work well when the seams are finished neatly with an appropriate method.
7. How can I make the bottom of the bag wider?
You can create boxed corners by flattening each bottom corner so the side seam aligns with the bottom seam, then stitching across the corner at a measured distance from the point. The distance determines the depth of the base. Make both corners the same size to keep the bag balanced. Alternatively, you can design a separate rectangular bottom panel, although this requires additional pattern preparation and construction steps.
8. How do I prevent the lining from bunching inside the bag?
Use accurately cut lining pieces, align the side seams carefully, and avoid making the lining significantly larger than the outer body unless the design requires it. Pressing the seams and topstitching around the opening can help keep the lining in place. After turning the bag, arrange the lining evenly and check the bottom corners before closing the turning opening.
9. Can I make a fabric shoulder bag without a sewing machine?
Yes, a simple shoulder bag can be hand-sewn if you use appropriate stitches and allow enough time for careful construction. Backstitching can create durable seams when worked consistently, and the strap attachments should receive particular attention. Hand sewing through thick canvas or several layers can be challenging, so choose manageable materials and avoid carrying heavy items unless the finished construction is appropriate for the load.
10. Can I wash a handmade fabric shoulder bag?
That depends on the fabric, interfacing, closure, and any decorative materials. Check the care instructions for all components before washing. If the materials permit, gentle washing and air drying may help preserve the bag’s shape. Remove loose contents first, and avoid high heat if it could shrink the fabric or damage the interfacing. Spot cleaning may be preferable for bags with delicate decorations.
11. What can I add to make the bag more practical?
Useful additions include an interior pocket, a divided organizer pocket, a secure closure, a reinforced bottom, or an adjustable strap. You can also use a contrasting lining to make small items easier to see. Choose features based on how you plan to use the bag, and remember that every extra pocket or layer adds sewing time and may increase bulk.
12. How can I customize the Fabric Shoulder Bag Pattern?
You can change the height and width, use different strap lengths, combine contrasting fabrics, add patchwork, or introduce decorative topstitching. A floral cotton bag can create a delicate appearance, while denim or canvas gives a more casual style. Before making major changes, check how the new dimensions affect the proportions and strap placement. Testing the shape with paper or inexpensive fabric can help you avoid unnecessary waste.
Conclusion
The Fabric Shoulder Bag Pattern provides a practical and creative way to make a reusable accessory tailored to your needs. By selecting suitable fabric, preparing accurate pattern pieces, sewing the outer body, adding a lining, constructing comfortable straps, and reinforcing important seams, you can create a handmade bag with a neat and attractive finish. Optional features such as boxed corners, interior pockets, contrasting panels, and decorative stitching allow you to personalize the design while developing useful sewing skills.
The key to a successful result is careful preparation and consistent construction. Measure before cutting, check the alignment of each layer, reinforce the strap attachments, and inspect the finished seams. Whether you choose a simple cotton design or a more structured canvas version, this project can become a useful everyday accessory or a thoughtful handmade gift.
Have you tried sewing a Fabric Shoulder Bag Pattern, or are you planning to make one for the first time? Please leave your honest opinion, share your favorite fabric choices, and suggest any details you would like to see in a future sewing tutorial. Your feedback and ideas can help inspire new designs and encourage other sewing enthusiasts to create their own unique bags.