
Fruit Fabric Coaster Pattern is a delightful sewing project for turning colorful cotton scraps into cheerful, useful table accessories.Inspired by citrus slices, these handmade coasters combine simple circles with decorative fabric wedges to create a fresh, recognizable design.You can sew orange, lemon, lime, or grapefruit versions by changing the colors while keeping the same basic construction.
Making a fabric fruit coaster is also a satisfying way to use small pieces of fabric left from other sewing projects.A bright scrap can become the fruit segments, a pale cotton can represent the pith, and a coordinating background can form the rind.The construction uses appliqué, which means attaching decorative fabric shapes to the surface of a larger fabric piece.
This Fruit Fabric Coaster Pattern creates a round coaster measuring approximately 4½ inches in diameter after sewing and turning.The main fabric circles measure 5 inches across, including the ¼-inch seam allowance used during assembly.A smaller cream circle and eight colorful wedges create the citrus details on the front of the coaster.Because a reference photo is not visible in this message, the instructions describe an original citrus-slice version with clearly defined dimensions.
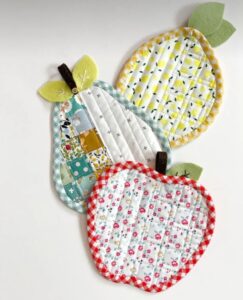
Choose Materials and Prepare the Fruit Coaster Templates
For one coaster, gather quilting cotton for the front and backing, cream cotton for the inner circle, and a colorful scrap for the fruit segments. You will also need thin cotton batting, coordinating thread, paper, scissors, a ruler, a removable fabric marker, pins or clips, and an iron. A sewing machine makes construction quicker, although careful hand sewing is also possible.
Choose cotton fabrics of similar weight so the finished layers behave consistently. Medium orange, pale cream, and a slightly lighter orange create an attractive orange slice. For a lemon, combine golden yellow, ivory, and soft yellow. Small prints can work beautifully, but check that the decorative wedges remain easy to distinguish against the pale background.
Wash and press your fabric before cutting, especially when combining saturated colors with cream or white. This helps reveal potential color bleeding and reduces later shrinkage. Press out creases without stretching the material. If a fabric continues releasing dye during testing, choose another scrap rather than risking discoloration across the pale sections of your handmade coaster.
Draw a 5-inch circle on paper and cut it out accurately. Use this template to cut one front circle, one backing circle, and one batting circle. The fabric circles include the seam allowance. Mark the center of the front piece lightly, then set the backing and batting aside while you prepare the decorative fruit design.
Draw a second circle measuring 4 inches in diameter for the pale inner layer. Cut one from cream cotton without adding a seam allowance because this piece will be appliquéd onto the front. When centered on the 5-inch background, it leaves a ½-inch border before assembly. The outer seam will reduce that border to approximately ¼ inch on the finished coaster.
To create the segments, draw a 3½-inch circle, divide it into eight equal 45-degree wedges, and trace one wedge onto another piece of paper. Trim about ¹⁄₁₆ inch from each straight side and round the narrow tip slightly. Cut eight fabric wedges using this template. These small reductions create pale spaces between the segments when they are arranged.
2. Build the Fruit Design with Simple Appliqué
Lay the front fabric circle right side up and position the 4-inch cream circle in its center. Measure the border at several points to check the alignment. This pale layer represents citrus pith, the light-colored area beneath the peel. Keep its placement even because it provides the visual framework for the eight segments that follow.
Secure the pale circle with hand basting, a few pins, or lightweight sewable fusible web. If using fusible web, follow its application instructions and test it on scraps first. Avoid heavy adhesive layers, which may make the coaster stiff. Temporary positioning methods hold the pieces while you sew, but stitching provides the lasting attachment needed for regular washing.
Stitch around the cream circle using a narrow zigzag or blanket stitch. As a starting point, test a zigzag approximately 2 millimeters wide and 1 millimeter long, adjusting it to your machine and fabric. The stitches should catch the raw edge without pulling the background into puckers. Practice on a scrap sandwich before sewing the actual coaster front.
Arrange the eight fruit wedges over the cream circle, with their narrow tips pointing toward the center. Their curved outer edges should form a balanced ring. Leave a visible cream border around the outside and narrow cream lines between neighboring wedges. Adjust all eight pieces together before securing them so the spacing looks consistent around the entire design.
Sew around each wedge with matching thread, using the same tested appliqué stitch. Work slowly around the curves and rounded tips. When changing direction, stop with the needle down, raise the presser foot, and reposition the fabric gently. Secure thread ends neatly, and avoid creating thick clusters of stitching where the segments approach the center.
Press the completed fruit appliqué carefully, lifting and lowering the iron instead of dragging it. Inspect every edge and stitch down any loose sections. If you want seed details, add a few small, flat embroidery stitches to selected wedges. Keep embellishments subtle and smooth so a cup can rest comfortably on the finished surface.
3. Sew, Turn, and Topstitch the Fabric Coaster
Place the batting circle on your table, then position the decorated front circle above it with the right side facing up. Lay the backing circle on top with the right side facing down. The cotton pieces should face each other, with the batting underneath. Align their outer edges and secure the layers with clips or pins.
Mark a 2-inch turning opening along the perimeter. Begin sewing at one end of this opening and continue around the circle with a ¼-inch seam allowance. Stop at the other mark, leaving the opening unsewn. Backstitch at the beginning and end to strengthen these areas, which will receive extra pressure when you turn the coaster.
Check the seam before trimming anything. Confirm that the stitching has caught all three layers throughout the sewn section. Trim the batting close to the stitching to reduce bulk, including carefully around the opening. Trim the fabric seam allowances slightly along the sewn curve, leaving enough fabric to protect the seam and keeping the opening allowances intact.
Turn the coaster right side out through the opening, reaching between the two cotton layers. The batting should settle inside between the front and backing. Use your fingers or a blunt turning tool to ease the perimeter into a smooth circle. Avoid sharp scissors or forceful pushing, which can damage the fabric or stretch the seam.
Fold the opening edges inward by ¼ inch, following the natural curve of the surrounding seam. Press the coaster flat and check that the front and backing meet evenly around the perimeter. Adjust any sections where the seam rolls toward one side. Clip the folded opening closed, making sure no batting extends beyond the tucked fabric edges.
Topstitch around the coaster approximately ⅛ inch from the finished edge, closing the opening as you sew. For additional stability, stitch through all layers around the outline of the pale inner circle. Finish by trimming threads and pressing gently. Place an empty mug on the coaster to confirm that the surface lies flat and supports the cup evenly.
4. Customize Your Fruit Fabric Coaster Pattern and Improve the Finish
Use the same Fruit Fabric Coaster Pattern to build a citrus collection with orange, lemon, lime, and grapefruit designs. Keep the measurements consistent while changing the fabric colors. Matching cream pith and coordinated backing fabrics help the set look cohesive. Four coasters are a practical starting point and provide enough repetition to strengthen your sewing confidence.
For a softer style, choose pastel yellow, peach, mint, and blush pink. For stronger definition, use rich fruit colors with a light cream background. A slightly darker outer fabric helps emphasize the rind. Before sewing, arrange the cut pieces together and view them from a short distance to check that the citrus design remains clear.
If the coaster puckers, check your stitch settings and fabric handling. Dense appliqué stitches can draw lightweight cotton inward, while pulling the fabric may stretch the curved edges. Reduce unnecessary stitch density, support the work as it feeds through the machine, and press between stages. Persistent puckering is easier to correct before the backing and batting are attached.
An uneven outer shape usually points to inconsistent cutting or seam allowances. Use a firm paper template and mark the stitching line on the wrong side of the backing if needed. Sew slowly around the curve, maintaining the same distance from the edge. When closing the opening, fold the fabric carefully so it follows the original circular outline.
Care for your fabric coasters according to the materials used, including the batting and any fusible product. Many cotton combinations suit a gentle cool wash followed by air drying. Reshape the coaster while damp and let it dry completely before storing. Wash the first sample before completing a larger batch to assess shrinkage, colorfastness, and overall appearance.
Use these coasters beneath everyday drinkware, and keep their intended function in mind when choosing materials. One thin layer of batting provides light padding but does not make the coaster suitable for hot cookware. Keep notes about your template sizes, thread colors, and machine settings so you can reproduce the same neat finish across future sets.
Frequently Asked Questions
Is this Fruit Fabric Coaster Pattern suitable for beginners?
Yes. The project introduces several useful sewing skills in a small format, including appliqué, curved seams, turning, and topstitching. Beginners may find it helpful to practice the appliqué stitch on scraps first. Complete one coaster before cutting a full set so you can make any adjustments with minimal fabric waste.
What is the best fabric for fruit coasters?
Quilting cotton is a reliable choice because it is easy to cut, press, and sew. It also comes in many colors suitable for fruit designs. Choose fabrics of similar weight and avoid stretchy materials for your first attempt. Prewashing is especially helpful when combining vivid colors with pale backgrounds.
Do the fruit segments need seam allowances?
No. The cream inner circle and fruit wedges are attached using raw-edge appliqué, so their templates represent their actual cut sizes. Only the main front and backing circles include the ¼-inch seam allowance needed for assembling the coaster. Adding seam allowances to the appliqué pieces would change the intended spacing.
Can I make the coaster without fusible web?
Yes. Hand basting is an effective alternative that holds the pieces without adding stiffness. You can also use pins carefully or a small amount of washable fabric glue designed for sewing. Whichever method you choose, stitch securely around each appliqué shape before assembling the coaster.
Why does my cup wobble on the finished coaster?
The surface may contain bulky batting, thick seams, dense embroidery, or puckered fabric. Use thin batting, trim seam bulk carefully, and keep decorative stitching flat. Press the completed coaster and test it on a level table. A broad, even surface is more useful than heavily padded construction for this project.
Can I enlarge this pattern for bigger mugs?
Yes. For a coaster approximately 5 inches across, cut the front and backing circles 5½ inches in diameter, maintaining the same ¼-inch seam allowance. Enlarge the decorative circles and segments proportionally to suit the new size. Make a paper layout first to check the rind width and spacing between wedges.
Can these fruit fabric coasters be sewn by hand?
Yes. Attach the decorative shapes with small blanket stitches, then sew the outer seam using a secure backstitch. After turning and pressing, close the opening with a ladder stitch. A fine running stitch around the perimeter can add a decorative finish while helping the layers remain aligned.
How many coasters should I make for a gift set?
A set of four is a convenient choice, while six offers more variety for a larger household. You can make all the coasters in one fruit color or combine several citrus designs. Allow each coaster to dry fully after any washing or pressing before stacking and wrapping the finished collection.
Conclusion
This Fruit Fabric Coaster Pattern shows how simple cotton circles, eight decorative wedges, and a thin batting layer can become an attractive handmade table accessory.
You have learned how to prepare the templates, arrange the citrus details, sew secure appliqué, assemble the layers, and finish the perimeter with neat topstitching. Careful cutting, balanced spacing, and gentle pressing all contribute to a smooth, practical result.
Start with your favorite fruit color, complete a sample, and use what you learn to create a coordinated collection. Each coaster offers room for personal choices while keeping the construction approachable and consistent. Please leave your honest opinion about this tutorial and share your suggestions, including the fruit designs, color combinations, or sewing techniques you would enjoy exploring next.