
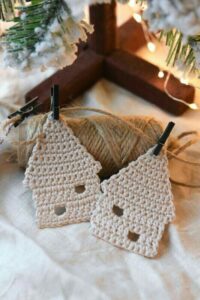
One of the most appealing features of a Crochet Christmas house pattern is its versatility. You can create a simple cottage with a white roof, a colorful gingerbread-inspired house, or a snowy cabin with embroidered windows and a little chimney.
In this tutorial, you will learn how to make a Crochet Christmas house pattern step by step, from preparing your materials to crocheting the walls, shaping the roof, and adding decorative features. The instructions use US crochet terminology and focus on a small, solid decorative cottage made from separate crocheted panels. You will also find practical guidance on joining the pieces, maintaining consistent tension, and making the finished house stand upright or hang as an ornament. With patience and a little imagination, you can turn ordinary yarn into a charming miniature home that celebrates the cozy atmosphere of Christmas.
Materials, Crochet Abbreviations, and Preparing Your Christmas House
Before starting your Crochet Christmas house pattern, gather the supplies you will need. Choose a main yarn color for the walls, another color for the roof, and small amounts of contrasting yarn for the door, windows, and other details. Red, green, white, cream, and brown are traditional choices, but pastel pink, light blue, and soft gray can create a modern winter-cottage appearance. Smooth acrylic or cotton yarn is a practical option because it makes the stitches easy to see and helps the individual pieces maintain a tidy shape.
You will also need a crochet hook suitable for your chosen yarn, scissors, a yarn needle, stitch markers, and a measuring tape or ruler. If you want your house to have a three-dimensional shape, prepare a small amount of fiberfill stuffing or lightweight, clean filling material suitable for crafts. You can also use a piece of firm felt or another appropriate insert to help support the base. Choose materials that are compatible with the intended use of your decoration, particularly if the finished house will be handled frequently.
The Crochet Christmas house pattern uses a few basic stitches. In US crochet terminology, ch means chain, sc means single crochet, sl st means slip stitch, inc means increase by working two single crochet stitches into one stitch, and dec means decrease by combining two stitches into one. The abbreviation BLO means back loop only. You do not need to master every technique before starting, but understanding single crochet, increases, and decreases will help you shape the walls and roof accurately.
For this beginner-friendly design, the walls are worked as flat rectangular panels, while the roof is made from two matching triangular panels. The pieces are then joined to create a simple cottage shape. This construction method is helpful because each part can be measured and adjusted before assembly. It also makes it easier to add embroidered windows and a door while the wall panels are still flat, rather than trying to decorate the entire house after it has been assembled.
Before crocheting, decide how large you want your finished house to be. A small ornament might measure approximately 3 to 4 inches tall, while a larger decorative cottage can be made by increasing the number of stitches and rows. The exact dimensions depend on your yarn, hook, and tension. For the sample instructions below, use a consistent stitch pattern and measure the panels as you work instead of relying entirely on estimated measurements. This will help you achieve a balanced shape.
Finally, prepare a simple sketch showing the front wall, back wall, side walls, roof panels, and base. Decide where the door, windows, and chimney should be positioned. Marking these details before assembly will help you keep the design symmetrical. A little preparation makes the Crochet Christmas house pattern easier to follow and reduces the chance of discovering that a window or roof section is positioned incorrectly after the pieces have been joined.
Step-by-Step Crochet Christmas House Pattern Instructions
Step 1: Crochet the front wall. Using your main wall color, chain 17. In the second chain from the hook, work 1 single crochet, then work 1 single crochet into each remaining chain across. You should have 16 stitches. Chain 1 and turn. Work 1 single crochet into every stitch across for the next 11 rows, keeping the stitch count at 16. This creates a rectangular front wall. If you want a larger house, increase the starting chain and add rows while keeping the proportions consistent. Fasten off, leaving a tail if you plan to use it for joining.
Step 2: Make the back and side walls. Repeat the same process to create a second front-sized rectangle for the back wall. For each side wall, chain 11 and work 10 single crochet stitches across, beginning in the second chain from the hook. Continue working single crochet rows until the side panels are the same height as the front and back walls. For the sample layout, make two side panels measuring approximately 10 stitches wide by 12 rows tall. Adjust the number of rows if necessary to match the actual height of your front and back panels.
Step 3: Create the two roof panels. Using your chosen roof color, chain 17. Work 1 single crochet into the second chain from the hook and across the row, producing 16 stitches. Chain 1 and turn. On the next row, work a single crochet decrease at the beginning, single crochet across until two stitches remain, and decrease over the final two stitches. You will reduce the stitch count by two. Repeat this process on each row until only a few stitches remain, then fasten off. Make a second matching triangle. These triangular panels will form a simple sloping roof when joined along their long edges.
Step 4: Add the door and windows. Lay the front wall flat and use a contrasting yarn color to create a small rectangular door near the bottom edge. You can crochet the door separately as a small rectangle or embroider its outline directly onto the wall. Add two small windows above or beside the door using embroidered lines or tiny crocheted squares. Keep the details relatively simple so they remain visible on the finished miniature house. If you prefer a more traditional appearance, use white yarn for window frames and brown yarn for the door.
Step 5: Assemble the walls. Place the front and side panels together with their edges aligned. Use a yarn needle and the matching yarn to sew the panels together, working through corresponding stitches along each edge. Attach the back wall in the same way, forming an open rectangular structure. Check that the corners are straight and that the bottom edges line up. If you prefer, you can join the panels with slip stitches using a crochet hook. Work slowly and avoid pulling the yarn too tightly, because excessive tension can make the walls bend inward.
Step 6: Attach the roof and finish the house. Place the two triangular roof panels together along their sloping edges and sew them to create a peaked roof. Position the roof over the assembled walls and attach the lower edges securely to the top edges of the house. Leave the roof slightly open at one side if you want to add a small amount of stuffing or an internal support before closing it completely. Weave in all yarn ends and check that the house holds its shape. Add a small crocheted chimney, embroidered snowflakes, or a hanging loop if desired.
Finishing Touches, Decorating Ideas, and Tips for a Beautiful Crochet Christmas House
Once the basic structure is complete, take time to inspect your Crochet Christmas house pattern carefully. Check that the walls are aligned, the roof sits evenly, and the seams are secure. Small differences are normal in handmade crochet, but gently adjusting the panels before finalizing the joins can improve the overall appearance. If the house leans to one side, check whether the base is level and whether the wall panels have matching dimensions. Correcting these details now will make the decoration look more balanced.
Adding a little support can help a three-dimensional crochet house maintain its shape. Light stuffing can work for a soft ornament, while a suitable firm insert can help a decorative cottage stand upright. If you use stuffing, distribute it evenly and avoid filling the house so tightly that the seams stretch. For a firmer structure, you can place a carefully cut piece of felt or another suitable craft material inside the base. Make sure any insert is fully enclosed and appropriate for the intended use of the decoration.
The roof is an excellent place to introduce texture and color. White yarn can imitate snow, while cream or light brown yarn creates the look of a traditional cottage roof. You can crochet a narrow border around the roof panels using slip stitches or single crochet. Small chain loops or embroidered lines can represent shingles, while tiny white stitches can suggest falling snow. Keep the decoration balanced so that the roof remains proportional to the walls and does not overwhelm the miniature house.
Windows and doors give your Crochet Christmas house pattern its personality. Embroidered windows are simple to create and do not add much bulk, while small crocheted squares can provide a more textured appearance. You might add a tiny wreath above the door, a red doorknob, or a few green stitches representing miniature garland. If you make several houses, try varying the window arrangements, roof colors, and door styles while using the same basic construction. This creates a coordinated village with enough variation to make every cottage distinctive.
You can also adapt the design for different Christmas decorations. Add a hanging loop to make a tree ornament, sew the house onto a larger crocheted background for a festive wall hanging, or create several small cottages for a tabletop village display. A row of houses in complementary colors can look especially charming when combined with other handmade decorations. If the house will be used as a freestanding ornament, ensure the base is flat and stable. If it will be hung, distribute the weight evenly and reinforce the attachment point.
Finally, care for your finished crochet house according to the yarn label and the materials used inside. Remove dust gently and avoid excessive moisture if the house contains a cardboard or other water-sensitive support. Store it in a clean, dry container when the holiday season ends, and avoid placing heavy objects on top of it. Keep the decoration away from open flames and high-heat sources. With thoughtful finishing and storage, your handmade Christmas cottage can become a decoration you enjoy displaying year after year.
Crochet Christmas House Pattern FAQ and Conclusion
1. Is the Crochet Christmas house pattern suitable for beginners?
Yes. This Crochet Christmas house pattern is suitable for beginners who know how to make chain stitches and single crochet stitches. The walls are simple rectangles, and the roof panels use basic decreases to create triangular shapes. Joining the panels requires patience, but you can work slowly and check the fit before sewing everything together. If you are new to crochet, practice the basic stitches on a small swatch first.
2. What yarn is best for a crochet Christmas house?
Smooth cotton or acrylic yarn is a good choice for a miniature house because it provides clear stitch definition and is easy to handle. Cotton tends to create a firm fabric, while acrylic offers softness and a wide range of festive colors. Choose a yarn weight that matches the size you want to make. Using the same yarn thickness for the walls and roof generally makes assembly easier, although you can use a contrasting texture for decorative details.
3. How do I make my crochet Christmas house stand upright?
To help the house stand upright, make sure the wall panels have matching heights and that the bottom edges form a level base. Use consistent tension when sewing the walls together and avoid pulling the joining yarn too tightly. A small amount of evenly distributed stuffing can support the walls, while a suitable firm insert in the base can improve stability. Check that the insert fits neatly without stretching the stitches.
4. Can I make a crochet Christmas house without stuffing?
Yes. Stuffing is optional. A flat house decoration or a hanging ornament may not need any filling at all. If you want a three-dimensional structure without stuffing, use a suitable internal support or construct the walls from firm crochet fabric. The best method depends on whether you want a soft ornament, a freestanding cottage, or a decorative piece that will hang from a Christmas tree.
5. How do I create a pointed roof?
For the sample pattern, the roof is made from two triangular panels created by decreasing stitches at both ends of successive rows. Each decrease row reduces the width of the panel, producing a sloping outline. Make two matching pieces and sew them together along the sloping edges. Attach the finished roof to the upper edges of the walls, checking that the peak is centered and both sides have a similar angle.
6. Why do my house walls look uneven?
Uneven walls may result from inconsistent stitch counts, changes in tension, or different numbers of rows in the panels. Count the stitches at the end of each row and measure the pieces before assembly. If one panel is wider or taller than the others, correct it before joining the walls. Using stitch markers and writing down the number of rows can make the process more consistent, especially if you are making multiple houses.
7. Can I customize the colors and decorations?
Absolutely. Traditional red, green, white, and brown create a classic Christmas look, but pastel shades and neutral colors can also be attractive. You can add embroidered windows, a crocheted wreath, a chimney, snowflakes, or a textured roof. Keep the details proportional to the size of the house so that they do not make the structure bulky. A consistent color palette helps the finished decoration look harmonious.
8. How do I attach the roof securely?
Align the roof with the top edges of the assembled walls and use a yarn needle to sew it in place with matching yarn. Begin at the center or at one corner, depending on your preferred method, and continue evenly along the edges. Check the roof position as you work so that the peak remains centered. Secure the yarn ends inside the structure and avoid pulling the stitches so tightly that the roof bends or the walls lean inward.
9. Can I make a miniature Christmas village with this pattern?
Yes. This Crochet Christmas house pattern can be adapted to create a collection of cottages in different colors and sizes. Keep the basic construction consistent while changing the door colors, window placement, roof details, and decorative accents. For a coordinated display, use a limited palette across the entire village. Arrange the houses on a stable surface and make sure each one has a level base if you want them to stand independently.
10. How much yarn will I need for one crochet Christmas house?
A small crochet house generally requires only a modest amount of yarn, but the exact quantity depends on its dimensions, yarn weight, stitch density, and roof design. The sample pattern uses a relatively small number of stitches, making it suitable for leftover yarn from other projects. If you plan to make several houses, prepare enough yarn in each color before starting so that the walls, roofs, and decorative details can be completed consistently.
11. Can I use the crochet house as a Christmas tree ornament?
Yes. Add a secure hanging loop made from chain stitches or a length of strong yarn attached near the top of the roof. Make sure the attachment is reinforced so the house does not fall when hung. Keep the ornament lightweight and check that decorative details are firmly secured. If the decoration will be used in a home with young children or pets, consider avoiding small detachable parts and place the ornament where it can be enjoyed safely.
12. How should I store my crochet Christmas house after the holidays?
Remove dust gently and ensure the house is completely dry before storing it. Place it in a clean, dry container where it will not be crushed by heavier decorations. If the house contains a firm insert, avoid storing it in a way that bends the walls or roof. Keep it away from excessive heat and moisture, and follow the care instructions for the yarn used. Proper storage helps preserve the shape and appearance of your handmade cottage.
Conclusion
The Crochet Christmas house pattern is a charming project that combines basic crochet techniques with creative details to produce a festive miniature cottage. By crocheting rectangular wall panels, shaping triangular roof pieces, adding a door and windows, and joining the sections carefully, you can create a handmade decoration that reflects your own style. This tutorial has covered the materials, abbreviations, step-by-step instructions, finishing techniques, customization options, and solutions to common problems.
Whether you make one cottage as a thoughtful handmade gift or create an entire miniature Christmas village, the project offers plenty of opportunities to experiment with color, texture, and decorative details. Remember to measure the panels, maintain consistent tension, and check the structure before completing the final joins. With patience and practice, your Crochet Christmas house pattern can become a special addition to your holiday decorations for many seasons to come.
If you enjoyed this tutorial, please leave your honest opinion in the comments and share your suggestions for improving the pattern. Tell us which colors you would choose, what decorations you would add, and whether you plan to make a single cottage or a complete Christmas village. Your feedback and creative ideas can inspire other crochet enthusiasts to explore new designs and enjoy the satisfaction of making their own handmade holiday decorations