
The Crochet pattern for a mini Santa hat is a delightful holiday project that brings the magic of Christmas into handmade decorations, miniature gifts, and festive accessories.
One of the best things about a Crochet pattern for a mini Santa hat is its versatility. You can use the finished hat as an ornament for your Christmas tree, a decorative accessory for a small stuffed toy, a festive addition to a gift package, or a charming handmade decoration for your holiday table.
In this tutorial, you will learn how to make a mini Santa hat crochet pattern step by step, including the materials you need, the stitches used to shape the pointed crown, and the techniques for adding the white brim and pom-pom. The instructions use US crochet terminology and provide a beginner-friendly approach to constructing the hat from the tip downward. You will also discover helpful finishing techniques, practical troubleshooting tips, and creative ideas for using your completed project. With a little patience and attention to stitch counts, you can create a neat, festive miniature hat that is perfect for handmade Christmas projects.
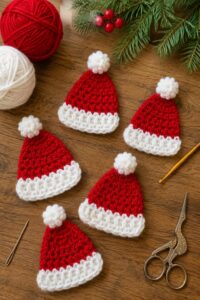
Materials, Crochet Abbreviations, and Preparation for a Mini Santa Hat
Before beginning your Crochet pattern for a mini Santa hat, gather your materials and prepare your workspace. You will need red yarn for the main body, white yarn for the brim, and a small amount of white yarn for the pom-pom. Smooth acrylic or cotton yarn is suitable for this project because it makes the stitches easy to see and handle. A small amount of fluffy yarn can also be used for the pom-pom if you want a softer, more traditional Santa hat appearance.
Choose a crochet hook that works well with your selected yarn. For a miniature amigurumi-style hat, a smaller hook than the yarn label recommends may help create a firmer fabric with fewer gaps. However, the ideal hook depends on your yarn thickness and personal tension. You will also need scissors, a yarn needle for weaving in the ends, and optional stitch markers to help you track the beginning of each round. If you plan to attach the hat to a toy or ornament, keep a small amount of extra yarn available for securing it.
This mini Santa hat crochet pattern uses several common crochet abbreviations. MR means magic ring, ch means chain, sc means single crochet, inc means increase by working two single crochet stitches into the same stitch, sl st means slip stitch, and BLO means back loop only. The pattern is worked in US crochet terminology. If you are more familiar with UK terminology, remember that US single crochet corresponds to UK double crochet, so checking the terminology before starting will help prevent confusion.
The main body of the hat is worked in continuous rounds from the pointed tip toward the wider opening. This construction creates a tapered cone that gradually expands as you add stitches. The white brim is added after the red section is complete, providing a contrasting band around the bottom. The pom-pom is made separately and attached to the tip. Working in continuous rounds helps reduce visible joining lines, although you should use a stitch marker to identify the first stitch of every round.
For this beginner-friendly version, the hat is designed as a small decorative accessory rather than a fitted garment. The exact dimensions will depend on your yarn, hook, and tension. If you want a larger hat for a particular toy, you can use thicker yarn or add additional increase rounds. If you want a tiny Christmas tree ornament, use finer yarn and a smaller hook. Making a small sample before starting can help you estimate the finished size more accurately.
Before crocheting the first round, decide how you want the finished hat to look. A traditional Santa hat uses bright red yarn with a white brim and pom-pom, but burgundy, cream, green, or even pastel shades can create attractive variations. You may also choose a slightly textured white yarn for the brim to imitate fluffy trim. Keeping the main body smooth and the finishing details soft creates a balanced design that emphasizes the recognizable silhouette of a Santa hat.
Step-by-Step Crochet Pattern for a Mini Santa Hat
Step 1: Begin with the pointed tip. Using red yarn, make a magic ring. If you prefer not to use a magic ring, chain 2 and work the first stitches into the second chain from the hook. For Round 1, work 4 single crochet stitches into the ring. Pull the magic ring closed if you used that method. Place a stitch marker in the first stitch to help you track the beginning of the round. This small starting circle forms the narrow tip of your Crochet pattern for a mini Santa hat.
Step 2: Start increasing the crown. For Round 2, work 1 single crochet into each stitch around, giving you 4 stitches. For Round 3, work 1 single crochet into the first stitch, then work 2 single crochet stitches into the next stitch. Repeat this sequence around to make 6 stitches. For Round 4, work 1 single crochet into each stitch around, keeping the count at 6. These early rounds establish the narrow pointed shape without making the tip too wide too quickly.
Step 3: Continue shaping the red cone. For Round 5, work 1 single crochet into each of the first 2 stitches, then work an increase into the next stitch. Repeat this sequence around, giving you 8 stitches. For Round 6, work 1 single crochet into every stitch around. For Round 7, work 1 single crochet into each of the first 3 stitches, then increase in the next stitch. Repeat around to make 10 stitches. Alternate increase rounds with plain rounds to create a gradually expanding cone.
Step 4: Expand the hat to the desired width. Continue using the same principle, adding increases at regular intervals. For example, work 1 single crochet into the first 4 stitches and increase in the next stitch during the following increase round. On the next round, work 1 single crochet into every stitch. Continue alternating increase rounds and plain rounds until the cone reaches the length and width you want. Count your stitches at the end of each increase round, and distribute the increases evenly so the fabric stays smooth rather than forming sharp corners.
Step 5: Work the lower red section. Once the cone reaches the desired length, continue working single crochet stitches without increases for two or three rounds. This creates a short, straighter section above the brim and helps the hat opening retain its shape. If the hat is intended for a miniature toy, check the opening against the toy before moving on. You can add another plain round if the hat needs more length, or stop earlier if you prefer a shorter, more compact design. Fasten off the red yarn if you plan to attach the brim separately, or keep it available if you prefer a continuous color change.
Step 6: Add the white brim and pom-pom. Attach white yarn to the bottom edge of the red hat. Work one single crochet stitch into each stitch around the opening. Join with a slip stitch if you are working a joined round. For a thicker brim, add one or two more rounds of single crochet. You can also work a round in the back loops only to create a subtle ridge. Fasten off and weave in the yarn ends. Make a small white pom-pom using a few wraps of yarn around your fingers, tie the center securely, trim the loops, and attach it firmly to the pointed tip with a yarn needle.
Finishing, Customization, and Creative Uses for Your Mini Santa Hat Crochet Pattern
After completing the main construction, take a moment to inspect your Crochet pattern for a mini Santa hat. Check the pointed tip, the width of the opening, and the shape of the white brim. If the hat looks slightly uneven, gently adjust the stitches with your fingers. A small amount of unevenness is normal in handmade crochet, especially when working with very small pieces. Consistent tension and accurate stitch counting will help your next hat look even more polished.
The white brim is one of the most recognizable features of a Santa hat, so choosing the right texture can make a noticeable difference. Smooth cotton or acrylic yarn creates a neat, simple border, while fluffy yarn produces a softer appearance. If you use fluffy yarn, work slowly because it can make individual stitches harder to see. For beginners, a smooth white yarn is usually easier to manage. You can also make the brim slightly wider by adding extra rounds, as long as the opening remains proportional to the red crown.
The pom-pom can be customized to match the size and style of the hat. A small, tightly trimmed pom-pom gives the design a tidy miniature appearance, while a fuller pom-pom creates a playful finish. Make sure the center is tied securely before trimming the loops, and leave enough yarn tails to attach it firmly to the hat. If the hat will be used on a toy intended for a young child, avoid loose decorations or small detachable parts that could present a choking hazard.
You can personalize your mini Santa hat crochet pattern by changing the colors or adding a simple decorative detail. A narrow gold-colored chain stitched around the red section can create a festive accent, while a tiny embroidered star can make the hat suitable for a handmade Christmas ornament. Another option is to add a small loop at the top or back so the hat can hang from a tree branch. Keep added decorations lightweight so that they do not pull the hat out of shape.
This project is also useful for creating coordinated handmade gifts. Make several miniature hats in matching colors and use them to decorate wrapped presents, holiday cards, small gift bags, or table settings. You can crochet a collection in different sizes to decorate a group of amigurumi figures or create a miniature Santa-themed display. If you plan to make multiple hats, record your stitch counts and the number of rounds so that each piece has a similar shape and proportion.
Proper finishing and storage will help your crochet accessories remain attractive. Weave in all yarn ends securely, especially if the hat will be handled frequently. If the hat becomes dusty, follow the care instructions for the yarn you used and clean it gently. Avoid excessive heat, which can damage some synthetic fibers, and allow the piece to dry fully before storing it. Keep miniature decorations in a clean container between holiday seasons so they are ready to use again the following year.
Mini Santa Hat Crochet Pattern FAQ and Conclusion
1. Is the Crochet pattern for a mini Santa hat suitable for beginners?
Yes. This Crochet pattern for a mini Santa hat is suitable for beginners who know how to make single crochet stitches, increases, and a magic ring. The project is small, so it can be completed without a large amount of yarn. Beginners should focus on counting stitches carefully and maintaining even tension. If the magic ring feels difficult, starting with a chain-2 ring is a useful alternative.
2. What yarn is best for a mini Santa hat?
Smooth acrylic or cotton yarn works well for most miniature Santa hats. Acrylic yarn is widely available in festive colors and creates a soft, lightweight accessory, while cotton provides clear stitch definition. Choose a yarn weight that matches the intended size of the hat. For very small ornaments, finer yarn can produce a delicate result. The white brim can be made from the same yarn type in a contrasting color or from a suitable fluffy yarn.
3. How do I make my mini Santa hat smaller or larger?
To make the hat smaller, use thinner yarn and a smaller hook, and stop increasing sooner. To make it larger, use thicker yarn, a larger hook, or additional increase rounds. Remember that changing the yarn and hook affects both the width and the length of the hat. If the hat needs to fit a particular toy, measure the toy first and compare the opening of your work as you crochet. This is more reliable than assuming every miniature hat will have identical dimensions.
4. Why does my crochet Santa hat look more like a circle than a cone?
This usually happens when too many stitches are added near the tip or when increases are made too frequently. A cone requires gradual expansion, so alternating increase rounds with plain rounds can help create a narrower point. If the hat begins to look like a flat circle, check your stitch count and review the increase placement. You may need to undo a round and repeat it with fewer increases.
5. How can I prevent gaps between the stitches?
Gaps may appear when the hook is too large for the yarn or when the stitches are worked loosely. Try using a smaller hook and maintaining a consistent tension. For an amigurumi-style accessory, a firm fabric generally produces a neater appearance. Avoid pulling the yarn so tightly that the hook becomes difficult to move, however, because excessively tight stitches can distort the cone and make the project uncomfortable to work on.
6. How do I attach the white brim neatly?
Attach the white yarn evenly around the bottom opening, placing one stitch into each appropriate stitch along the edge. Make sure the brim does not become too tight or too loose. If the opening begins to ruffle, check whether you have added too many stitches. If it pulls inward, you may need to adjust the tension or use a different stitch count. A second round of single crochet can create a thicker and more defined brim.
7. Can I make the hat without a pom-pom?
Yes. The pom-pom is a traditional decorative feature, but it is optional. You can leave the tip plain for a minimalist appearance or add a small crocheted ball instead. A crocheted ball can be useful if you want a more durable decoration that is less likely to shed loose fibers. Whichever finish you choose, secure it carefully and keep the proportions appropriate for the size of the hat.
8. Can I use this pattern for amigurumi toys?
Yes. The mini Santa hat crochet pattern works well as a seasonal accessory for many small amigurumi figures. You can adjust the yarn and hook to match the scale of the toy. Before completing the brim, check the opening against the toy’s head so the hat sits comfortably. If you plan to attach it permanently, use a yarn needle and matching yarn to sew it securely in place.
9. How much yarn does a mini Santa hat require?
A miniature hat usually requires only a small amount of red yarn and an even smaller amount of white yarn. The exact quantity depends on the yarn weight, hook size, and finished dimensions. A small leftover ball from another project may be sufficient. If you are making several hats, keep your color choices consistent and set aside enough yarn for the brims and pom-poms before beginning the series.
10. Can I sell mini Santa hats made with this pattern?
You can generally sell handmade items that you crochet yourself, subject to any applicable laws and the terms associated with the pattern or materials you use. If you plan to sell your finished hats, describe their size and intended use accurately, and avoid making unsupported claims about their safety or materials. Ensure that small parts are securely attached and clearly identify the item as a decoration or accessory when appropriate.
11. Why does my mini Santa hat curl or twist?
Curling or twisting can happen when stitch tension changes, increases are unevenly distributed, or the fabric is worked too tightly. Use a stitch marker to identify the beginning of each round and count the stitches regularly. Check that increases are spaced evenly around the cone. After finishing, gently shape the hat with your fingers. If the distortion is severe, it may be necessary to undo the affected rounds and repeat them with more consistent tension.
12. How can I make several hats look the same?
Keep a written record of your hook size, yarn type, stitch counts, and the number of rounds. Use the same method for the red crown, white brim, and pom-pom on every hat. Check the width and length as you work instead of waiting until the end. These simple habits make it easier to produce a coordinated set of miniature Christmas accessories for gifts, ornaments, or handmade holiday decorations.
Conclusion
The Crochet pattern for a mini Santa hat is a fun and accessible way to create a festive handmade accessory using basic crochet techniques. By starting with a small ring, gradually increasing the red crown, adding a contrasting white brim, and finishing with a soft pom-pom, you can make a miniature Santa hat suited to Christmas ornaments, amigurumi toys, gift decorations, and seasonal displays. This tutorial has explained the materials, abbreviations, step-by-step construction, finishing techniques, and common solutions that can help you achieve a neat result.
The most important things to remember are to count your stitches, distribute increases evenly, choose a hook suitable for your yarn, and secure the finishing details carefully. Once you understand the basic construction, you can experiment with different colors, sizes, and decorative touches to create your own variations. Whether you are making one special hat or a whole collection for the holidays, this mini Santa hat crochet pattern offers an enjoyable opportunity to practice your skills and add a personal handmade touch to Christmas.
If you enjoyed this tutorial, please leave your honest opinion in the comments and share any suggestions that could make the instructions more useful. Tell us which colors you would choose, whether you would use the hat as a tree ornament or an amigurumi accessory, and what other Christmas crochet patterns you would like to learn. Your feedback and creative ideas can inspire other crocheters and help everyone enjoy making beautiful handmade decorations for the holiday season.