
A Crochet cat coaster pattern is a delightful way to combine creativity, practicality, and a love for handmade decorations.
One of the best things about a Crochet cat coaster pattern is its versatility. You can make a simple cat silhouette with pointed ears, add embroidered whiskers, experiment with colorful yarn, or create a collection of different feline expressions.
This step-by-step guide explains how to prepare your materials, understand the crochet instructions, shape the cat’s head and ears, and finish your coaster with neat details. The project uses accessible techniques, including chain stitches, single crochet, increases, and slip stitches. You will also learn how to adjust the finished size, avoid common mistakes, and care for your completed work. By following this Crochet cat coaster pattern, you can develop your crochet skills while creating an adorable accessory that is practical enough for everyday use and attractive enough to display when guests visit.
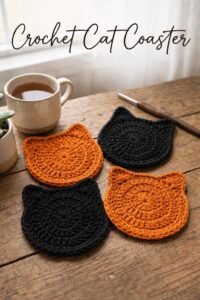
Materials, Abbreviations, and Preparation for a Crochet Cat Coaster Pattern
Before starting your Crochet cat coaster pattern, gather the materials you need. Having everything within reach makes the process easier and helps you maintain consistent tension throughout the project. You will need cotton yarn in your preferred color, a crochet hook appropriate for that yarn, scissors, a yarn needle, and a measuring tape or ruler. Optional materials include a small amount of contrasting yarn for facial details and stitch markers to help identify important positions.
For this project, medium-weight cotton yarn and a crochet hook around 4 mm are a useful starting point. However, the recommended hook size on your yarn label should always be considered, and you may need to adjust it to achieve a firm fabric. A coaster should generally be dense enough to support a cup without developing large gaps between stitches. If your stitches are too loose, try a slightly smaller hook. If they are too tight to work comfortably, move up a hook size.
Choosing the right yarn makes a noticeable difference in the finished coaster. Cotton is a popular choice because it handles moisture better than many decorative fibers and usually withstands regular use. Acrylic yarn can be used for a decorative version, but it may not absorb condensation as effectively. Avoid fuzzy yarn for your first project because its fibers can make individual stitches difficult to see. Smooth yarn will help you identify the beginning of each round and create more defined cat ears.
Understanding the abbreviations before beginning will make the written Crochet cat coaster pattern easier to follow. This tutorial uses US crochet terminology, which differs slightly from UK terminology. The abbreviation ch means chain, sc means single crochet, sl st means slip stitch, inc means increase, and st means stitch. An increase means working two single crochet stitches into the same stitch. When an instruction says to repeat a sequence, continue following that sequence for the specified number of stitches.
The pattern is worked primarily in joined rounds, beginning at the center and gradually forming a rounded cat head. The ears are then shaped with short sections of stitches at the upper edge. This construction creates a recognizable feline silhouette without requiring complicated shaping techniques. Beginners should remember that the exact appearance will depend on yarn thickness, hook size, and personal tension. The sample instructions are a practical design rather than a fixed-size commercial pattern, so small adjustments may be necessary as you work.
Before making the full coaster, consider crocheting a small test circle if you are unfamiliar with your yarn. This helps you determine whether your stitches create a firm, flat surface. If the fabric curls upward, your tension may be too tight or the increases may be insufficient. If it develops waves, there may be too many increases. Learning to recognize these signs early can save time and make your Crochet cat coaster pattern more enjoyable. Once your materials are prepared and you understand the abbreviations, you are ready to begin crocheting.
Step-by-Step Crochet Cat Coaster Pattern Instructions
Start your Crochet cat coaster pattern by making a magic ring. Wrap the yarn around your fingers to create a loop, insert the hook through the loop, draw up a loop of yarn, and chain one to secure your starting position. Work six single crochet stitches into the ring, then pull the yarn tail to close the center. If you find the magic ring difficult, you can chain two and work the stitches into the second chain from the hook instead. The magic ring usually produces a neater, more adjustable center.
Round 1: After completing the six single crochet stitches, join the round with a slip stitch into the first single crochet. Chain one to prepare for the next round. This initial circle establishes the center of your coaster. Count your stitches carefully because an incorrect count at the beginning can affect the shape of the entire project. The chain used to begin the next round does not count as a single crochet stitch in these instructions.
Round 2: Work two single crochet stitches into every stitch around. You will finish with twelve stitches. Join with a slip stitch to the first single crochet, then chain one. This round doubles the stitch count and expands the circle evenly. Try to keep your tension consistent so the center lies flat. If the circle begins to cup noticeably, check that you have completed both stitches in every designated stitch.
Round 3: Work one single crochet in the first stitch, then two single crochet stitches in the next stitch. Repeat this sequence around the circle. You should have eighteen stitches when the round is complete. Join with a slip stitch and chain one. This pattern of alternating a regular stitch with an increase helps the coaster grow while maintaining a rounded shape.
Round 4: Work one single crochet in each of the first two stitches, followed by an increase in the third stitch. Repeat this sequence around, finishing with twenty-four stitches. Join with a slip stitch and chain one. At this stage, the circle should be large enough to form the central portion of the cat’s head. If you prefer a larger coaster, you can continue expanding the circle with evenly spaced increases before adding the ears.
Round 5: Work one single crochet in each of the first three stitches, then make an increase in the fourth stitch. Repeat around to reach thirty stitches. Join with a slip stitch, fasten off if you want to finish the circular base before adding the ears, and weave in the center tail. If you need a larger base, continue the same general principle by adding one regular stitch between increases in each successive round. The exact stitch count may require adjustment to maintain a flat circle.
To create the cat’s ears, identify two positions along the upper edge of the circular base. They should be separated by a shallow central dip that will form the top of the cat’s head. Attach the yarn at the first position, chain one, and work single crochet stitches toward the ear area. For a simple pointed ear, work a short sequence of single crochet stitches, half-double crochet stitches, and double crochet stitches, then reverse the sequence to descend toward the head. The height and width of the ear can be adjusted by adding or removing stitches.
Repeat the ear construction on the opposite side, keeping both ears approximately the same height. The ears do not need to be perfectly identical, but balanced shapes generally make the coaster look more polished. If the edges appear uneven, use slip stitches along the outer edge to create a cleaner outline. You may also crochet a final round of single crochet around the entire silhouette, working carefully around the ear points and the lower edge. Avoid adding so many stitches at the corners that the fabric begins to ruffle.
After shaping the silhouette, fasten off the yarn and pull the tail through the final loop. Thread the tail onto a yarn needle and weave it securely through the backs of several stitches. Trim any excess yarn without cutting too close to the fabric. Repeat this process for any remaining loose ends. A well-finished Crochet cat coaster pattern should have a stable outline, a flat center, and no loose strands that could catch on cups or household objects.
Finishing, Customization, and Troubleshooting Your Crochet Cat Coaster
Finishing details are what transform a simple crocheted shape into a recognizable cat. To create the face, use a yarn needle and a contrasting color to embroider two small eyes, a triangular nose, and a short mouth. You can add three short whiskers on each side if you prefer a more expressive design. Keep these details relatively flat so that cups can rest evenly on the coaster. Embroidery is generally preferable to raised decorative elements because bulky embellishments may make the finished surface less practical.
Color choices can completely change the character of your project. A gray cat coaster with white facial details creates a classic look, while orange, cream, black, and brown yarn can represent different coat colors. You can also make a set using pastel pink, sage green, lavender, or blue for a playful decorative style. If you are making several coasters for a coordinated table setting, use the same yarn weight and hook size for every piece. This will help the finished items maintain a similar size and shape.
For an especially simple design, skip the embroidered face and focus on the cat silhouette. This minimalist version works well in neutral colors and may be faster to produce when making a large batch. Alternatively, use small embroidered stripes or patches to suggest a tabby or calico coat. If you want to give the coaster as a gift, consider matching the yarn color to the recipient’s kitchen or adding a handmade label to the packaging. The design is flexible enough to suit both playful and understated styles.
Blocking can help improve the appearance of a coaster that has uneven edges. Lightly dampen the finished piece according to the yarn care instructions, gently shape it on a clean, flat surface, and allow it to dry completely. Avoid stretching the ears excessively because this can distort the silhouette. Cotton often benefits from careful shaping, although some projects will lie flat without blocking. Always test your preferred care method on a small sample if you are uncertain about how the yarn will respond.
If the coaster curls, check whether the increases were distributed evenly. A circle that curls upward may need more increases, while a wavy circle may have too many. You can undo the affected round and repeat it with a corrected stitch count rather than trying to force the finished piece into shape. If the ears look too rounded, use a more gradual increase in stitch height to create sharper points. If they look overly long, reduce the number of stitches in the ear section or shorten the sequence of taller stitches.
Another common issue is inconsistent size between coasters. This often happens when different amounts of yarn tension are used or when stitch counts vary between rounds. Count each round before joining it, and use stitch markers if you tend to lose track of the first stitch. Measuring the diameter as you work will help you decide whether the coaster is approaching your desired size. With practice, you will become more comfortable modifying the Crochet cat coaster pattern to suit different cups, yarns, and decorative preferences.
Care for the finished coaster by following the yarn manufacturer’s washing instructions. Cotton pieces are often suitable for gentle washing, but colorfastness and yarn construction can vary. Remove embroidered details carefully from the wash cycle if they are particularly delicate, and allow the coaster to dry flat when necessary. Do not place a wet coaster directly on delicate wood or other moisture-sensitive surfaces. Although the project is designed for everyday drinkware, it is not intended to protect furniture from extremely hot cookware, open flames, or other sources of intense heat.
Creative Ideas, Practical Uses, and Frequently Asked Questions
A handmade Crochet cat coaster pattern can be adapted for many occasions. Make a set for a birthday, create matching coasters for a housewarming present, or prepare several pieces for a craft fair. You can also use the design as a small handmade accent on a desk or bedside table. If you are producing coasters for sale, calculate the cost of materials and the time required for each item so you can set a fair price. Describe the materials and care instructions accurately, and make sure every piece is finished securely before offering it to customers.
You can expand the design into a small collection by varying the ears, facial expressions, and colors. A pair of upright ears creates a classic cat appearance, while embroidered closed eyes can give the face a sleepy expression. Stripes and contrasting patches help distinguish individual designs without changing the basic construction. Keep decorative elements securely attached and avoid small detachable embellishments when making items intended for households with young children or pets.
For a more coordinated set, crochet the coasters in the same main color and vary only the facial embroidery. This creates a unified appearance while allowing each cat to look slightly different. Another option is to make a larger version as a decorative mat, provided the stitch count and materials are adjusted appropriately. A larger mat may need additional rounds and a sturdier yarn, but the same principles of circular increases and balanced shaping still apply.
The following FAQ addresses common questions about creating and using cat-shaped crochet coasters. These answers can help beginners understand the techniques and make practical decisions before starting their next project.
1. Is a crochet cat coaster suitable for beginners?
Yes. This project can be beginner-friendly because the main body uses basic stitches and simple increases. The ear shaping and embroidered face introduce a little extra detail, but these sections can be simplified if you are still learning. Start with a single-color design and add facial details after you are comfortable with the basic shape.
2. What is the best yarn for a crochet cat coaster pattern?
Cotton yarn is generally a strong choice because it is absorbent, durable, and suitable for household accessories. Choose a smooth yarn that allows you to see the stitches clearly. The yarn weight will influence the finished size, so use a consistent yarn type if you want to create a matching set.
3. What size should a cat coaster be?
A practical coaster is often around 4 to 5 inches across, although the ideal size depends on the cups and mugs you use. The pattern in this guide provides a starting point, but your finished dimensions will depend on your yarn, hook, tension, and ear placement. Measure your project as you work and add or remove rounds as needed.
4. Why is my crochet coaster curling?
Curling often occurs when the circle does not have enough increases or when the stitches are too tight. Check the stitch count in each round and consider using a slightly larger hook. If the coaster waves rather than curls, you may have added too many increases. Correcting the stitch count is usually more effective than stretching the finished piece.
5. Can I make this pattern without a magic ring?
Yes. Chain two and work the starting stitches into the second chain from the hook. This is a useful alternative for crocheters who find the magic ring difficult. Depending on your technique, the center may be slightly less adjustable, but it can still produce a neat and functional coaster.
6. How do I make the cat ears look pointed?
Use a combination of shorter and taller stitches to create a gradual rise and fall. Single crochet, half-double crochet, and double crochet stitches can be arranged to form a pointed outline. Keep the sequence consistent for both ears and adjust the stitch placement if the points look too wide or too rounded.
7. Can I use acrylic yarn instead of cotton?
Yes, acrylic yarn can be used, especially when the coaster is primarily decorative. However, it may not absorb condensation as effectively as cotton, and its response to heat differs by fiber and construction. For everyday drinks, cotton is generally the more practical option. Always avoid using crochet coasters as heat pads for hot cookware.
8. How do I wash crochet cat coasters?
Check the yarn label first. Many cotton coasters can be gently hand-washed or washed according to the manufacturer’s directions. Reshape the piece while damp if needed and allow it to dry completely before using it again. Avoid harsh washing methods that could distort the ears or loosen embroidered details.
9. How can I make all my coasters the same size?
Use the same yarn, hook, and stitch pattern for every coaster. Count the stitches at the end of each round and compare the diameter of each piece as you work. Consistent tension and careful finishing will make a matching set look more professional.
10. Can I sell coasters made from this design?
You can generally sell handmade items you produce yourself, but you should respect any applicable pattern terms, intellectual property rights, and local business requirements. If you plan to sell your work, describe the materials accurately and account for your labor when pricing each coaster. Do not claim that your handmade item is an officially licensed product unless that is true.
11. How can I make the coaster more decorative without affecting its function?
Embroidery is a practical way to add personality without creating bulky surfaces. Try small eyes, a simple nose, subtle whiskers, or a few embroidered markings. Avoid thick appliqués or hard decorative pieces where a cup needs to rest, since these can make the coaster unstable.
12. What should I do if my first coaster does not look like a cat?
Review the proportions of the head and ears before starting another piece. The ears should be clearly separated, and the central dip between them should help define the top of the head. Adjust the ear width, height, and spacing gradually. Practicing on a small sample can help you test different shapes without having to remake the entire coaster.
Conclusion
The Crochet cat coaster pattern is a wonderful way to combine creativity, practicality, and a love for handmade crafts. In this tutorial, you learned how to select the right materials, crochet the rounded base, shape the cat’s ears, and add charming facial details to create a unique and functional coaster. You also discovered helpful tips for maintaining consistent stitches, correcting common mistakes, choosing suitable yarn, and caring for your finished project.
Whether you are a beginner exploring new crochet techniques or an experienced crafter looking for a delightful handmade gift, this project offers plenty of opportunities to experiment with colors, textures, and designs. By following the step-by-step instructions and adjusting the pattern to suit your preferences, you can create a beautiful set of cat coasters that adds a playful touch to your home or makes a thoughtful gift for someone special.
Now it is your turn to pick up your crochet hook and bring your favorite feline design to life! Please leave your honest opinion in the comments and share your suggestions, favorite yarn colors, or ideas for improving this pattern. Your feedback can inspire other crochet enthusiasts and help make future projects even more enjoyable. Happy crocheting!