
One of the best things about a Fabric hair cap pattern is its versatility. You can choose lightweight cotton, satin, polyester, or another suitable fabric depending on the purpose of your cap and the finish you prefer.
Learning how to make a Fabric hair cap is also an excellent way to practice measuring, cutting, pinning, and sewing curved fabric pieces. These fundamental skills are useful for many other handmade projects, and you can develop them without purchasing expensive equipment. In this tutorial, you will discover how to prepare your materials, create a reusable pattern, assemble the cap step by step, and make adjustments for a more comfortable fit. The instructions are intended as a flexible beginner-friendly guide, so you can adapt the measurements to your needs and experiment with different fabrics while keeping the construction simple and practical.
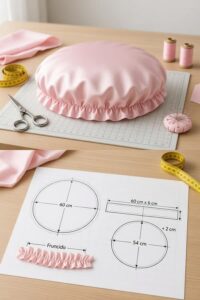
Understanding the Fabric Hair Cap Pattern and Preparing Your Materials
Before starting your Fabric hair cap pattern, it is important to understand the basic structure of the project. A simple hair cap generally consists of a rounded fabric body and an elasticized opening that helps keep the cap in place. Depending on the design, the body may be made from one circular piece of fabric or two curved pieces sewn together. For a beginner, a gathered circular cap is a convenient option because it requires relatively few pattern pieces and can be adjusted to accommodate different head sizes.
The first step is selecting the right fabric. Lightweight cotton is easy to handle and suitable for practicing basic sewing techniques, while satin or a smooth polyester fabric may be preferable when you want a softer surface against your hair. The best choice depends on the intended use, the desired appearance, and your personal comfort. Look for fabric that is clean, washable, and appropriate for repeated contact with your hair and scalp.
To complete this Fabric hair cap pattern, gather a piece of fabric, measuring tape, fabric scissors, sewing pins or clips, matching thread, an elastic band, a ruler, and a fabric marking pencil. A sewing machine can make the process faster, but you can also sew the cap by hand using small, even stitches. If you are new to sewing, prepare all your materials before cutting so that you can work comfortably without interrupting the process to search for tools.
Take accurate measurements before drawing the pattern. Measure around the widest part of your head, keeping the measuring tape comfortably positioned without pulling it too tightly. You should also consider how much room you need for your hair, especially if you intend to wear the cap over braids, curls, or a bun. Record your measurements and use them as a guide rather than relying on a standard size that may not fit your needs.
For a basic gathered design, start with a fabric circle approximately 20 to 24 inches in diameter, depending on the desired volume and the amount of hair the cap needs to accommodate. This is a starting point, not a universal measurement, so you may need a larger or smaller circle after testing the fit. Add approximately half an inch around the edge for the casing or hem, depending on your construction method. A paper template can help you maintain a symmetrical shape and make the same Fabric hair cap pattern again in the future.
Finally, prepare the fabric before cutting. If the material is washable, consider prewashing it according to its care instructions to reduce the possibility of later shrinkage. Press the fabric gently if necessary, following the manufacturer’s recommendations for temperature. A smooth, flat surface makes it easier to trace an even circle and prevents wrinkles from affecting the finished shape. These preparation steps may seem small, but they help produce a more consistent and professional-looking handmade hair cap.
Step-by-Step Fabric Hair Cap Pattern Instructions for Beginners
Begin by creating the pattern on paper or directly on the prepared fabric. To make a circle, measure the intended diameter and calculate the radius by dividing that measurement by two. For example, a circle with a diameter of 22 inches has a radius of 11 inches. Mark a center point, use a measuring tape or string to mark equal distances from that point, and connect the marks to create a rounded outline. Cut out the paper template first if you want to check its size before transferring it to your fabric.
Place the template on the fabric and secure it with pins or pattern weights. Trace around the edge using a washable fabric marking pencil, keeping the outline visible enough to guide your scissors. Cut carefully along the marked circle, avoiding jagged edges that could make the hem difficult to sew. If your fabric slips easily, use additional clips to hold it steady. Accurate cutting is one of the most important parts of creating a neat Fabric hair cap pattern.
Next, prepare the outer edge of the circle. Fold approximately one-quarter inch of fabric toward the wrong side and press it gently to create a clean first fold. Fold the edge again by approximately one-half inch, or adjust the fold to accommodate the width of your elastic. Pin or clip the folded edge in place. This creates a casing through which the elastic can pass, helping the opening gather evenly around the head. Make sure the channel is wide enough for the elastic to move through without becoming trapped.
Sew around the folded edge, leaving a small opening of approximately one inch through which you can insert the elastic. Use a straight stitch and keep the stitching line consistent. If you are sewing by hand, use small running stitches and secure the thread at the beginning and end. Avoid sewing across the opening because you will need it to thread the elastic through the casing. Check that the casing remains open and that the stitches have not accidentally narrowed the channel.
Measure the elastic around the area where the cap will sit. It should feel secure without creating uncomfortable pressure. As a starting point, you might cut a piece of elastic approximately 1 to 2 inches shorter than the measured head circumference, but the ideal length depends on the elastic’s stretch and your preferred fit. Attach a safety pin to one end of the elastic and carefully guide it through the casing, keeping the other end from disappearing inside the fabric. When both ends emerge, overlap them slightly and sew them together securely.
The final assembly step is closing the casing and distributing the gathers. Gently pull the elastic until the fabric forms even folds around the opening, then adjust the gathers so that they are not concentrated in one area. Once the fit feels comfortable, sew the casing opening shut and inspect the entire seam. Your basic Fabric hair cap pattern is now complete, and you can trim loose threads and make any small adjustments needed for a clean finish.
Customizing, Fitting, and Finishing Your Handmade Fabric Hair Cap
A well-made Fabric hair cap should feel comfortable rather than tight. If the elastic leaves noticeable marks or causes pressure, it may be too short or too firm for your needs. Open the casing if necessary, adjust the elastic length, and try the cap again before securing everything permanently. A cap that slips off may need slightly shorter elastic, a better-fitting body, or a different construction method. Make small adjustments gradually instead of cutting away excess material before checking the fit.
Fabric selection can influence how the finished cap looks and feels. Cotton is generally easy to sew and works well for practice projects, while satin offers a smooth surface and an elegant appearance. Polyester blends may provide additional durability, depending on their construction and quality. If you choose a slippery fabric, use sharp scissors, extra pins, and a suitable needle to improve control. Test your stitch settings on a scrap piece first, since delicate materials may require a smaller needle or a different tension setting.
You can also modify the Fabric hair cap pattern to create different styles. A larger circle produces more volume and room for fuller hairstyles, while a smaller circle creates a less gathered appearance. If you want a more structured cap, consider adding a second fabric layer or experimenting with shaped panels. Remember that extra layers can increase warmth and bulk, so choose a construction method that matches the purpose of your project and the climate in which you plan to wear it.
Decorative details offer another way to personalize your handmade cap. You can choose a contrasting thread color, use a printed fabric, or add a small fabric bow to the exterior if it will not interfere with comfort. Decorative elements should be securely attached and positioned so that they do not press against sensitive areas of the head. For a simple everyday design, a neat seam and coordinated fabric may be all you need. Keeping the decoration minimal can also make the cap easier to wash and maintain.
Careful finishing makes a significant difference in the durability of the finished project. Inspect the seam around the casing and reinforce any areas that appear weak. Remove loose threads and check that the elastic is completely enclosed where intended. If you want to make multiple caps, record the measurements and construction details that worked best for you. Keeping a reusable paper template with notes about fabric type, elastic length, and seam allowance will make future versions of your Fabric hair cap pattern easier to reproduce.
When the cap is finished, test it during normal movement to see whether it stays in place without pulling your hair. Check that the fabric provides sufficient coverage and that the elastic remains comfortable after several minutes of wear. Wash the cap according to the fabric’s care instructions and allow it to dry appropriately before using it again. If the elastic becomes loose or the seams begin to fray, repair the cap promptly. These simple habits can help you maintain a useful handmade accessory while making the most of your sewing time and materials.
Troubleshooting, Project Variations, and Frequently Asked Questions
One common problem when making a Fabric hair cap pattern is uneven gathering around the opening. This usually happens when the elastic twists inside the casing or the fabric bunches in one area during assembly. To prevent this, guide the elastic through the channel slowly and keep the fabric distributed evenly as you work. After joining the elastic ends, gently move the gathers around the entire opening before closing the casing. If the finished cap still looks uneven, reopen a small section and redistribute the fabric instead of starting the entire project again.
Another frequent challenge is choosing the right size. A circle that is too small may not provide enough coverage, while an oversized circle may produce more gathers than expected. The best dimensions depend on your head circumference, hairstyle, fabric thickness, and preferred appearance. If you are uncertain, make a quick paper template and hold it against your head to estimate the coverage before cutting your final fabric. Remember that the elastic controls the opening, while the circle diameter largely determines the cap’s volume and coverage.
Can beginners sew a fabric hair cap without a sewing machine? Yes. Hand sewing is a practical alternative for this project because the construction mainly involves a folded casing and a simple circular seam. Use a strong thread, small stitches, and secure knots to help prevent the seam from opening during use. Work slowly around the curved edge and keep the stitches as even as possible. Although a sewing machine can produce faster and more uniform results, careful hand sewing can create a functional and attractive cap.
What is the best fabric for a fabric hair cap? The best material depends on your priorities. Cotton is beginner-friendly and easy to handle, while satin and some smooth polyester fabrics offer a different texture against the hair. Consider breathability, washability, durability, and personal comfort before choosing. If you are making a cap for sleeping or extended wear, pay attention to the fabric’s feel and the tightness of the elastic. No single material is ideal for every person or purpose, so testing a small sample can help you decide.
How much fabric do I need for this project? For a single gathered cap with a circle measuring approximately 20 to 24 inches in diameter, a fabric piece large enough to accommodate the circle plus room for accurate cutting is generally sufficient. You may need additional fabric if you want a larger design, a second layer, or matching decorative pieces. Check the width of your fabric before purchasing and allow extra material for mistakes or future repairs. If you are making several caps, arrange your paper templates carefully to minimize waste.
How do I choose the correct elastic length? Begin by measuring the area around your head where the cap will sit, then use a slightly shorter elastic length as a starting point. The amount of reduction depends on the elasticity and thickness of the band. Soft elastic may stretch differently from firm elastic, so testing a small loop before inserting it can save time. The finished cap should remain in place without causing discomfort, pulling at the hairline, or creating excessive pressure. Adjust the length before closing the casing permanently.
Can I wash a handmade fabric hair cap? Most fabric caps can be washed, but the appropriate method depends on the fabric, thread, and elastic. Follow the care instructions for your chosen materials and consider gentle washing when the fabric is delicate. Avoid excessive heat if it may damage the elastic or cause shrinkage. Allow the cap to dry thoroughly before storing it, and inspect the seams regularly. Washing the cap when needed helps maintain cleanliness, particularly when it is worn frequently or comes into contact with hair products.
How can I make the cap more suitable for thick or long hair? Consider increasing the diameter of the fabric circle to provide additional room. A larger body can accommodate more volume, while a comfortable elastic opening helps keep the cap in position. You can also experiment with a two-panel design if you prefer a different silhouette. Test the cap over the hairstyle you expect to wear most often, and make adjustments based on the actual fit rather than relying only on standard measurements.
What should I do if the cap keeps slipping off? First, check whether the elastic is too loose or the opening is too large for your head. If necessary, shorten the elastic slightly and test the fit again. You should also make sure the cap has enough coverage for your hairstyle and that the fabric is not excessively heavy. Avoid tightening the elastic so much that it becomes uncomfortable. If the cap still slips, a different pattern shape or a more suitable fabric may solve the problem.
Can I use the same fabric hair cap pattern to make gifts? Yes. A reusable pattern makes it easy to create several caps in different colors and prints. Before making a gift, consider the recipient’s preferred fabric, head measurements if available, and intended use. Choose materials that are easy to care for and avoid decorations that could scratch the skin or become loose. You can also include a small care note explaining how to wash and store the finished cap.
How can I make my fabric hair cap look more professional? Accurate cutting, consistent stitching, neatly finished edges, and a well-adjusted elastic band are the most important details. Press the fabric carefully when appropriate, keep the casing width even, and remove loose threads before considering the project complete. Choose a suitable needle and thread for your fabric, and test the machine settings on scraps. With practice, these small improvements can make your handmade caps look cleaner and last longer.
Conclusion
In conclusion, this Fabric Hair Cap Pattern tutorial has explained how to choose suitable materials, measure and cut the fabric, sew an elastic casing, and assemble a comfortable handmade hair cap. You have also learned how to adjust the fit, prevent uneven gathers, select the right fabric, and care for your finished project. By following these step-by-step instructions, even beginners can create a practical and reusable fabric hair cap at home.
As you gain experience, you can experiment with different fabrics, colors, sizes, and decorative details to create a design that suits your personal preferences. Remember that careful measuring, neat stitching, and comfortable elastic are essential for achieving a beautiful and functional result.
Have you tried making your own Fabric Hair Cap Pattern? Please leave your honest opinion in the comments and share any suggestions, tips, or creative ideas you would recommend to other sewing enthusiasts. Your feedback can inspire others to explore this enjoyable DIY project and discover new ways to personalize their handmade accessories.