
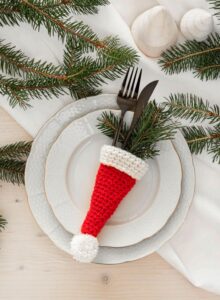
The Crochet Cutlery Holder Pattern in the Shape of a Santa Claus Hat is a charming Christmas craft that combines the warmth of handmade decorations with the practical purpose of organizing your holiday table.
One of the best things about making a crochet Santa Claus hat cutlery holder is that you can customize the size, texture, and decorative details to suit your table setting.
This tutorial explains how to create a Crochet Cutlery Holder Pattern in the Shape of a Santa Claus Hat step by step, including the materials, basic stitches, shaping techniques, assembly, and finishing touches. The instructions use standard US crochet terminology and are written as a practical pattern that you can adjust to your preferred cutlery size. Since yarn thickness, hook size, and individual tension affect the final dimensions, it is helpful to measure your utensils before completing the project. By following the directions carefully and checking your work as you go, you can create a coordinated collection of festive holders that looks attractive, feels sturdy, and brings handmade charm to your Christmas table.
Materials, Crochet Stitches, and Preparation for Your Santa Hat Cutlery Holder
To make this crochet cutlery holder pattern, gather medium-weight yarn in red and white, a crochet hook appropriate for your yarn, scissors, a yarn needle, and a measuring tape. Red yarn forms the main body of the Santa hat, while white yarn creates the traditional brim and optional pom-pom. You may also use a small amount of green, gold, or another contrasting color if you want to add decorative details. Choose yarn that is easy to wash and comfortable to handle, especially if you plan to use the holders during meals.
The most suitable yarn is generally a smooth, medium-weight cotton or cotton-blend yarn. Cotton provides a relatively firm fabric, helps the holder maintain its shape, and is often convenient for reusable table accessories. Acrylic yarn can also work well for decorative projects, although its care requirements and heat sensitivity differ from those of cotton. Avoid yarns that shed excessively or have long decorative fibers, because loose fibers can collect around cutlery and make the finished piece less practical.
For the hook, begin with the size recommended on your yarn label and adjust if necessary. Your stitches should be close enough together to create a stable fabric without leaving large gaps. If your work feels too loose, try a smaller hook; if the stitches are difficult to form, a slightly larger hook may help. A small practice swatch is useful because it allows you to evaluate the fabric before investing time in the complete Santa Claus hat crochet pattern.
Before starting, learn or review the basic stitches used throughout this project. The chain stitch (ch) creates the foundation and can also be used to establish the height of certain rows. The single crochet (sc) produces a compact fabric that is well suited to small holders. The slip stitch (sl st) is useful for joining rounds, attaching decorative pieces, and moving along an edge. The increase (inc) means working two single crochet stitches into the same stitch, while a decrease (dec) combines stitches to reduce the width of the fabric.
The following pattern uses a simple flat construction with a tapered red body, a white brim, and an optional pom-pom. The red section is shaped into a long, slightly pointed panel that can be folded into a pocket, making it possible to insert cutlery without creating a complicated three-dimensional structure. This approach is beginner-friendly and allows you to adjust the dimensions before joining the sides. The finished holder should be large enough to accommodate your chosen utensils while remaining compact enough to sit neatly on a dinner plate.
Before working the full piece, measure your cutlery and decide how much of each utensil should remain visible. A practical starting size is approximately 4 inches wide at the lower portion and 8 to 9 inches long before folding, although these measurements are only guidelines. You can make the holder longer for large serving utensils or smaller for a child’s place setting. Keep in mind that the white brim and folded pocket affect the usable space, so checking the dimensions against your actual utensils will produce the best results.
Step-by-Step Crochet Cutlery Holder Pattern in the Shape of a Santa Claus Hat
Begin with the red yarn and make a foundation chain of 22 stitches. This chain creates the lower width of the sample panel, although you can add or remove chains to match your preferred measurements. For Row 1, work one single crochet into the second chain from the hook and continue with one single crochet in each remaining chain. You should have 21 single crochet stitches. Chain one and turn your work, remembering that the turning chain does not count as a stitch in this pattern.
For Rows 2–6, work one single crochet into each stitch across the row, then chain one and turn. These rows establish a firm lower section that will eventually become part of the cutlery pocket. Count your stitches at the end of each row to ensure that the width remains consistent. If you accidentally skip a stitch or work two stitches into one space, the panel may become uneven, making the finished holder harder to fold neatly.
To create the tapered shape associated with a Santa hat, begin decreasing gradually. For Row 7, work one single crochet in each of the first nine stitches, make one single crochet decrease over the next two stitches, and continue with one single crochet in each remaining stitch until two stitches remain. Work a decrease over the final two stitches. This produces a narrower row while keeping the shaping relatively balanced. Chain one and turn.
For Rows 8–14, continue working single crochet across each row, decreasing once near the beginning and once near the end of every second row. On the rows without decreases, work one single crochet into every stitch. Because the stitch count will gradually become smaller, count your stitches after each decrease row. If you want a more pronounced Santa hat point, continue the shaping for additional rows. If you prefer a broad, gently sloping silhouette, stop decreasing earlier and work several straight rows before finishing the tip.
Once the red body reaches your preferred length and taper, fasten off the yarn, leaving a tail long enough to weave in securely. Lay the panel on a flat surface and check its shape. The lower section should be wide enough to accommodate the utensils, while the upper section should narrow toward a soft point. If the panel curls slightly, gently straighten it with your hands and follow the yarn manufacturer’s care instructions for blocking, if needed. Avoid stretching the stitches excessively, because this can change the dimensions of the holder.
Next, attach the white yarn along the lower edge of the red panel to create the Santa hat crochet brim. Join the yarn with a slip stitch, chain one, and work one single crochet into each stitch along the edge. At the end of the row, chain one and turn. Work a second row of single crochet to create a thicker-looking band. For a fluffy appearance, you can use a textured stitch or a soft white yarn, but keep the texture controlled so it does not interfere with inserting or removing the cutlery. Fasten off and weave in the ends.
Shaping, Assembly, and Finishing Your Christmas Cutlery Holder
After completing the red body and white brim, fold the lower portion of the panel upward to create a pocket. The exact fold depends on the finished length of your panel and the utensils you plan to hold. As a starting point, fold approximately the bottom third of the piece upward, leaving enough of the tapered red section visible to resemble a Santa hat. Place your cutlery inside temporarily to check the depth and width. Adjust the fold until the utensils fit comfortably without forcing the fabric out of shape.
Use red yarn and a yarn needle to sew the two side edges of the folded pocket together. Start at the lower corner and work upward toward the brim, keeping your stitches close to the edge but not so tight that the fabric puckers. A mattress stitch or a neat whip stitch can both work well. Secure the yarn at the end and weave the tail into the surrounding stitches. Leave the top opening of the pocket completely free so that the cutlery can slide in and out easily.
Check the pocket before adding decorative details. Insert a fork and spoon, or whichever utensils you plan to use, and confirm that the holder supports them securely. If the opening is too narrow, undo a small section of the side seam and resew it with a little more room. If the pocket is too loose, reinforce the sides with a few additional stitches. These small adjustments can make a noticeable difference when you are preparing several crochet Christmas cutlery holders for a holiday gathering.
To make the optional pom-pom, use white yarn and wrap it around two or three fingers approximately 20 to 30 times, depending on how full you want it to look. Carefully remove the loops without allowing them to unravel, then tie a separate length of yarn tightly around their center. Cut through the loops at both ends and trim the strands into a rounded shape. Attach the pom-pom securely to the tip of the red hat using the yarn tails. Alternatively, crochet a small white ball by working single crochet stitches in the round, increasing to form a small sphere, adding a little filling if desired, and decreasing to close the opening.
You can personalize the Santa hat cutlery holder pattern with simple embellishments, but it is best to keep the design practical. A narrow line of green embroidery can resemble holly leaves, while a few small stitches in gold yarn can add a subtle festive accent. If you choose to attach beads, buttons, or other small decorations, make sure they are firmly secured and appropriate for the intended setting. For households with young children, simple embroidered details are often a more practical choice than detachable embellishments.
When the holder is complete, weave in all loose ends and inspect the seams. Trim excess yarn only after confirming that the tails are securely hidden. If the finished piece needs blocking, use a method suitable for the fiber content and avoid excessive heat. Wash the holder according to the yarn care instructions before using it with clean cutlery, and allow it to dry completely. Store the holders flat or gently folded so that the pocket and tapered shape remain neat between holiday meals.
Customization Ideas, Care Instructions, and Frequently Asked Questions
One advantage of this Crochet Cutlery Holder Pattern in the Shape of a Santa Claus Hat is that it can be adapted to different decorating styles. Traditional red and white yarn creates the familiar Santa look, while cream and deep red produce a softer, vintage-inspired effect. You can also make a coordinated set with alternating colors, such as red hats with white brims and white hats with red brims. If you are preparing holders for a large dinner, using the same yarn and hook throughout the project will help maintain consistent sizing.
You can also adjust the construction to accommodate different utensils. For teaspoons or dessert forks, make a smaller foundation chain and reduce the length of the red panel. For larger forks and knives, increase the width and length while maintaining a similar tapered shape. Always test the pocket with the actual cutlery before finishing the side seams. A holder that fits the utensils comfortably will be easier to use and less likely to stretch during everyday handling.
Care is important because these accessories come into contact with items used for eating. Cotton yarn is often a convenient choice for washable holders, but the correct washing method depends on the specific yarn. Follow the manufacturer’s instructions, use a gentle cleaning method when appropriate, and make sure the pieces are completely dry before storing them. Avoid placing yarn holders directly against hot cookware or using them as heat-resistant pads, since ordinary crochet fabric is not designed to protect against high temperatures.
For gifting, you can bundle several holders together with matching handmade napkin ties or a simple fabric gift bag. Choose a number of holders that suits the recipient’s table setting and check that all pieces are approximately the same size. Handmade gifts are especially appealing when they combine a thoughtful appearance with a practical function. You might also include a small note explaining the recommended care instructions so the recipient can enjoy the accessories for future Christmas celebrations.
Frequently Asked Questions
1. Is this Santa Claus hat cutlery holder pattern suitable for beginners?
Yes. The basic version uses chain stitches, single crochet, decreases, and simple sewing. Beginners can practice these techniques on a small swatch before starting the full holder. Working slowly and counting stitches at the end of each row will help you achieve a more even shape.
2. What yarn is best for a crochet Santa hat cutlery holder?
Medium-weight cotton or cotton-blend yarn is a practical option because it generally creates a firm fabric and is suitable for many washable accessories. Red and white are the traditional colors, but you can choose other shades to coordinate with your Christmas decorations. Always check the yarn label for care instructions.
3. How much yarn do I need for one holder?
The amount depends on the yarn weight, hook size, finished dimensions, and decorative details. A small holder usually requires only a modest amount of red yarn and a smaller quantity of white yarn for the brim and pom-pom. If you are making a complete set, having extra yarn from the same dye lot can help maintain consistent color.
4. Can I make the holder without a pom-pom?
Absolutely. The pom-pom is optional and is included mainly to emphasize the appearance of a Santa hat. The holder will still look festive with a tapered red body and a white brim. Leaving off the pom-pom can also make the piece easier to store and keep the top of the hat flatter.
5. How do I make the crochet pocket fit my cutlery?
Measure the utensils before folding the red panel. Adjust the depth of the fold to provide enough support, then check the width of the opening. If the cutlery feels cramped, make the panel wider or reduce the amount of fabric folded upward. Testing the fit before sewing the sides permanently is the easiest way to avoid unnecessary adjustments.
6. Can I use this pattern for a Christmas dinner party?
Yes. These holders are suitable for decorative place settings at family meals, holiday parties, and seasonal gatherings. Make one for each guest and coordinate the yarn colors with your table linens. Before serving a meal, ensure that the holders are clean and dry and that the cutlery can be removed without difficulty.
7. Can I make the pattern in different sizes?
Yes. Increase or decrease the foundation chain to adjust the width, and add or remove rows to change the length. Keep the tapered shaping balanced on both sides so the finished piece resembles a Santa hat. Because yarn and tension affect the dimensions, measure the completed panel before folding it into a pocket.
8. How should I wash and store the finished holders?
Follow the care instructions for the yarn you selected. If the fiber permits washing, clean the holders gently and allow them to dry completely before putting them away. Store them flat or folded loosely in a clean, dry place. Avoid harsh washing methods that could distort the pocket, loosen the seams, or damage decorative details.
9. Can I sell holders made using this pattern?
You can consider selling handmade items you produce, but you should check any applicable pattern-use terms if you have used additional instructions or designs created by someone else. If you develop your own version from these general instructions, keep your product descriptions accurate and do not claim that the items are made from materials or methods you did not use. Also, describe the holders as decorative cutlery accessories rather than heat-resistant products.
10. How can I make a coordinated set look professional?
Use the same yarn weight, hook size, stitch tension, and approximate measurements for every holder. Check the pocket depth and seam placement before completing each piece. Weave in loose ends carefully, trim uneven fibers, and keep decorative details consistent. A little attention to finishing can make a handmade set look more polished and cohesive.
Conclusion
The Crochet Cutlery Holder Pattern in the Shape of a Santa Claus Hat offers a creative way to combine crochet skills with practical Christmas table decorations. In this tutorial, you learned how to choose suitable materials, create the tapered red hat body, crochet the white brim, fold and sew the pocket, and finish the project with an optional pom-pom. You also explored ways to customize the size, select appropriate yarn, care for the finished accessories, and prepare coordinated sets for holiday gatherings or handmade gifts.
The most important steps are to measure your cutlery, maintain consistent stitches, check the pocket before sewing it permanently, and secure all loose ends carefully.
With these details in mind, you can adapt the pattern to different table settings and create a collection that reflects your personal style. Try traditional Christmas colors or experiment with a different palette to make the design your own. If you make this project, please leave your honest opinion and share any suggestions for improving the pattern. Your feedback can help other crochet enthusiasts discover new ideas and make their own festive creations.