
The Crochet Angel Ornament Pattern for Christmas is a beautiful handmade project that brings warmth, elegance, and a personal touch to your holiday decorations.
One of the most appealing aspects of a Christmas crochet angel ornament is its versatility. You can make a small, lightweight angel for hanging on a Christmas tree or create a slightly larger version for a tabletop display.
This Crochet Angel Ornament Pattern for Christmas explains how to prepare your materials, crochet the angel’s body, shape the wings, create the head and halo, and assemble the finished ornament step by step. The instructions use standard US crochet terminology and include stitch counts to help you follow the pattern with confidence. The design is intended to be approachable for beginners who know the basic stitches, while more experienced crocheters can adapt the proportions and embellishments to suit their preferences. With careful stitching, secure assembly, and a little patience, you can create a graceful handmade angel that adds a special touch to your Christmas decorations year after year.
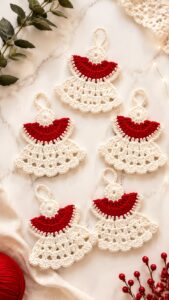
Materials, Crochet Stitches, and Preparation for Your Christmas Angel
To begin your crochet angel ornament pattern, gather lightweight or medium-weight yarn in white or ivory, a small amount of yarn in your preferred color for optional details, a suitable crochet hook, scissors, a yarn needle, and a stitch marker. You may also want a small amount of embroidery thread for the facial details and a short piece of gold-colored yarn for the halo. For a simple angel, these basic supplies are enough to create the body, wings, head, and hanging loop without needing complicated materials.
Choose a yarn that produces a neat fabric and is comfortable to work with. Cotton yarn is an excellent option for a decorative angel because it generally provides clear stitch definition and holds its shape well. Acrylic yarn is another suitable choice when you want a lightweight ornament with a softer feel. For a delicate appearance, consider a fine yarn and a smaller hook; for a more substantial ornament, use medium-weight yarn. Always check the yarn label and make a small sample if you are uncertain about the finished texture.
The basic stitches used in this Christmas angel crochet pattern include the chain stitch (ch), slip stitch (sl st), single crochet (sc), half double crochet (hdc), and double crochet (dc). A chain stitch creates the foundation for several pieces, while single crochet produces a compact fabric. Half double crochet and double crochet help create the wider, flowing shape of the angel’s dress and the decorative edges of the wings. A magic ring is useful for beginning the head in the round, although you can substitute a small chain loop if you prefer.
Before starting, become familiar with increases and decreases. An increase (inc) means working two stitches into the same stitch to widen the piece. A decrease (dec) combines two stitches into one, allowing you to shape a rounded head or narrow section. When working in the round, use a stitch marker to identify the beginning of each round. Counting your stitches regularly is especially helpful when making a small ornament because even a minor difference in stitch count can affect the proportions.
For the sample pattern, the angel consists of four main components: a flared dress, a rounded head, two matching wings, and a small halo. A hanging loop completes the design. The pieces are crocheted separately and then assembled with a yarn needle, which makes it easier to adjust their positions before securing them. The instructions provide a simple decorative design rather than a rigid template, so you can alter the dress length, wing shape, and head size to suit the look you want.
A finished angel made with lightweight yarn will often measure approximately 4 to 6 inches tall, depending on your yarn, hook, and tension. Before completing all the pieces, check the proportions by placing the head and wings against the dress. The head should sit comfortably above the neckline, and the wings should extend slightly beyond the upper body. If you want a larger angel, use thicker yarn and an appropriately sized hook, or add a few rounds to the dress. Keeping the materials consistent will help the finished ornament look balanced.
Step-by-Step Crochet Angel Ornament Pattern for Christmas
Start by crocheting the angel’s dress with white or ivory yarn. Make a magic ring, chain one, and work six single crochet stitches into the ring. Pull the ring closed and join with a slip stitch if you are working joined rounds. For Round 2, chain one and work two single crochet stitches into each stitch around. You will have 12 stitches. For Round 3, work one single crochet in the first stitch and two single crochet stitches in the next stitch, repeating this sequence around for a total of 18 stitches.
For Round 4, work one single crochet in each of the first two stitches, then two single crochet stitches in the next stitch. Repeat this sequence around to create 24 stitches. This gradual increase produces a small, rounded base for the dress. For Round 5, work one single crochet into each stitch without increasing, keeping the stitch count at 24. The base should lie reasonably flat. If it curls significantly, check your tension and confirm that the increases were distributed evenly.
To shape the dress, switch to double crochet. For Round 6, chain two and work one double crochet into each stitch around, joining with a slip stitch at the end if you are using joined rounds. Repeat this round for Rounds 7–9, or add more rounds if you prefer a longer dress. The double crochet stitches create a slightly more open texture and help the dress flare gently. If you want a denser ornament, you can use half double crochet instead, remembering that the finished dimensions may change.
For a decorative hem, work Round 10 with a repeating sequence of one single crochet, one half double crochet, and two double crochet stitches in the next stitch, adjusting the sequence to fit the stitch count evenly. If you prefer a simpler edge, work one single crochet in each stitch around. Fasten off, leaving a tail for sewing if needed. Lay the dress flat and check that the hem is reasonably symmetrical. This lower section becomes the main visual feature of your crochet Christmas angel ornament.
Next, create the head using the same yarn or a soft skin-tone shade. Make a magic ring and work six single crochet stitches into it. For Round 2, work two single crochet stitches in every stitch to make 12 stitches. For Round 3, repeat one single crochet followed by an increase around to make 18 stitches. Work Rounds 4–5 without increasing, keeping 18 stitches in each round. These rounds form the center of the head. If you want a softly rounded shape, work one additional round before beginning the decreases.
For Round 6, repeat one single crochet followed by a decrease around, reducing the stitch count to approximately 12. For Round 7, work decreases until the opening is small enough to close neatly. If you want a lightly padded head, add a tiny amount of fiber filling before closing the final opening. Fasten off and leave a long tail for attaching the head to the dress. Keep the filling minimal so the head remains proportionate to the small body. If you prefer a flat, unstuffed angel, you can make a small circular head and sew it directly to the neckline instead.
Creating the Wings, Halo, and Final Assembly
The wings give the crochet angel ornament pattern for Christmas its recognizable silhouette. To make the first wing, chain seven. Beginning in the second chain from the hook, work one single crochet in the next two chains, one half double crochet in the following two chains, and one double crochet in each of the remaining two chains. This creates a small tapered piece. Chain one, turn, and work a second row using the same general progression, adjusting the stitch placement to create a gently curved outer edge. Fasten off and weave in the ends.
Make the second wing in the same way, keeping the stitch counts and row lengths consistent. Place both wings side by side on a flat surface and compare their shapes before attaching them. If you want fuller wings, add one or two rows with half double crochet and double crochet stitches. You can also create a scalloped edge by working small groups of stitches along the outer edge. The wings should be decorative without becoming so large that they overwhelm the dress or make the ornament difficult to hang.
To create the halo, use gold or yellow yarn. Chain approximately 12 stitches, then join the chain into a ring with a slip stitch, making sure the loop is not twisted. Work a round of slip stitches around the chain if you want a thicker outline. Fasten off, leaving a tail for attaching the halo to the back of the head. If you prefer a simple design, a small ring made from yarn alone is sufficient. Avoid using sharp wire or exposed metal ends, particularly if the ornament will be handled by children.
Before sewing the components together, arrange the head, wings, and dress on a flat surface. Position the head at the top center of the dress, then place the wings behind the upper body so that they extend evenly on both sides. Attach the head first using the yarn tail and a yarn needle. Make several secure stitches around the neckline, checking that the head remains upright. Then sew the wings to the back of the body, ensuring that the seams are secure but do not distort the shape.
Add the halo behind the top of the head, positioning it so that the ring is visible above the angel’s head. Use small stitches to secure it in several places. If you want to embroider a face, use a small amount of embroidery thread to create two simple eyes and an optional tiny mouth. Keep facial details understated for a traditional decorative style. You may also add a small embroidered star or a few stitches in gold thread to the dress. Embroidery is often a practical alternative to small detachable decorations.
Finally, make a hanging loop by chaining 15 to 20 stitches, depending on the size of your ornament. Fasten off and attach both ends securely to the top or back of the angel. Test the loop gently before hanging the ornament on a Christmas tree. Weave in all loose yarn ends and trim any excess only after confirming that each end is secure. If the dress or wings need shaping, gently arrange them by hand. Follow the yarn manufacturer’s care instructions if you choose to block the finished piece.
Customization, Care Tips, and Frequently Asked Questions
One of the most enjoyable parts of making a Crochet Angel Ornament Pattern for Christmas is customizing the design to suit your holiday decorations. White and gold create a classic, elegant appearance, while cream and beige give the angel a warm, rustic look. Pale blue, lavender, and soft pink can create a delicate winter palette. If you are making several ornaments, consider using the same yarn and hook for each one while changing only the halo color or dress trim. This approach creates a coordinated collection without making every ornament identical.
Texture can also change the appearance of the angel. A smooth single crochet dress looks neat and simple, while a double crochet skirt creates a lighter, more open effect. For a lace-inspired design, you can add small chain spaces along the hem or wings. Work these decorative spaces carefully, since very large gaps may make the ornament less durable. If you want a fuller skirt, add extra increase rounds near the base rather than increasing randomly throughout the dress.
You can adapt the angel to different uses around the home. A small version works well on a Christmas tree, while a larger one can be placed on a decorative shelf or incorporated into a handmade holiday centerpiece. You might also attach a secure loop to use it as a gift topper. If you are creating ornaments for a group, keep the construction simple and repeatable so that each piece has a similar size and finish.
Careful finishing is essential for keeping handmade ornaments attractive. Weave in the yarn ends securely, check that the wings and halo are firmly attached, and remove any loose fibers. Store the ornament in a dry place away from excessive heat and moisture. If it becomes dusty, gently clean it according to the yarn care instructions. Avoid pulling on the wings or hanging loop when handling the piece, because small crochet components can stretch if they are repeatedly tugged.
Frequently Asked Questions
1. Is this crochet angel ornament pattern suitable for beginners?
Yes. The pattern is suitable for beginners who understand chain stitches, single crochet, half double crochet, double crochet, increases, and decreases. The components are small and worked separately, so you can practice one piece at a time. If you are new to crocheting in the round, practice making a magic ring and counting stitches before beginning the dress or head.
2. What yarn should I use for a Christmas crochet angel?
Lightweight cotton or acrylic yarn works well for many decorative angels. Cotton usually provides clear stitch definition, while acrylic can produce a softer finish. White, ivory, and cream are traditional choices, but you can select colors that match your tree decorations. Choose a yarn that is easy to work with and follow its care instructions.
3. How long does it take to crochet one angel ornament?
The time varies according to your experience, yarn choice, and the amount of decoration you add. A simple angel may take a few hours, while a more detailed version with textured wings, embroidered features, and a decorative dress may take longer. Beginners may need extra time to check stitch counts and assemble the pieces neatly.
4. Can I make the angel larger or smaller?
Yes. Use finer yarn and a smaller hook for a smaller ornament, or thicker yarn and a larger hook for a larger version. You can also add or remove rounds from the dress and adjust the size of the head and wings. Maintain similar proportions between the components so the finished angel looks balanced.
5. How do I keep the wings symmetrical?
Use the same foundation chain, stitch sequence, and number of rows for both wings. Compare the pieces before attaching them, and gently adjust their positions on the body. If one wing looks larger, check whether you accidentally added or missed a stitch. Consistent tension will also help both wings maintain a similar shape.
6. Can I crochet the angel without a magic ring?
Yes. If you find the magic ring difficult, chain two and work the required starting stitches into the second chain from the hook. This method creates a small center opening that may be slightly more visible. Pull the starting yarn tail tight and weave it in securely to reduce the opening.
7. What can I use instead of a crocheted halo?
You can make a simple halo with a small chain loop in gold or yellow yarn, or leave it off for a minimalist design. Embroidered gold stitches can also suggest a halo without adding another separate component. If the ornament will be handled frequently, a soft yarn halo avoids the need for rigid materials.
8. How do I attach the angel securely to a Christmas tree?
Make a hanging loop with a length of chain stitches and sew both ends firmly to the upper back of the ornament. Reinforce the attachment with several stitches, then test the loop gently before hanging it. Check the loop and seams periodically, particularly if the ornament is moved or stored frequently.
9. Is this crochet angel suitable as a handmade Christmas gift?
Yes. A crocheted angel is a thoughtful seasonal gift because it can be customized with colors, textures, and personal details. You can package it in a small gift box or fabric pouch to protect the wings and halo. Before gifting it, inspect all seams and ensure that the hanging loop is secure.
10. How should I store my crochet angel after Christmas?
Store the ornament in a clean, dry container away from direct sunlight, moisture, and excessive heat. Place it flat or surround it with soft tissue to help protect the wings and halo from bending. Avoid placing heavy decorations on top of it. Proper storage helps preserve the shape and appearance of the ornament for future holiday seasons.
Conclusion
The Crochet Angel Ornament Pattern for Christmas is a lovely way to bring handmade charm to your seasonal decorations while practicing useful crochet techniques. Throughout this tutorial, you learned how to prepare the materials, crochet a flared dress and rounded head, create matching wings, shape a halo, and assemble the individual components into a finished angel. You also discovered how yarn choice, stitch texture, color combinations, and small decorative details can transform the same basic pattern into many different designs.
The key to a successful result is to work carefully, count stitches regularly, keep the wings symmetrical, and secure every component before hanging the ornament. Whether you create one angel for your own Christmas tree or make a coordinated set for family and friends, this project offers a meaningful opportunity to enjoy the creative process and produce a decoration you can use for years to come. Feel free to experiment with different colors and dress lengths while maintaining the basic construction.
If you try this Christmas crochet angel ornament pattern, please share your honest opinion, experience, and suggestions for improvement. Your feedback can inspire other crochet enthusiasts, help beginners approach the pattern with confidence, and encourage new ideas for future handmade Christmas projects.