
The Christmas crochet hair clip pattern is a delightful way to bring handmade charm, creativity, and festive color to your holiday accessories.
One of the best things about a Christmas crochet hair clip pattern is its versatility. You can adapt the size, shape, texture, and color combination to suit different preferences, from traditional red and green decorations to elegant white, gold, and silver designs.
In this tutorial, you will learn how to prepare your materials, understand the crochet abbreviations, and follow a step-by-step pattern to create a festive hair clip. The instructions focus on a beginner-friendly Christmas bow with decorative details, but the same techniques can help you develop other seasonal designs. You will also discover how to attach the crochet piece securely, adjust its proportions, and finish the accessory neatly. By following this Christmas crochet hair clip pattern, you can create a handmade decoration that reflects your personal style while practicing useful crochet techniques. Always prioritize secure construction and age-appropriate materials when making accessories, particularly those intended for children.
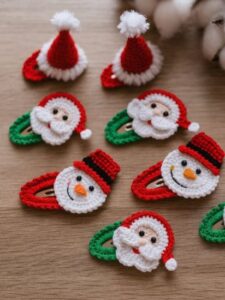
Materials, Crochet Abbreviations, and Preparation for Your Christmas Crochet Hair Clip Pattern
Before beginning your Christmas crochet hair clip pattern, gather the necessary materials and organize your workspace. You will need a small amount of lightweight yarn in festive colors, such as red, green, white, or gold. Cotton yarn is a practical option because it provides clear stitch definition and helps small decorative shapes retain their appearance. You can also use another suitable yarn if you prefer a softer texture. Choose a crochet hook that works well with your yarn and produces a firm fabric without making the stitches difficult to work.
You will also need a plain metal or fabric-covered hair clip, a yarn needle, scissors, and a measuring tape or ruler. A small amount of matching sewing thread can help attach the crocheted decoration to its base. If you plan to create a bow, a contrasting color for the center wrap can add visual interest. Keep your materials within reach before starting, and make sure your scissors and other sharp tools are handled carefully. For children’s accessories, avoid loose decorative components that could detach and create a choking hazard.
This Christmas crochet hair clip pattern uses basic stitches that many beginners can learn with practice. The instructions use standard US crochet terminology, so it is helpful to become familiar with the abbreviations before beginning. The abbreviation ch means chain, sl st means slip stitch, sc means single crochet, hdc means half double crochet, and dc means double crochet. The abbreviation st means stitch, while sts refers to multiple stitches. These terms appear in many crochet patterns, making them useful to remember for future projects.
Start by choosing the finished size you want for your hair accessory. A small bow measuring approximately 2 to 3 inches wide is a convenient starting point for a standard decorative clip. The exact dimensions will depend on your yarn, hook, and tension. If you prefer a larger statement accessory, you can increase the number of stitches and rows. For a delicate design, use thinner yarn and a smaller hook. Keep in mind that the crochet piece should remain lightweight enough to sit comfortably on the clip without making it difficult to secure in the hair.
Before working on the final bow, make a short practice chain and crochet a few single crochet stitches. This will help you check your tension and become comfortable holding the yarn and hook. If the fabric looks too loose, try a smaller hook; if the stitches feel excessively tight, consider a larger hook. Consistent tension helps the finished bow maintain a balanced shape. It is also helpful to count your stitches at the end of each row, especially when creating a symmetrical accessory.
Finally, select a simple design that matches your available time and skill level. A classic red bow with a green center wrap creates a recognizable Christmas look, while a white bow with a gold accent offers a more understated appearance. You can also combine two colors in the main bow or add a small crocheted holly leaf as a decorative feature. Planning the colors before starting makes the process easier and helps ensure that your finished Christmas crochet hair clip pattern has a coordinated, polished appearance.
Step-by-Step Instructions for Making the Christmas Crochet Hair Clip Pattern
To begin the main bow, choose your primary yarn color and make a slip knot. Create a foundation chain of 21 stitches. This chain forms the starting edge of a small rectangular bow. If you prefer a wider bow, you can increase the foundation chain by a few stitches, keeping the number consistent throughout the project. The foundation chain should be firm enough to support the shape without pulling tightly. Take a moment to count the chains before proceeding, as an accurate starting point helps produce a neat rectangle.
For the first row, work one single crochet stitch into the second chain from the hook. Continue making one single crochet in each remaining chain until you reach the end of the row. You should have 20 single crochet stitches. Chain one and turn your work. This turning chain does not count as a stitch in the instructions that follow. Keeping the turning-chain convention consistent helps prevent the edges from becoming uneven as the rectangle grows.
For rows two through eight, work one single crochet into each stitch across the row. At the end of each row, chain one and turn. Count the stitches regularly to ensure that every row contains 20 single crochet stitches. If you would like a taller bow, add one or two rows. If you prefer a smaller bow, reduce the number of rows while maintaining a rectangular shape. This simple construction makes the Christmas crochet hair clip pattern accessible to beginners while providing a useful foundation for more elaborate designs.
When the rectangle is complete, fasten off the yarn, leaving a tail long enough for sewing. Pull the tail through the final loop and gently tighten it. Use a yarn needle to weave in any loose starting or ending tails, taking care not to distort the fabric. Place the rectangle on a flat surface and gently adjust its corners so the edges appear straight. If necessary, lightly smooth the fabric with your fingers. Avoid aggressive stretching, which could make the bow lose its shape over time.
Next, create the center wrap that gives the bow its recognizable appearance. With a contrasting yarn color, make a chain of seven stitches. Work one single crochet into the second chain from the hook and continue across the row, creating six single crochet stitches. Chain one, turn, and work one single crochet in each stitch across. Repeat until you have approximately four rows, then fasten off with a sewing tail. The finished strip should be narrow enough to wrap around the middle of the bow without covering too much of the main rectangle.
To assemble the bow, pinch the center of the rectangle together so the fabric forms two balanced loops. Wrap the narrow strip around the pinched middle, keeping the join at the back. Use the remaining yarn tail and a yarn needle to sew the strip securely in place. Adjust the loops until they appear even, and check that the center wrap is snug without gathering the fabric excessively. At this stage, your basic bow is complete. You can leave it simple or prepare an additional small decoration before attaching it to the hair clip.
Finishing, Attaching the Decoration, and Customizing Your Christmas Crochet Hair Clip Pattern
The finishing process helps transform a simple crocheted bow into a wearable accessory. Before attaching the bow, inspect the front and back for loose yarn ends, uneven stitches, or areas that need additional securing. Gently shape the loops with your fingers so they appear balanced. If one side is noticeably larger, reposition the center wrap and make small adjustments. Taking time with these details can significantly improve the final appearance of your Christmas crochet hair clip pattern without requiring advanced crochet skills.
To prepare the hair clip, choose a clean clip with a smooth surface and an opening mechanism that works properly. Position the crocheted bow on the outer surface of the clip, checking where it will sit when worn. The bow should not obstruct the opening or closing mechanism. It should also remain clear of the part that grips the hair. Once you are satisfied with the placement, mark the approximate center using a removable sewing pin or another safe method appropriate to the clip material.
For a sewn attachment, use matching thread and a needle suitable for the clip and crochet fabric. Carefully stitch through stable sections of the bow and around a suitable part of the clip, where the construction permits. Keep the stitches snug and distribute them across the center rather than relying on a single attachment point. Avoid piercing a spring mechanism or any area that could interfere with the clip’s movement. If the clip has a design that cannot be sewn safely, choose a compatible attachment method recommended for that particular accessory instead.
After attaching the bow, open and close the clip several times to make sure the decoration does not interfere with its operation. Gently tug the bow from different directions to check that it stays in place. If it shifts, reinforce the attachment before wearing it. For accessories intended for young children, use particular caution: small crocheted parts, beads, buttons, bells, and other detachable decorations may pose choking risks. A simple stitched bow without loose embellishments is generally a more suitable design choice, although every finished accessory still needs careful inspection and age-appropriate supervision.
You can personalize the Christmas crochet hair clip pattern by changing the colors or adding a simple crocheted leaf. To make a basic leaf, chain six stitches using green yarn. Starting in the second chain from the hook, work one slip stitch, one single crochet, one half double crochet, and one double crochet into successive chains. In the final chain, work several stitches into the same space to create a rounded tip, then work back along the opposite side of the foundation chain with corresponding stitches to form the other half of the leaf. Adjust the placement of the stitches to create a balanced outline, and fasten off when the leaf looks even.
For a classic Christmas style, use a red bow with a green center wrap and one small green leaf on either side. For a snowy winter theme, choose white or pale blue yarn and keep the decoration minimal. Gold or silver yarn can add a festive accent, but it is best used sparingly if the yarn feels stiff or scratchy. You can also create a coordinated pair of smaller bows or make several clips in different colors. Keep the decorations lightweight, ensure all parts are securely attached, and select a design that suits the intended wearer and occasion.
Troubleshooting, Care Tips, and Creative Ideas for Your Christmas Crochet Hair Clip Pattern
One common challenge when following a Christmas crochet hair clip pattern is creating a bow that looks uneven. This usually happens when the rectangle has inconsistent stitch counts, the tension changes between rows, or the center wrap is positioned off-center. To prevent this problem, count your stitches after every row and compare the two loops before sewing the center strip permanently. Small adjustments can often correct the shape without requiring you to unravel the entire project. If the rectangle is significantly wider on one side, it may be easier to redo the affected rows.
Another common issue is a bow that feels too floppy. This can happen when the yarn is very soft, the stitches are loose, or the rectangle is too large for the chosen clip. Try using a slightly smaller hook to produce firmer stitches, or choose a yarn with more structure. You can also reduce the number of rows to create a more compact bow. Avoid making the fabric excessively stiff, however, because the accessory should remain comfortable and flexible enough for ordinary use.
If your bow curls at the edges, check whether your tension is too tight or whether the turning chains are being handled consistently. Blocking may help certain yarns, but not every fiber responds well to moisture or heat. Follow the care recommendations for the yarn you selected, and test any shaping method on a small sample first. For a small accessory, gently smoothing the fabric and adjusting the center wrap may be sufficient. Avoid using high heat on synthetic yarn, which can melt or become damaged.
If the clip does not hold the bow securely, inspect both the attachment and the clip itself. A decorative piece that is too heavy can pull the clip out of position, while loose stitches may allow the bow to slide. Reinforce the attachment using an appropriate sewing method and reduce unnecessary embellishments. Make sure that the attachment does not obstruct the clip’s gripping surfaces or moving parts. If the clip is damaged or cannot close properly, replace it rather than attempting to compensate with extra stitching.
Careful storage helps maintain the appearance of your finished accessory. Keep the clip in a dry place away from excessive heat, direct sunlight, and objects that could crush the crochet loops. When the bow becomes dusty, gently remove surface debris with a soft brush. If the yarn is washable, follow its care instructions and avoid soaking the metal clip unless it is suitable for water exposure. Allow any cleaned fabric to dry completely before storing it. Proper care can help preserve the color, texture, and shape of your handmade accessory.
Once you have mastered this Christmas crochet hair clip pattern, you can experiment with new shapes and techniques. Try making miniature stars, simple holly leaves, tiny Christmas trees, or small crocheted ornaments that fit the dimensions of your chosen clip. You can also create a coordinated collection of accessories using the same yarn colors and finishing method. Keep a note of the hook size, stitch counts, and number of rows used for each successful design. Recording these details makes it easier to reproduce a favorite accessory or adjust the pattern for future handmade gifts.
Frequently Asked Questions About the Christmas Crochet Hair Clip Pattern
1. Is the Christmas crochet hair clip pattern suitable for beginners?
Yes. The basic bow uses a foundation chain, single crochet stitches, turning chains, and simple sewing techniques. These are accessible skills for someone who has learned the basics of crochet. Beginners should take their time counting stitches and assembling the bow. Starting with a single-color design can make the process easier, and decorative details can be added after the basic shape is complete.
2. How much yarn do I need to make one crochet hair clip?
A small bow usually requires only a small amount of yarn, often just a few grams depending on the yarn weight, hook size, and finished dimensions. The center wrap and any leaves will require additional yarn, but the overall amount remains modest. If you are making several clips, prepare a little extra yarn to account for differences in tension and any practice pieces.
3. Which yarn is best for a Christmas crochet hair clip pattern?
Lightweight cotton yarn is a useful choice because it provides defined stitches and a relatively structured finish. Other suitable yarns can also work, depending on the appearance and texture you want. Choose a yarn that is comfortable, durable, and appropriate for the intended wearer. Avoid yarns that shed excessively or produce loose fibers that could become tangled in the hair.
4. Can I make this crochet hair clip in different sizes?
Yes. You can change the foundation-chain length to make the bow wider or shorter, and you can add or remove rows to adjust its height. The center wrap should be resized to fit the new dimensions. Keep the finished piece proportionate to the clip so that it remains secure and does not interfere with the clip’s function.
5. How do I attach the crocheted bow to a hair clip?
A sewn attachment is often a practical option when the clip design allows it. Position the bow carefully, then stitch it securely to a stable part of the clip without obstructing the spring or gripping surfaces. Inspect the finished attachment and test the clip before use. If sewing is unsuitable for the particular clip, select an attachment method compatible with its materials and construction.
6. Can I make this pattern without a contrasting center color?
Absolutely. You can use the same yarn for the bow and center wrap to create a coordinated, understated design. A contrasting color makes the center more noticeable, but it is not necessary for the bow to look attractive. Red, green, cream, white, and gold can all work well for seasonal accessories.
7. How can I make my crochet bow look symmetrical?
Count your stitches carefully, maintain consistent tension, and use the same number of rows throughout the rectangular section. When assembling the bow, fold or pinch the rectangle at its midpoint and adjust both loops before securing the center wrap. If necessary, compare the loop sizes on a flat surface and reposition the fabric until the shape looks balanced.
8. Is this Christmas crochet hair clip pattern suitable for children?
The design can be adapted for older children, but safety depends on the finished construction and the intended wearer’s age. Small parts, detachable decorations, sharp clip edges, and loose yarn can present hazards. Avoid beads, buttons, bells, and other small embellishments on accessories intended for young children. Check the attachment regularly, supervise use where appropriate, and do not leave clips within reach of children who may put them in their mouths.
9. How should I clean and store a handmade crochet hair clip?
Follow the yarn manufacturer’s care instructions and consider the material of the hair clip. If the crochet portion can be cleaned, use a gentle method that will not damage the yarn or metal components. Dry the accessory completely before storage. Keep it in a clean, dry location where the bow will not be crushed or exposed to excessive heat.
10. Can I sell hair clips made with this pattern?
You can consider selling finished handmade accessories, provided that you comply with applicable laws, product-safety requirements, and any terms associated with the particular pattern or materials you use. Keep descriptions accurate, represent the materials honestly, and avoid promising that an accessory is suitable for every age group. If you develop your own variations, maintain clear records of your construction methods and quality checks.
Conclusion: Create Your Own Festive Christmas Crochet Hair Clip Pattern
The Christmas crochet hair clip pattern is a simple and enjoyable project that combines basic crochet techniques with the creativity of seasonal handmade accessories. In this tutorial, you learned how to prepare your materials, understand the essential crochet abbreviations, make a rectangular bow, create a contrasting center wrap, and attach the finished decoration to a suitable hair clip. You also explored ways to customize the design with festive colors and small crocheted leaves, troubleshoot common construction problems, and care for the completed accessory.
By practicing consistent stitches and paying attention to the finishing details, you can create attractive Christmas hair clips that reflect your personal style. Experiment with different yarn colors, adjust the proportions, and develop variations that suit your preferences while keeping each accessory lightweight and securely assembled. Remember that careful construction and appropriate safety checks are important parts of every handmade project.
If you try this Christmas crochet hair clip pattern, please share your honest opinion about the instructions and your finished results. Your feedback can help other crafters understand which techniques worked well and which steps might need clarification. You are also welcome to leave suggestions for future Christmas crochet patterns, color combinations, or festive accessories you would like to make. Every thoughtful suggestion helps inspire new ideas and makes the crafting experience more enjoyable for everyone.