
The Crochet Spiral Elf Pattern for Christmas is a charming project for anyone who loves handmade holiday decorations, whimsical amigurumi figures, and creative crochet gifts.
One of the most appealing features of a Crochet Spiral Elf Pattern for Christmas is the way simple stitches can create a character with plenty of personality.
In this tutorial, you will learn how to prepare your materials, understand the crochet abbreviations, and follow a detailed sequence of stitches to create a spiral Christmas elf. The pattern includes instructions for the body, head, pointed hat, arms, and decorative finishing touches. You will also discover how to maintain even tension, shape the spiral effect, and assemble the pieces into a balanced figure. The instructions use standard US crochet terminology and are designed as an approachable, customizable project. By following this Crochet Spiral Elf Pattern for Christmas, you can develop useful amigurumi skills while creating a festive handmade character suitable for seasonal decorating and thoughtful gift-giving.
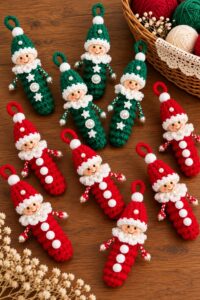
Materials, Crochet Abbreviations, and Preparing Your Christmas Elf
Before starting your Crochet Spiral Elf Pattern for Christmas, gather all the materials you need so you can work comfortably without interrupting your progress. Choose a main yarn color for the body, another for the clothing, and a contrasting shade for the hat. Red and green are classic options, but blue, cream, burgundy, and gold can also create a beautiful holiday palette. Lightweight or medium-weight yarn can work, depending on the size you want. A crochet hook slightly smaller than the yarn label recommends often helps create the firm fabric needed for amigurumi.
You will also need a yarn needle, stitch marker, scissors, and a small amount of suitable stuffing. Polyester fiberfill is commonly used to give crochet figures their shape. Keep the stuffing distributed evenly so the body and head look smooth rather than lumpy. If you want your elf to have a face, you can use securely embroidered eyes and a small stitched smile. Embroidery is particularly useful when making decorations for young children because small plastic eyes and other detachable parts can pose choking hazards. Always consider the intended use of the finished figure.
Understanding the abbreviations will make the Crochet Spiral Elf Pattern for Christmas easier to follow. In standard US terminology, ch means chain, sc means single crochet, sl st means slip stitch, inc means increase, and dec means decrease. An increase usually means working two single crochet stitches into the same stitch, while a decrease combines two stitches into one. The abbreviation MR means magic ring, which creates a closed starting circle. The term st means stitch, and BLO means back loop only. These basic techniques are frequently used in amigurumi patterns.
The spiral effect is created by crocheting continuously around the piece instead of joining every round with a slip stitch. This produces a smooth surface without a visible seam running up the body or hat. Place a stitch marker in the first stitch of each round, moving it upward as you progress. Since continuous rounds do not end with a joining stitch, it is easy to lose track of where one round finishes. Counting your stitches regularly will help keep the body symmetrical and make it easier to follow the shaping instructions.
Before beginning the full project, practice making a magic ring and a few single crochet stitches. The magic ring allows you to close the center tightly, preventing a noticeable hole at the top of the head or bottom of the body. If you find the technique difficult, you can use a short chain joined into a ring as an alternative starting method, although the center may be less adjustable. Practice increasing and decreasing stitches as well, since these techniques help create the rounded head, tapered neck, and shaped body of your Christmas elf.
Finally, decide how you want your finished elf to look. A traditional design might include a green body, red jacket, cream face, and a long red hat with a curled tip. Another option is to create a striped hat by alternating red and white yarn. Prepare a simple color plan before you start, and keep your yarn changes consistent. With your materials organized and your stitch abbreviations understood, you are ready to begin creating your Crochet Spiral Elf Pattern for Christmas.
Step-by-Step Crochet Spiral Elf Pattern for Christmas
Begin with the elf’s body using your chosen clothing color. Make a magic ring and work six single crochet stitches into the ring. Pull the yarn tail to close the center. Place your stitch marker in the first stitch to identify the beginning of the round. In Round 2, work two single crochet stitches into each stitch around, giving you 12 stitches. In Round 3, repeat the sequence of one single crochet followed by an increase six times, resulting in 18 stitches. These early increases create a rounded base for the body.
For Round 4, work two single crochet stitches followed by an increase, repeating the sequence around to reach 24 stitches. In Round 5, work one single crochet into each stitch around, maintaining the total of 24 stitches. For Round 6, repeat three single crochet stitches followed by an increase six times, resulting in 30 stitches. These increases gradually widen the lower body. If you want a slightly slimmer elf, you can stop increasing at 24 stitches instead, but keep the stitch count consistent with the following rounds.
Continue the body by working one single crochet into each stitch for Rounds 7 through 12, keeping the total at 30 stitches per round. This section forms the main torso. If you would like a striped outfit, change colors at the beginning of selected rounds, carrying the unused yarn carefully or fastening it off when appropriate. To change colors neatly, begin the final stitch of the previous color and complete its final yarn-over with the new color. Keep the yarn ends secure and avoid leaving loose loops inside the figure. This section gives your Crochet Spiral Elf Pattern for Christmas its recognizable clothing.
To shape the upper body, begin decreasing gradually. In the next round, work three single crochet stitches followed by an invisible decrease, repeating the sequence around to reduce the stitch count from 30 to 24. In the following round, work two single crochet stitches followed by an invisible decrease around, reducing the count from 24 to 18. Stuff the body lightly before the opening becomes too small. Add small amounts of fiberfill at a time, using the blunt end of your hook or a stuffing tool to distribute it evenly. The body should feel firm enough to hold its shape without stretching the stitches.
For the head, continue working with the skin-tone yarn. Work one single crochet into each of the 18 stitches for one round. Then increase evenly in the following rounds: work two single crochet stitches followed by an increase around to reach 24 stitches, then work three single crochet stitches followed by an increase around to reach 30 stitches. Continue increasing in the same gradual manner if you want a larger head, or maintain 30 stitches for a compact figure. Work several rounds evenly without increasing to create the rounded head shape. The exact number of rounds can be adjusted to suit your preferred proportions.
Shape the top of the head by reversing the increases. Work three single crochet stitches followed by a decrease around, then work two single crochet stitches followed by a decrease around. Add stuffing before the opening becomes too small, making sure the head remains rounded. Continue decreasing evenly until only a small opening remains, then fasten off and close the gap with a yarn needle. If you prefer a more seamless neck, you can sew the head to the body rather than making the pieces as one continuous shape. Check the proportions before sewing, ensuring that the head sits securely and straight.
Making the Spiral Hat, Arms, and Decorative Elf Details
The spiral hat is the most distinctive part of the Crochet Spiral Elf Pattern for Christmas. Start with the hat color and make a magic ring containing four single crochet stitches. Work continuously in rounds, placing your stitch marker in the first stitch. In the next round, increase in each stitch to create eight stitches. For the following round, work one single crochet into each stitch. Then repeat one single crochet followed by an increase around to reach 12 stitches. These early rounds establish a narrow point that can gradually widen into the hat’s main section.
Continue the hat by increasing at regular intervals. Work two single crochet stitches followed by an increase around to reach 16 stitches, then work one round without increasing. In the next increase round, work three single crochet stitches followed by an increase around to reach 20 stitches. Continue with one plain round, then increase again if necessary to match the size of the elf’s head. Keep the stitch count consistent with the number of stitches you actually have, and avoid increasing too quickly. The goal is to create a tapered cone rather than a flat circle.
To produce the spiral appearance, gently bend the growing hat as you work and introduce small, controlled variations in the increase placement. You can also alternate two colors every few rounds to create a striped spiral effect. For a curled tip, work a few additional stitches on one side of the narrow upper section, or make a separate small chain that is crocheted back into with increases to form a curved extension. The exact curl depends on yarn, tension, and stitch placement, so try a small sample if you want a dramatic twist. Shape the hat with your fingers before attaching it to the head.
To create each arm, begin with the skin-tone yarn. Make a magic ring and work six single crochet stitches into it. Continue for one or two rounds, then change to the clothing color. Work several rounds of single crochet to create a narrow sleeve. You can lightly stuff the hand portion if you want a rounded shape, but keep the sleeve flexible so it can be sewn comfortably to the body. Fasten off, leaving a long tail for sewing. Repeat the same process for the second arm, making sure both pieces have similar lengths and thicknesses.
For the elf’s feet, use a darker color such as brown, black, or deep green. Make a magic ring with six single crochet stitches and increase to 12 stitches in the next round. Work one or two rounds evenly, then begin reducing the stitch count if you want a rounded toe. Make two matching feet and add a small amount of stuffing if needed. Sew them to the lower front of the body, positioning them evenly so the elf can sit or stand against a support. If the figure is intended as a tabletop decoration, keep the base broad and balanced enough to support the head and hat.
Finish the face using embroidery thread or fine yarn. Add two small eyes, a short smile, and optional rosy cheeks using a few carefully placed stitches. Attach the hat to the head with a yarn needle, sewing around the lower edge so it stays in place. Sew the arms to the sides of the body and position the feet at the front. You can add a tiny belt, a small collar, or a crocheted pom-pom if desired. Keep decorative parts lightweight and securely attached. At this stage, your Crochet Spiral Elf Pattern for Christmas should look like a complete festive character with a distinct outfit and playful spiral hat.
Finishing, Troubleshooting, Care, and Creative Ways to Customize Your Christmas Elf
Once all the parts are assembled, inspect your elf carefully. Look for loose yarn tails, gaps between sewn pieces, uneven stuffing, or stitches that have stretched. Use a yarn needle to weave in any remaining ends and reinforce the areas where the head, arms, and feet join the body. The seams should be secure but not so tight that they distort the shape. If the head leans to one side, adjust the stitching and add a little support inside the neck area before closing the seam completely.
A common challenge in the Crochet Spiral Elf Pattern for Christmas is losing track of stitches while working in continuous rounds. The stitch marker is your best tool for preventing this problem. Move it after completing the first stitch of each new round, and count the stitches whenever the shaping changes. If the body begins to twist or flare unexpectedly, check whether an increase or decrease was accidentally skipped. Correcting the mistake early is usually easier than trying to reshape the entire piece at the end.
Another issue is uneven stuffing. Too much stuffing can stretch the stitches and make the fabric look lumpy, while too little can leave the body floppy. Add small amounts of fiberfill gradually, smoothing the surface with your fingers as you work. Pay special attention to the neck, where the head and body meet. A small amount of additional stuffing in this area can help the head sit upright, but avoid packing it so tightly that the stitches become distorted. The finished figure should feel firm while remaining soft.
If your spiral hat does not hold its shape, experiment with your tension and the placement of increases. A smaller hook may create a firmer fabric, while a larger hook can make the hat softer and more flexible. You can gently curve the finished hat with your fingers and sew the tip in place if necessary. Avoid applying excessive heat, especially when working with synthetic yarn. If you want a more dramatic spiral, try alternating colors or making a longer tapered section before widening the hat.
There are many ways to personalize your Crochet Spiral Elf Pattern for Christmas. You can make a girl elf with a small crocheted skirt, a boy elf with a belt and pointed shoes, or a woodland-inspired character in earthy colors. A tiny scarf, embroidered snowflakes, or a contrasting collar can add character without requiring complicated techniques. You might also make a matching set of elves in different colors for a holiday display. When creating variations, record the yarn type, hook size, stitch counts, and number of rounds so you can reproduce your favorite designs.
To care for your finished elf, follow the yarn manufacturer’s cleaning recommendations. Many small crochet decorations can be spot-cleaned gently with a damp cloth, but the best method depends on the fiber and stuffing. Avoid soaking any parts that contain materials that may rust or become damaged by moisture. Let the figure dry completely before storing it. Keep it away from direct heat, and place it in a box or fabric bag where the hat will not become crushed. Before displaying it each Christmas season, inspect the seams and embroidered details and repair any loose areas.
Frequently Asked Questions About the Crochet Spiral Elf Pattern for Christmas
1. Is the Crochet Spiral Elf Pattern for Christmas suitable for beginners?
Yes, this pattern can be a good project for beginners who already know how to make single crochet stitches, increases, and decreases. The most challenging parts are maintaining stitch counts in continuous rounds and assembling the small pieces neatly. Beginners can simplify the design by using one color for the body, choosing a short hat, and keeping facial features minimal. Working slowly and checking each round makes the project easier to manage.
2. What type of yarn works best for a crochet Christmas elf?
Cotton and acrylic yarn are both useful options. Cotton provides clear stitch definition and can help small details look neat, while acrylic is often soft, lightweight, and available in many festive colors. Choose a yarn that works comfortably with your hook and produces a firm fabric. For amigurumi, avoid a loose stitch structure that allows stuffing to show through the fabric.
3. How do I create the spiral effect on the elf’s hat?
The spiral effect can be created by shaping a tapered hat with carefully placed increases and gently curving the finished piece. Alternating colors can make the spiral more visible. You can also crochet a narrow curved extension at the tip for a more playful shape. Since yarn tension affects the final appearance, adjust the number of rounds and increase placement to achieve the curl you prefer.
4. How much yarn is needed for one Christmas crochet elf?
A small elf generally requires modest amounts of yarn in several colors, although the exact quantity depends on the figure’s dimensions, yarn weight, and hat design. Prepare enough yarn for the body, head, hat, arms, and feet, along with a little extra for sewing and finishing. If you are making several elves, record the amount used for the first one to help estimate the supplies needed for the rest.
5. Can I make the elf larger or smaller?
Yes. To make a larger elf, use thicker yarn with a suitable hook or increase the number of stitches and rounds. To make a smaller figure, choose finer yarn and a smaller hook. If you change the yarn weight, make sure the hook creates a firm fabric. Keep the head, body, arms, and hat in proportion so the finished character looks balanced.
6. Why does my amigurumi elf have visible holes?
Visible holes usually result from loose tension, an oversized hook, or uneven stuffing pressure. Try using a smaller hook and keep your stitches consistent. Add stuffing gradually rather than pushing a large amount into one area. If the holes remain noticeable, consider choosing a denser yarn or adjusting your stitch technique.
7. How can I make my crochet elf stand upright?
A stable base, balanced stuffing, and secure assembly all help the elf stand or sit properly. Keep the lower body firm and position the feet evenly. If the figure has a long or heavy hat, its weight may pull the head backward, so adjust the stuffing and hat angle. You can also display the elf against a stable decorative support if the design is intended primarily as an ornament.
8. Is the crochet Christmas elf suitable for young children?
A crocheted elf can be a decorative item, but safety depends on its size, construction, and intended use. Plastic eyes, buttons, bells, small accessories, and loose yarn may create hazards for young children. Embroidered facial features and securely sewn parts can reduce some risks, but they do not automatically make a toy suitable for every age. Follow applicable toy-safety guidance and supervise children appropriately.
9. Can I use the pattern to make Christmas gifts?
Yes. Handmade elves can make thoughtful gifts for friends, family members, teachers, or people who enjoy seasonal decorations. You can personalize each figure with different colors, facial expressions, or small clothing details. Before gifting the elf, check that all parts are secure and include appropriate care information if the recipient may want to clean or store it.
10. How do I keep the spiral hat from becoming floppy?
Use a hook that creates a sufficiently firm fabric, maintain even tension, and avoid excessive stuffing or stretching. If the hat is especially long, you can add a small amount of support through careful shaping and stitching. Blocking may help some yarns, but always check the fiber’s care instructions first. For a simple decorative figure, gently shaping the hat and sewing the tip into position may be enough.
Conclusion: Enjoy Creating Your Crochet Spiral Elf Pattern for Christmas
The Crochet Spiral Elf Pattern for Christmas offers a fun way to practice amigurumi while making a festive handmade decoration. Throughout this tutorial, you learned how to prepare your materials, understand essential crochet abbreviations, shape the body and head, create a distinctive spiral hat, and assemble the arms and feet. You also explored finishing techniques, common troubleshooting tips, care recommendations, and creative ways to personalize your elf with seasonal colors and decorative details.
With patience, consistent stitches, and careful assembly, you can create a charming Christmas elf that reflects your own creativity. Try different color combinations, experiment with the hat’s shape, and make a collection of characters to display during the holiday season or give as thoughtful handmade gifts. Remember that counting stitches, distributing stuffing evenly, and securing every component are important steps toward achieving a neat and durable result.
If you make this Crochet Spiral Elf Pattern for Christmas, please share your honest opinion about the instructions and tell us how your project turned out. Your suggestions can help other crocheters improve their techniques and discover new ideas. Feel free to recommend colors, variations, or other Christmas crochet patterns you would like to see in future tutorials. Your feedback and creativity are always welcome!