
The Fabric Bow Ornament Pattern is a charming and versatile sewing project that transforms simple fabric scraps into beautiful handmade decorations.
One of the most appealing features of a Fabric Bow Ornament Pattern is its flexibility. You can use cotton fabric, linen, plaid material, floral prints, seasonal designs, or leftover pieces from previous sewing projects.
This Fabric Bow Ornament Pattern is suitable for beginners who want to practice basic sewing techniques while making something useful and decorative. The project does not require complicated equipment, and many of the steps can be completed by hand if you do not have a sewing machine. The key is to measure accurately, sew neat seams, turn the fabric carefully, and arrange the finished pieces into a balanced bow shape. By following the instructions below, you will learn how to create a fabric ornament with a polished appearance while avoiding common mistakes that can affect its shape, durability, and overall finish.
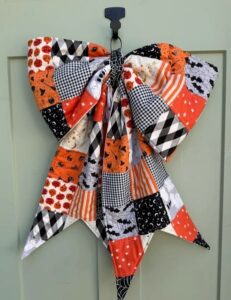
Materials and Preparation for a Fabric Bow Ornament Pattern
Before beginning your Fabric Bow Ornament Pattern, gather all the materials you need in one place. Preparation makes the sewing process more enjoyable and helps you avoid interruptions once you start assembling the bow. You will need woven fabric, matching thread, scissors or a rotary cutter, a ruler, sewing pins or clips, a sewing needle or sewing machine, and an iron. Optional supplies include ribbon, decorative buttons, embroidery thread, fabric glue suitable for your material, and a small hanging loop. Choose supplies that complement one another so the finished ornament looks intentional and well coordinated.
Selecting the right fabric is an important part of creating an attractive Fabric Bow Ornament Pattern. Lightweight cotton is an excellent option because it is easy to cut, sew, turn, and press. Quilting cotton works particularly well for structured bows because it comes in many colors and prints. Linen offers a natural, slightly textured appearance, while lightweight seasonal fabric can introduce festive patterns. Avoid materials that are excessively thick or difficult to turn if this is your first project. If you want a fuller bow, choose fabric with enough body to hold its shape without becoming too stiff or bulky around the center.
For a simple medium-sized bow, prepare one rectangular piece measuring approximately 10 inches by 6 inches for the main bow and another piece measuring approximately 4 inches by 2 inches for the center wrap. These measurements are suggested starting points rather than fixed requirements. You can make the main rectangle larger for a fuller ornament or smaller for a delicate decoration. If you prefer pointed or notched ends, you can also prepare two short fabric tails. Remember that the final dimensions will be smaller than the original cut pieces because the seams use some of the fabric.
Before cutting, inspect your material for wrinkles, stains, loose threads, or damaged areas. Wash and dry the fabric if appropriate for its fiber content and intended use, following its care instructions. Press it with an iron to create a smooth surface, making accurate measurements easier. Place the fabric on a flat cutting surface and align the ruler with the grain whenever possible. Straight edges help the bow look symmetrical and prevent uneven twisting during assembly. If your fabric has stripes, checks, or directional motifs, consider how the pattern will appear once the material is folded into the finished bow.
Next, decide how you want the ornament to be displayed. A Fabric Bow Ornament Pattern can be used as a standalone hanging decoration, attached to a wreath, sewn onto a fabric gift bag, or added to a decorative pillow. If you intend to hang it on a Christmas tree, prepare a narrow fabric strip, cord, or ribbon for the hanging loop. For a bow intended to decorate a wreath or gift package, you may not need a loop at all. Planning the final use before assembly helps you determine the right size, fabric weight, and attachment method.
Finally, test your thread and sewing settings on a small scrap of the chosen material. The stitches should be secure without puckering the fabric. If the fabric is lightweight, a suitable fine needle and moderate stitch length can help produce clean seams. For thicker woven material, select a needle appropriate for the fabric. Keep your workspace organized, and take care when using sharp scissors, rotary cutters, pins, and hot irons. Proper preparation may seem like a small part of the project, but it contributes significantly to the quality and consistency of your finished ornament.
Step-by-Step Sewing Instructions for a Fabric Bow Ornament Pattern
Start your Fabric Bow Ornament Pattern by folding the main rectangle in half lengthwise, with the right sides of the fabric facing each other. Align the raw edges carefully and secure them with pins or clips. Sew along the long edge using an approximately 1/4-inch seam allowance, leaving the short ends open. Backstitch at the beginning and end if you are using a sewing machine to help prevent the seam from coming undone. If you are sewing by hand, use small, even stitches and secure the thread neatly. Consistent stitching will make the finished bow look cleaner and help it hold together during use.
After sewing the long edge, turn the fabric tube right side out through one of its open ends. A blunt turning tool can help guide the fabric through without damaging the stitches. Avoid pushing with a sharp object, because it may pierce the material or create holes. Once the fabric is turned, position the seam along the back or center of the piece so it is less visible from the front. Press the tube gently with an iron at a temperature appropriate for the fabric. This step creates a smooth foundation for the bow and makes the next stages easier to manage.
Now fold the open short ends inward by approximately 1/4 inch to conceal the raw edges. Press the folds in place, then close the opening with a neat ladder stitch or another discreet hand stitch. You can also sew close to the edge with a machine if you prefer, although hand stitching may create a less noticeable finish. Inspect the rectangle to make sure its corners and edges appear even. This piece will form the main body of your Fabric Bow Ornament Pattern, so a smooth, well-finished rectangle is worth the extra attention.
To create the bow shape, place the finished rectangle flat on your work surface. Bring the two short ends toward the middle, overlapping them slightly on the back if needed. Adjust the folds until both sides appear balanced. Pinch the center of the rectangle to form two rounded loops, then create small accordion folds at the midpoint. You can make two or three folds depending on the thickness of the fabric and the fullness you want. Secure the center temporarily with a few hand stitches, wrapping the thread around the middle several times if necessary. Pull only firmly enough to hold the folds without tearing the fabric or distorting the loops.
Next, prepare the narrow center strip. Fold the long edges of the 4-by-2-inch rectangle toward the wrong side, then fold the strip lengthwise so the raw edges are concealed. Press it carefully to form a narrow band. Wrap this band around the pinched center of the bow, keeping the smooth side visible. Trim the strip if it is longer than necessary, allowing enough length for a small overlap on the back. Secure the ends with discreet hand stitches. The center wrap hides the gathering stitches and gives the Fabric Bow Ornament Pattern a finished, professional appearance.
Once the center band is attached, inspect the loops from the front and gently adjust them with your fingers. If one side appears larger, reposition the folds or add a small securing stitch on the back. Fluff the fabric carefully rather than pulling hard on the loops. If you prepared optional tails, attach them behind the main bow before finishing the center wrap, or stitch them securely to the back afterward. Check that all seams are closed, all loose threads are trimmed, and the ornament maintains its shape when lifted. These finishing checks help turn a simple sewn rectangle into a balanced decorative bow.
Customizing, Finishing, and Displaying Your Fabric Bow Ornament Pattern
Personalization is one of the most enjoyable aspects of a Fabric Bow Ornament Pattern. The simplest way to customize the project is by choosing a distinctive fabric print. Plaid and tartan fabrics create a traditional holiday appearance, while small floral prints offer a softer decorative style. Solid colors can make the bow look elegant and understated, particularly when paired with a contrasting center band. You can also combine two complementary fabrics, using one for the main bow and another for the center wrap or tails. When mixing patterns, choose colors that share at least one shade to maintain a coordinated appearance.
If you want the bow to look fuller, experiment with the width and length of the main fabric rectangle. A longer rectangle generally creates more volume, while a wider rectangle can produce broader loops. The result also depends on the thickness and flexibility of the fabric. For a small ornament, narrower proportions may be easier to shape and attach. Make a paper template before cutting expensive or special fabric, especially when producing several bows. Testing different proportions on inexpensive scraps helps you determine which dimensions best suit your intended decoration.
Decorative details can give each handmade bow its own character. Consider adding a small button, a fabric-covered embellishment, a few embroidered stitches, or a short length of contrasting ribbon. If you are making a Christmas ornament, a subtle metallic accent or a seasonal fabric print can create a festive look without overwhelming the design. For a rustic style, choose natural-colored fabric and a simple center wrap. Attach embellishments securely and consider their weight, especially if the bow will hang from a thin branch. Avoid details that make the ornament excessively heavy or cause its loops to droop.
To turn the bow into a hanging decoration, create a loop from narrow ribbon, cord, or a folded strip of fabric. Position the two ends of the loop on the back of the bow and stitch them firmly in place. The size of the loop should match the way you plan to display the ornament. A small loop is suitable for a tree branch or wall hook, while a longer loop may work better for a wreath or decorative display. Before hanging the finished bow, gently test the attachment by holding the ornament over a soft surface and checking that the stitches remain secure.
Careful pressing is another important finishing step. Use an iron setting suitable for your fabric and test it on a scrap first. Press the center band and any fabric tails, but avoid flattening the loops so much that the bow loses its volume. If necessary, reshape the loops by hand after pressing. Store finished ornaments in a dry container away from excessive moisture, direct sunlight, and crushing pressure. If the fabric becomes dusty, follow the care instructions for the material and any attached embellishments. Gentle cleaning and appropriate storage can help preserve the bow’s color and shape for future seasons.
Before displaying the ornament, complete a final quality check. Look for uneven loops, visible raw edges, loose stitches, and thread ends that need trimming. Confirm that the center band covers the gathered fabric and that the hanging loop, if included, is firmly attached. If you are making multiple bows, compare their dimensions and adjust them so the collection looks consistent. For homes with young children or pets, avoid small detachable embellishments that could present a choking hazard, and place hanging decorations where they cannot be easily pulled down. These practical details make your Fabric Bow Ornament Pattern more attractive, durable, and suitable for its intended setting.
Fabric Bow Ornament Pattern FAQ and Conclusion
1. What is a Fabric Bow Ornament Pattern?
A Fabric Bow Ornament Pattern is a sewing guide that explains how to cut, fold, stitch, and assemble fabric into a decorative bow. The finished bow can be used as a Christmas tree ornament, a wreath accent, a gift decoration, or a handmade accessory. Patterns can range from simple rectangles to more elaborate designs with separate tails, layered loops, and decorative center bands. The basic method in this guide provides a useful foundation that you can adapt to different fabric types, dimensions, and decorating styles.
2. Is this fabric bow project suitable for beginners?
Yes. This project is suitable for beginners who are comfortable learning basic cutting, folding, and sewing techniques. The main bow can be made with straight seams, and the center wrap conceals much of the gathering at the middle. You do not need advanced tailoring skills or specialized equipment. Start with medium-weight cotton, practice on inexpensive fabric scraps, and take your time shaping the loops. If you are new to hand sewing, use small, consistent stitches and secure the thread carefully.
3. What fabric works best for a fabric bow ornament?
Cotton and quilting cotton are useful choices because they are easy to handle and available in many colors and prints. Linen provides a natural texture, while other lightweight woven fabrics can work if they hold their shape and are easy to sew. Very slippery fabrics may be harder to control, and thick materials can create bulky seams around the center. The best choice depends on your preferred appearance, the size of the bow, and whether the ornament will be hung, attached to a wreath, or used on a gift.
4. Can I make a fabric bow without a sewing machine?
Yes. You can complete a Fabric Bow Ornament Pattern entirely by hand. Use a backstitch for the main seam and a ladder stitch to close the opening. Small stitches help the fabric hold together, while a few additional stitches at the center can secure the folded shape. Hand sewing may take longer than machine sewing, but it allows you to work with basic supplies and gives you greater control over small details. A thimble can help protect your fingers when sewing thicker fabric.
5. How do I make the bow symmetrical?
Accurate cutting and careful folding are the main factors in creating a symmetrical bow. Measure the fabric before cutting, align the edges when sewing, and place the center band directly over the gathered midpoint. After securing the center, compare the loops from the front and adjust them until they look balanced. If one side is larger, gently reposition the folds and add a small securing stitch on the back. Using a paper template can also help when making several bows of the same size.
6. How can I attach a hanging loop to my fabric bow?
Cut a short piece of ribbon, cord, or narrow fabric, then fold it into a loop of the desired length. Position the two ends on the back of the bow and sew them securely in place. Reinforce the attachment with several stitches, particularly if the ornament will be hung from a Christmas tree or wreath. Attach the loop before closing the center wrap if you want to conceal the stitching. Always test the finished attachment gently before displaying the ornament.
7. Can I use fabric scraps for this pattern?
Absolutely. Fabric scraps are ideal for small decorative bows and can help reduce sewing waste. Choose pieces large enough to accommodate the main rectangle and center strip, allowing for the seam allowances. If your scraps are small, use a coordinating fabric for the center wrap or make a miniature bow. Mixing leftover prints can also create an attractive patchwork effect. Check that the fabric is clean and in good condition before using it.
8. How do I make the bow fuller or larger?
To make a fuller bow, increase the length of the main rectangle so that more fabric can form the loops. You can also widen the rectangle for a broader appearance. The center wrap should be adjusted to accommodate the thickness of the gathered fabric. If the bow becomes too bulky, reduce the number of folds or choose a lighter material. Testing different measurements on scraps is an easy way to find a proportion that works for your design.
9. How can I decorate a fabric bow for Christmas?
Choose seasonal fabrics such as red plaid, green cotton, snowflake prints, or understated winter patterns. A contrasting center band, a small ribbon accent, or a securely attached decorative button can add interest. For a traditional look, use coordinated colors; for a more modern style, try neutral fabric with a simple metallic detail. If the ornament will hang on a tree, keep the embellishments lightweight so the loops maintain their shape. Make sure all decorations are securely attached.
10. How should I store and clean fabric bow ornaments?
Store your ornaments in a clean, dry container where they will not be crushed by heavier decorations. Keep them away from moisture and prolonged direct sunlight to help protect the fabric. Cleaning methods depend on the material and the embellishments used. Some bows may tolerate gentle hand washing, while others are best cleaned by spot treatment or careful dusting. Test any cleaning method on an inconspicuous area first, and allow the ornament to dry completely before storing it.
11. Can I change the dimensions of the pattern?
Yes. The suggested measurements are a starting point, not a requirement. Increase the main rectangle for a larger bow or reduce it for a smaller ornament. Adjust the center strip to fit comfortably around the gathered midpoint. Remember that seam allowances reduce the finished dimensions, and thicker fabric may require a slightly longer center band. A paper template is especially helpful when testing sizes or creating a coordinated collection of bows.
12. What are the most common mistakes when sewing a fabric bow?
Common mistakes include cutting uneven rectangles, using inconsistent seam allowances, leaving raw edges exposed, and pulling the center too tightly. These issues can cause the bow to look lopsided or bulky. To prevent them, measure carefully, press the fabric before cutting, secure the folds with temporary pins or clips, and check the shape before completing the center wrap. If the loops are uneven, adjust them before adding final stitches. Finishing slowly is often more effective than trying to correct the shape after every component has been secured.
Conclusion
Creating a Fabric Bow Ornament Pattern is a rewarding way to transform simple fabric into a charming handmade decoration. In this guide, you learned how to select suitable materials, measure and cut the fabric, sew the main rectangle, shape the loops, attach the center wrap, and add a hanging loop when needed. You also explored ways to customize the design with different prints, sizes, colors, and decorative details. By paying attention to accurate measurements, neat seams, balanced folds, and secure finishing stitches, you can create fabric bows that look attractive and suit many decorating occasions.
Whether you are making your first bow or adding another design to your collection of handmade ornaments, remember that practice helps you develop your own style. Experiment with fabric scraps, adjust the proportions, and choose finishing details that reflect your creativity.
The most successful project is one that suits your needs and brings you satisfaction as you make it. If you try this Fabric Bow Ornament Pattern, please leave your honest opinion in the comments and share any suggestions, creative variations, or helpful tips you discovered along the way. Your feedback can inspire other readers to begin their own sewing projects and create beautiful decorations with confidence.