
The Fabric Christmas tree pattern for decoration is a charming way to bring warmth, creativity, and a handmade touch to your holiday celebrations. This decorative sewing project transforms simple fabric scraps into beautiful Christmas trees that can be displayed on tables, shelves, mantels, and other special corners of your home. Whether you enjoy sewing as a relaxing hobby or are searching for an affordable seasonal craft, making a fabric Christmas tree is a wonderful opportunity to create something personal and memorable.
One of the most appealing features of a Fabric Christmas tree pattern for decoration is its versatility. You can choose traditional Christmas fabrics in red, green, and white, or experiment with neutral colors, plaid prints, floral patterns, and rustic textures. Each fabric combination creates a different look, allowing you to match your handmade decorations to your existing Christmas theme. You can also adjust the size, shape, and embellishments to create a coordinated collection of trees that looks beautiful throughout your home.
This project is suitable for many sewing skill levels because the basic design relies on simple shapes, careful cutting, and straightforward stitching. Beginners can start with a small tree made from cotton fabric, while experienced crafters can explore layered designs, decorative stitching, and more elaborate finishing details. With a few basic supplies and some patience, you can create a reusable Christmas decoration that brings joy year after year. The following tutorial explains how to prepare your materials, construct your fabric tree, and personalize the finished piece.
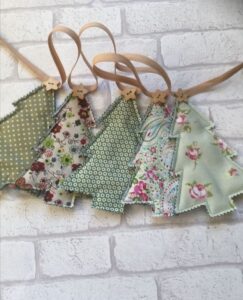
Materials and Preparation for Your Fabric Christmas Tree Pattern for Decoration
Before beginning your Fabric Christmas tree pattern for decoration, gather your materials and decide what kind of finished tree you want to make. Preparing everything in advance makes the sewing process easier and helps you avoid interruptions. You do not need expensive supplies, and many of the materials may already be available in your sewing basket.
1. Choose your fabric. Cotton quilting fabric is an excellent option because it is easy to cut, sew, and press. Select two coordinating fabrics if you want a reversible tree, or use the same fabric on both sides for a simpler design. Christmas prints featuring stars, snowflakes, ornaments, and evergreen branches can create a festive appearance without requiring additional decoration.
2. Gather your basic sewing tools. You will need fabric scissors or a rotary cutter, a ruler, pins or fabric clips, a sewing machine or hand-sewing needle, matching thread, an iron, and a marking pen suitable for fabric. If you are making a stuffed tree, prepare polyester fiberfill or another appropriate stuffing material. A small amount of stuffing is usually sufficient for a compact tabletop decoration.
3. Decide on the size and shape. Draw a simple triangular tree with a wide bottom and a pointed top. You can make the sides straight for a modern appearance or slightly curved for a softer, more playful silhouette. For a small tabletop tree, a finished height of approximately 8 to 12 inches is a practical starting point, although you can scale the design up or down according to your available space.
4. Create a paper template. Fold a sheet of paper in half and draw half of your desired tree shape along the folded edge. Cut through both layers, then unfold the paper to reveal a symmetrical tree template. This method helps you achieve balanced sides and makes it easier to reproduce the same shape when creating several decorations for a matching holiday display.
5. Prepare the fabric. Wash and dry washable fabric before cutting if you want to minimize future shrinkage. Press the material with an iron to remove wrinkles, following the fabric manufacturer’s care instructions. Smooth fabric is easier to measure accurately, and careful preparation helps both sides of your finished tree align neatly.
6. Plan the finishing details. Consider whether you want a hanging ornament, a flat decorative tree, or a three-dimensional stuffed centerpiece. Small trees can be finished with ribbon loops, buttons, fabric stars, or decorative bows. For a standing design, you may also need a small fabric base or a suitable support, depending on the construction method you choose.
A well-prepared workspace makes this Fabric Christmas tree pattern for decoration easier to complete. Keep your tools organized, leave enough room to spread out the fabric, and check your template before cutting. A few minutes of preparation can prevent uneven edges and help you achieve a professional-looking result.
Step-by-Step Instructions to Sew a Fabric Christmas Tree
Once your materials are ready, you can begin constructing your Fabric Christmas tree pattern for decoration. The following method creates a simple, lightly stuffed fabric tree with a neat outline. The exact appearance will depend on your template, fabric choice, and finishing preferences, so feel free to adapt the instructions to your desired style.
Step 1: Cut the tree pieces. Place your fabric on a flat surface with the right side facing upward. Position the paper template on the fabric and trace around it. Cut out two matching tree shapes, one for the front and one for the back. If you are using two different fabrics, make sure both pieces have the same dimensions so they fit together properly.
Step 2: Add the seam allowance. If your template does not already include a seam allowance, leave approximately 1/4 inch around the outside of the shape when marking or cutting. This extra fabric will be used to join the two pieces. Keep the allowance consistent, especially around the pointed top and the lower corners, to create a balanced finished outline.
Step 3: Position the fabric pieces. Place the two tree shapes together with their right sides facing inward and their wrong sides facing outward. Align the edges carefully and secure them with pins or clips. Check that the pointed top and the bottom corners match. If you are using directional prints, make sure the pattern will appear upright when the tree is turned right side out.
Step 4: Sew around the outline. Stitch around the tree using a straight stitch and your chosen seam allowance. Begin near the bottom and work around the sides, following the outline slowly. Leave an opening of approximately 2 to 3 inches along the lower edge so you can turn the fabric and add stuffing later. Reinforce the stitching at the beginning and end of the seam to help prevent unraveling.
Step 5: Trim and shape the seam allowance. Carefully trim excess fabric around the curves and corners, taking care not to cut through the stitches. At the pointed top, reduce the bulk of the seam allowance so the tip can turn neatly. If necessary, make small clips into the seam allowance around curved sections, keeping the cuts safely away from the stitching line.
Step 6: Turn the tree right side out. Gently pull the fabric through the opening at the bottom. Use your fingers or a blunt turning tool to shape the pointed top and smooth the edges. Avoid using sharp objects that could puncture the fabric. Press the tree carefully with an iron set to a temperature appropriate for your material, taking care around any delicate prints or embellishments.
Step 7: Add the stuffing. If you want a padded tree, insert small amounts of polyester fiberfill through the opening. Start with the tip and gradually work downward, distributing the stuffing evenly. Use only enough filling to create the desired shape without stretching the seams. Too much stuffing can make the edges look rounded or place unnecessary pressure on the stitching.
Step 8: Close the opening. Fold the raw edges of the opening inward and pin them in place. Close the gap with a neat ladder stitch by hand, or use a carefully positioned machine stitch if the design allows. Take your time so the closure blends into the surrounding seam. If the tree will be displayed where the bottom is visible, a discreet finish will help it look polished from every angle.
Step 9: Add decorative details. Sew on small fabric stars, attach a ribbon bow, or add a few embroidered snowflakes. You can also use contrasting thread to create the appearance of garlands or branches. Keep embellishments proportional to the size of the tree so the design remains balanced rather than crowded.
Step 10: Prepare the tree for display. Arrange the tree on a shelf, place it in a suitable decorative container, or attach a ribbon loop if you want to hang it. A stuffed tree may need a small weighted base or a separate support to stand upright. Test the arrangement on a stable surface before using it as part of a larger holiday display.
These steps provide a practical foundation for a Fabric Christmas tree pattern for decoration that can be repeated in different colors and sizes. If your first tree has slightly uneven seams or an imperfect point, do not be discouraged. Handmade decorations often become more refined with practice, and small variations can give a collection its own character.
Creative Finishing Ideas, Display Tips, and Common Mistakes
The finishing stage is where your Fabric Christmas tree pattern for decoration becomes a personalized holiday accent. A simple fabric shape can look completely different depending on the prints, textures, and embellishments you choose. Think about the overall style of your home and select details that complement your existing decorations.
1. Explore different fabric combinations. Traditional green cotton paired with red accents creates a classic Christmas appearance. Cream, beige, and muted green fabrics work well for a farmhouse-inspired setting, while metallic prints and jewel tones can create a more glamorous effect. You can also use leftover quilting fabric to make a coordinated collection without purchasing a large amount of new material.
2. Try a layered tree design. For a dimensional appearance without extensive stuffing, create several fabric layers in decreasing sizes and sew or attach them to a larger backing. Alternatively, add narrow strips of contrasting fabric across the tree to imitate branches. Plan the placement before sewing so the details remain evenly spaced and the tree’s silhouette stays recognizable.
3. Add practical hanging features. If you intend to use your fabric tree as a hanging ornament, sew a small ribbon loop securely into the top seam before stitching the two pieces together. Reinforce the attachment with additional stitching when necessary. For a larger decoration, use a loop and hanging support appropriate for its weight, and avoid hanging it where it could fall onto someone.
4. Create a matching decoration set. Make several trees in different heights and complementary prints to form a small holiday display. You could place them together on a mantel, arrange them on a side table, or use them as part of a seasonal centerpiece. Varying the scale adds visual interest, while repeating one or two colors helps the collection look coordinated.
5. Avoid common sewing mistakes. Uneven cutting, inconsistent seam allowances, and overstuffing are frequent reasons a fabric tree loses its intended shape. Always check that both pieces match before sewing, use pins or clips to prevent shifting, and leave a sufficient opening for turning. When working with thick fabric, reduce unnecessary bulk around the tip and corners so the finished edges remain smooth.
6. Care for your handmade decoration. Before cleaning the finished tree, check the care instructions for the fabric and any added decorations. Some pieces may be suitable for gentle hand washing, while others are best cleaned with a soft brush or a lightly damp cloth. Allow the decoration to dry completely before storing it. Keep it in a clean, dry container away from moisture, pests, and direct sunlight to help preserve its color and shape.
Safety is also important when personalizing handmade Christmas decorations. If the tree includes buttons, beads, pins, or other small components, keep them away from young children and pets. Avoid placing fabric decorations near candles, fireplaces, heaters, or other sources of heat and flame. If you use a hanging tree, make sure the attachment is secure and suitable for the intended location.
Frequently Asked Questions About the Fabric Christmas Tree Pattern for Decoration
1. Is the Fabric Christmas tree pattern for decoration suitable for beginners?
Yes. A basic fabric Christmas tree is a beginner-friendly sewing project because it uses a simple outline, two fabric pieces, and a straightforward seam. Beginners can start with a small design and practice turning and closing the opening before adding more elaborate details. Choosing a stable cotton fabric can also make the first project easier to manage.
2. What is the best fabric for making a Christmas tree decoration?
Cotton quilting fabric is a popular choice because it is easy to cut, sew, and press. Felt is another option, especially for flat decorations that do not require turning or complicated seams. Linen blends and lightweight canvas can create different textures, but thicker materials may require adjustments to the seam allowance and needle.
3. Can I make this fabric Christmas tree without a sewing machine?
Yes. You can sew the pieces together by hand using a small, consistent backstitch. Although hand sewing may take longer, it allows you to control the stitches carefully around the pointed top and corners. Felt decorations can also be assembled using suitable hand stitching, depending on the design.
4. How do I make a fabric Christmas tree stand upright?
A stuffed fabric tree may need additional support to remain upright. One option is to attach it to a small, stable fabric base. Another is to position the finished tree in a decorative container with an appropriate support. The best solution depends on the tree’s height, weight, and shape. Test the finished arrangement on a flat surface before displaying it.
5. Do I need to add stuffing to the tree?
No. Stuffing is optional and depends on the style you want. A stuffed tree creates a soft, three-dimensional appearance, while an unstuffed tree can serve as a flat ornament, wall decoration, or hanging accent. If you choose a flat design, you may use a layer of interfacing between the fabric pieces to provide extra structure.
6. How much fabric is needed for one tree?
The amount depends on the finished dimensions and the direction of the fabric print. A small tabletop tree may require only two pieces cut from a modest fabric area, while a larger design will need more material. Create a paper template first and place it on your fabric to estimate the amount needed before cutting.
7. Can I use leftover fabric scraps for this project?
Absolutely. Fabric scraps are excellent for small Christmas trees, especially when you want to combine different prints or coordinate the project with other handmade decorations. Make sure each piece is large enough for the template and avoid placing weak or frayed sections in areas that will receive tension from the seams.
8. How can I decorate my fabric Christmas tree?
You can add ribbon, embroidery, fabric stars, decorative stitching, small bows, or appliqué shapes. Choose embellishments that complement the fabric rather than overwhelming it. If the tree will be handled frequently, attach decorative elements securely and avoid loose components that may detach.
9. Can I wash a handmade fabric Christmas tree?
That depends on the fabric, stuffing, thread, and embellishments. Some simple cotton designs may tolerate gentle cleaning, while decorations containing delicate trims or materials that are not washable may need spot cleaning. Check the care requirements of all components before washing, and allow the tree to dry thoroughly before storing it.
10. How can I store fabric Christmas tree decorations after the holidays?
Remove dust and ensure the decorations are completely dry before packing them away. Store them in a clean, dry container and avoid crushing stuffed trees under heavy objects. Keeping decorations away from moisture and direct sunlight can help maintain their shape and color for future seasons.
11. Can I change the size of the pattern?
Yes. You can enlarge or reduce the paper template to create trees for different locations. When changing the size, remember to adjust the seam allowance and consider whether the pointed tip will be wide enough to turn neatly. Larger trees may also need more stuffing or additional support.
12. What should I do if the top of my tree looks bulky?
Bulky tips often result from excess fabric in the seam allowance or insufficient shaping after turning. Carefully trim the excess seam allowance before turning, without cutting the stitches, and use a blunt tool to shape the point gently. If the tree is already sewn, avoid forcing the fabric, as this may damage the seam.
Conclusion
Creating a Fabric Christmas tree pattern for decoration is a rewarding way to bring handmade charm into your holiday home. Throughout this tutorial, we explored how to select suitable fabrics, prepare a paper template, cut matching pieces, sew the outline, turn the fabric, add stuffing, and finish the opening neatly. We also covered creative embellishments, display ideas, common sewing mistakes, and practical care tips to help your decorations last for many Christmas seasons.
The beauty of this project lies in its flexibility. You can keep the design simple for a quick beginner-friendly craft or experiment with different prints, layered details, and decorative finishes to create a more personalized result. By using leftover fabric and adjusting the pattern to suit your needs, you can make a collection of festive trees that reflects your own style and creativity.
Now it is your turn to bring this Fabric Christmas tree pattern for decoration to life! If you try this project, please share your honest opinion, tell us which fabrics and colors you chose, and leave your suggestions for future sewing and Christmas decoration tutorials. Your feedback can inspire other craft lovers and help everyone discover new ways to make the holiday season more beautiful with handmade creations.